At GitGuardian, we like to understand how things work and look for secrets in unlikely places. This is the story of a casual coffee break conversation that began with curiosity—asking "What?", "How?", and "What if?"—and led to fascinating discoveries.
TL;DR
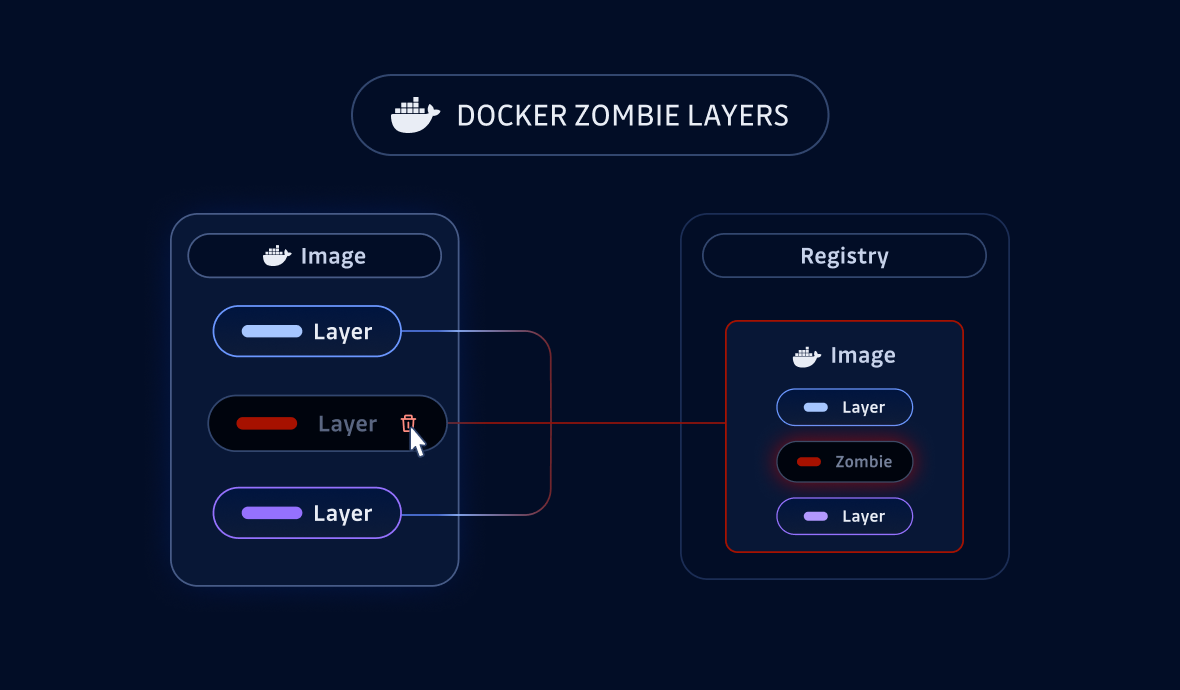
- Unreferenced Docker image layers persist in a registry after being removed from a manifest, hence becoming “zombie layers.”
- Zombie layers can live for weeks in registries before being removed by the registry garbage collector.
- They can become a security risk if they embed sensitive data such as secrets and a threat actor is continuously monitoring a specific registry.
- In AWS ECR, tag immutability prevents manifest overwrites, but layers are still pushed before rejection, allowing zombie layers to be created.
What's inside a Docker image?
A Docker image is described by a Dockerfile which contains a sequence of commands sequentially applied at build time, and is identified by a name and a tag (i.e. a version). A typical Dockerfile contains the FROM, RUN and COPY commands as shown in the following example. It will result in an image containing the files ` /root/app.sh, and /root/mongodb.txt.
$ cat Dockerfile
FROM ubuntu:24.10

RUN echo "connection_uri = 'mongo://z0:kHR@192.0.2.28:773'" > /root/mongodb.txt

ENV MESSAGE="Hello World!"

COPY app.sh /root/
The demo Dockerfile
From this Dockerfile, run the following shell commands to build an image named blogpost-image with the tag original, then run it, display the app.sh script, and finally execute it:
$ docker build -t blogpost-image:original .

$ docker run --rm -it blogpost-image:original
root@5831ef8de3d5:/# cat /root/app.sh
echo $MESSAGE
root@5831ef8de3d5:/# /bin/bash /root/app.sh
Hello World!
Building the blogpost-image:original image and running it
Thanks to this very simple example, we can explore the structure of a Docker image. It consists of several files:
- a JSON manifest, that describes the contents of the Docker image, including its layers;
- several layers in the tar archive format, which contains files such as /bin/bash and
/root/app.sh.
The following command will display our new image manifest with some interesting information:
- Id: the SHA256 hash of our image configuration JSON file.
- Env: the environment variables used by the image, including
MESSAGEthat we specified in the Dockerfile. - Layers: the list of SHA256 hashes of the tar archives containing the image files.
$ docker inspect blogpost-image:original | jq '.[] |.Id, .Config.Env, .RootFS'
"sha256:e8efac89ff2d5df926d69fbe35b4805880c38ed5a35c981ee4e080533ae21da7"
[
  "PATH=/usr/local/sbin:/usr/local/bin:/usr/sbin:/usr/bin:/sbin:/bin",
  "MESSAGE=Hello World!"
]
{
  "Type": "layers",
  "Layers": [
    "sha256:35de1435b273af9899f19dc9185e579c3553b03a285397e01ad580f3ed607250",
    "sha256:31dbac5402efe38f23f5ff87c464b867c3f300a8b0788fd7de28220ce3f2713b",
    "sha256:b6783ff925260fba1ab9f52863b7dd647c18e472e2b083e014846d2fa961b785"
  ]
}
Docker image attributes
To further explore our image, we can use the skopeo tool. First, let’s extract the image contents:
$ skopeo copy docker-daemon:blogpost-image:original dir:original_content

$ ls original_content
31dbac5402efe38f23f5ff87c464b867c3f300a8b0788fd7de28220ce3f2713b
b6783ff925260fba1ab9f52863b7dd647c18e472e2b083e014846d2fa961b785
manifest.json
35de1435b273af9899f19dc9185e579c3553b03a285397e01ad580f3ed607250
e8efac89ff2d5df926d69fbe35b4805880c38ed5a35c981ee4e080533ae21da7
version
Docker image extracted content
From this output, we see the three layers and a file named as our image ID. This is a text file containing, among other things, the build history and the layers we successfully built. Note that docker history --no-trunc blogpost-image:original gives a similar output.
$ cat original_content/e8efac89ff2d5df926d69fbe35b4805880c38ed5a35c981ee4e080533ae21da7 |jq '..history, .rootfs'
[
  {
    "created": "2024-09-13T03:45:45.267601999Z",
    "created_by": "/bin/sh -c #(nop)  ARG RELEASE",
    "empty_layer": true
  },
  {
    "created": "2024-09-13T03:45:45.298845055Z",
    "created_by": "/bin/sh -c #(nop)  ARG LAUNCHPAD_BUILD_ARCH",
    "empty_layer": true
  },
  {
    "created": "2024-09-13T03:45:45.322690413Z",
    "created_by": "/bin/sh -c #(nop)  LABEL org.opencontainers.image.ref.name=ubuntu",
    "empty_layer": true
  },
  {
    "created": "2024-09-13T03:45:45.34650769Z",
    "created_by": "/bin/sh -c #(nop)  LABEL org.opencontainers.image.version=24.10",
    "empty_layer": true
  },
  {
    "created": "2024-09-13T03:45:47.796572396Z",
    "created_by": "/bin/sh -c #(nop) ADD file:09509f4e7d531b71ff20f83a8fdb1fd7fafd2621a6c0d5cf35bee26ddf03028a in / "
  },
  {
    "created": "2024-09-13T03:45:48.030541078Z",
    "created_by": "/bin/sh -c #(nop)  CMD [\"/bin/bash\"]",
    "empty_layer": true
  },
  {
    "created": "2024-10-01T12:06:18.789793084Z",
    "created_by": "RUN /bin/sh -c echo \"connection_uri = 'mongo://z0:kHR@192.0.2.28:773'\" > /root/mongodb.txt # buildkit",
    "comment": "buildkit.dockerfile.v0"
  },
  {
    "created": "2024-10-01T12:06:18.825235917Z",
    "created_by": "ENV MESSAGE=Hello World!",
    "comment": "buildkit.dockerfile.v0",
    "empty_layer": true
  },
  {
    "created": "2024-10-01T12:06:18.825235917Z",
    "created_by": "COPY app.sh /root/ # buildkit",
    "comment": "buildkit.dockerfile.v0"
  }
]
{
  "type": "layers",
  "diff_ids": [
    "sha256:35de1435b273af9899f19dc9185e579c3553b03a285397e01ad580f3ed607250",
    "sha256:31dbac5402efe38f23f5ff87c464b867c3f300a8b0788fd7de28220ce3f2713b",
    "sha256:b6783ff925260fba1ab9f52863b7dd647c18e472e2b083e014846d2fa961b785"
  ]
}
Docker image build history
Some commands in a Dockerfile, such as ENV, do not create a layer. On the other hand, FROM ,RUN and COPY do. From the previous output, we can see the file 35de..7250 is the base image created by FROM (i.e. ubuntu:24.10), the 31db..713b file contains mongodb.txt created by RUN and finally, the b678..b785 file contains app.sh created by COPY. Let's check the contents of these last two layers using the tar command:
$ tar tf original_content/31dbac5402efe38f23f5ff87c464b867c3f300a8b0788fd7de28220ce3f2713b
root/
root/mongodb.txt

$ tar tf original_content/b6783ff925260fba1ab9f52863b7dd647c18e472e2b083e014846d2fa961b785
root/
root/app.sh
Layers containing the files added to our demo image
Once built, a Docker image is typically published to a Docker registry using the docker push command. The following example shows what happens when our image is published to the DockerHub registry after being properly tagged: the three layers are pushed, and their short hashes are displayed along the image ID.
$ docker tag blogpost-image:original example/blogpost-image:v0.1.0

$ docker push example/blogpost-image:v0.1.0
The push refers to repository [docker.io/gggvaladon/blogpost-image]
b6783ff92526: Pushed
31dbac5402ef: Pushed
35de1435b273: Pushed
v0.1.0: digest: sha256:ddfa644ea64486150c8b97775a8b00c407c2c32212519cc22cc80d155b39a295 size: 943
Pushing the demo image to DockerHub
What if a layer is removed from an image?
Let's assume that after pushing our image to the Docker Hub registry, we discovered that the MongoDB credentials were published by mistake. Note that the correct and only reflex is to revoke and renew this credential, but this blog post only focuses on the side effect of removing a layer.
To remove the layer containing the credential (i.e. 31db..713b), we have several options. Obviously, we could manually edit the manifest.json and e8ef..1da7 files to remove all references to the layer, and then rebuild the image with skopeo. A less tedious method is to use layeremove, a tool developed by Jérôme Petazzoni, which automates the manual steps. Using these two methods, the image ID and its digest will change because the manifest is modified, while the layer hash will remain the same because the corresponding tar archives are not modified.
Today we will use the simplest solution: comment out the RUN command and rebuild the image, tagging it as altered. Listing the layer hashes shows something interesting. The hash of the COPY layer has changed, while the content has not!
$ docker inspect blogpost-image:altered |jq '.[].RootFS'
{
  "Type": "layers",
  "Layers": [
    "sha256:35de1435b273af9899f19dc9185e579c3553b03a285397e01ad580f3ed607250",
    "sha256:abdd7e4717f42cafbdf90a9c5fbeeda575361d2c3704b37266c3140761e1216d"
  ]
}
Layers of our modified Docker image
Remember that Docker layers are tar archives. The tar header contains a timestamp. Because we built the two COPY layers one after the other, the timestamps are different, resulting in two different SHA256 hashes.
When we push this new image with the same name and tag, the new RUN layer (i.e. abdd..216d) is the only one pushed to the repository, since the other ones already exist.
$ docker tag blogpost-image:altered example/blogpost-image:v0.1.0

$ docker push example/blogpost-image:v0.1.0
The push refers to repository [docker.io/gggvaladon/blogpost-image]
abdd7e4717f4: Pushed
35de1435b273: Layer already exists
v0.1.0: digest: v0.1.0: digest: sha256:6a2ddb202bfdec2066db7b9bf8489d70f1ab90e309d936a5fb4f28e5bf7ddb45 size: 736
Pushing the modified demo image to DockerHub
What happens to the layer that was removed?
The RUN and COPY layers from the original push are not referenced by the new altered image manifest. Let's investigate how to interact with a Docker registry and see if we can retrieve them.
A Docker registry is a web service that implements a well-defined protocol.For this experiment, we will use three endpoints to manually retrieve image content:
- get a token for use in the other steps;
- retrieve the image manifest;
- download layers.
We will use DockerHub to demonstrate how to interact with a Docker registry. Note that the authentication endpoints may be different for other registries, but other endpoints are similar. First, let's get a token for the Docker image we want to pull:
$ curl 'https://auth.docker.io/token?scope=repository:gggvaladon/blogpost-image:pull&service=registry.docker.io' |jq .
{"token":"SGVsbG8gZnJvbSBHaXRHdWFyZGlhbiE=","expires_in":300,"issued_at":"2024-10-01T07:45:24.84317206Z"}
{
  "token":"SGVsbG8gZnJvbSBHaXRHdWFyZGlhbiE=",
  "access_token": "VGhpcyBpcyBub3QgdGhlIHRva2VuIHlvdSdyZSBsb29raW5nIGZvciEK",
  "expires_in": 300,
  "issued_at": "2024-10-07T08:26:37.10650739Z"
}
Retrieving an authentication token from DockerHub
Using this token, we can now get the image manifest and extract the list of layers that it contains:
$ curl --header "Authorization: Bearer $TOKEN" https://registry-1.docker.io/v2/gggvaladon/blogpost-image/manifests/v0.1.0 |jq '.fsLayers[].blobSum' |sort -u
"sha256:5ed0c1e3b84c0b46d8f8294f077d20e83cf4cad3a0195d90ded59ee666730439"
"sha256:6f192fbb9b2ab30739ebcfa04665d365d4fb63abf3e4c9a796803829bfaec560"
"sha256:a3ed95caeb02ffe68cdd9fd84406680ae93d633cb16422d00e8a7c22955b46d4"
Retrieving the list of layers stored in DockerHub
Let's stop for a moment and compare these three hashes from the previous ones. None of them match what the skopeo and docker commands show! What is going on here? It turns out that the layers are being compressed by the registry, resulting in different SHA256 values in the manifest. Reproducing this new hash locally can be easily done using the Golang compress/gzip package, in a binary called compress_stdin, such as:
$ skopeo copy docker-daemon:blogpost-image:altered dir:altered_content

$ cat altered_content/abdd7e4717f42cafbdf90a9c5fbeeda575361d2c3704b37266c3140761e1216d |compress_stdin |shasum -a 256
5ed0c1e3b84c0b46d8f8294f077d20e83cf4cad3a0195d90ded59ee666730439 -
Computing the compressed layer SHA256 hash
Interestingly, the new RUN layer (i.e. abdd..216d) is now identified by the DockerHub registry as 5ed0..0439. Let's try to download this layer and check its contents:
$ curl --location --header "Authorization: Bearer $TOKEN" https://registry-1.docker.io/v2/gggvaladon/blogpost-image/blobs/sha256:5ed0c1e3b84c0b46d8f8294f077d20e83cf4cad3a0195d90ded59ee666730439 -O

$ file sha256:5ed0c1e3b84c0b46d8f8294f077d20e83cf4cad3a0195d90ded59ee666730439
sha256:5ed0c1e3b84c0b46d8f8294f077d20e83cf4cad3a0195d90ded59ee666730439: gzip compressed data, original size modulo 2^32 2560

$ tar tf sha256:5ed0c1e3b84c0b46d8f8294f077d20e83cf4cad3a0195d90ded59ee666730439
root/
root/app.sh
Pulling the layer and displaying its content
This is the contents of our RUN layer. Conversely, we can verify that the SHA256 hash of the uncompressed layer matches the local hash with:
$ zcat -f sha256:5ed0c1e3b84c0b46d8f8294f077d20e83cf4cad3a0195d90ded59ee666730439 |shasum -a 256
abdd7e4717f42cafbdf90a9c5fbeeda575361d2c3704b37266c3140761e1216d  -
Computing the SHA256 hash of the uncompressed layer
Now that we understand how layers are stored and how they can be retrieved, it is time to try to see if the original RUN layer (i.e. 10ca..9a1c) containing the secret is still in the registry or not.
$ curl --location --header "Authorization: Bearer $TOKEN" https://registry-1.docker.io/v2/gggvaladon/blogpost-image/blobs/sha256:10ca0674a0c252b8081225eecff28b6612f6b2b47c79ed05b18dc8784c669a1c

$ tar tf sha256:10ca0674a0c252b8081225eecff28b6612f6b2b47c79ed05b18dc8784c669a1c
root/
root/mongodb.txt
Retrieving the zombie layer
As you can see, the secret is still stored and can be retrieved using the SHA256 hash of the compressed layer. Overriding a tag does not delete the previously stored layers. We've coined the term zombie layer to describe Docker layers that are stored in a registry but not referenced by a manifest.
From an attacker's perspective, this creates an interesting opportunity to monitor the manifest and retrieve the zombie layer. In the rest of this blog post, we'll look at another issue: the retention time of a zombie layer in a registry. In fact, a registry has a garbage collection mechanism that aims to remove layers and manifests that are no longer referenced.
How long does a zombie layer stay in a registry?
Four registries were tested: DockerHub, Quay.io, GitHub Packages, and AWS ECR. The method used is very similar to the one detailed previously: push an original Docker image, remove a layer, push a modified image, retrieve the missing layer. The only difference is the token recovery, which is different from the example described for Quay.io and AWS ECR. The way to retrieve the image remains the same as all these registries are based on the same specification.
To cut a long story short, after one month, the zombie layer is still visible in all the registries tested, but Quay.io removed it after 17 days.
In this experiment, we discovered that AWS ECR works in a surprising way. A feature called "tag immutability" can be used to prevent a Docker image from being overwritten, as was done in this experiment. In our tests, it worked as expected: it's not possible to push a new manifest. However, we were very surprised to find that the layers were pushed before the manifest was rejected. So it's still possible to push zombie layers!
Takeaway Messages
Zombie layers live for weeks and can be easily retrieved, posing a potential risk to sensitive information. While this is not a new attack vector in and of itself, it becomes dangerous if a layer enumeration technique exists. An attacker monitoring your published Docker images could easily detect and access the zombie layer.
Again, it's critical to ensure that any exposed secrets are immediately revoked. Leaving secrets accessible, even for a short period of time, can cause significant damage. To minimize potential risks, vigilant monitoring and quick action to eliminate exposure is the only way to protect your assets and prevent attackers from exploiting your infrastructure.
If you are not already scanning for secrets in your Docker images, we invite you to get started today by signing up for GitGuardian and downloading ggshield. Then, after authenticating with ggshield auth login, you could use the following command to check for secrets before pushing images:
$ ggshield secret scan docker --show-secrets --format json -o ggshield-scan-docker.json blogpost-image:original

$ cat ggshield-scan-docker.json |jq '.entities_with_incidents[0].incidents[0].occurrences[0]'
Saving docker image... OK
Scanning Docker config
Scanning... ━━━━━━━━━━━━━━━━━━━━━━━━━━━━━━━━━━━━━━━━ 100% 1 / 1
Skipping layer sha256:35de1435b273af9899f19dc9185e579c3553b03a285397e01ad580f3ed607250: already scanned
Skipping layer sha256:b6783ff925260fba1ab9f52863b7dd647c18e472e2b083e014846d2fa961b785: already scanned
{
  "match": "mongo://z0:kHR@133.251.16.252:773",
  "type": "connection_uri",
  "line_start": 48,
  "line_end": 48,
  "index_start": 1507,
  "index_end": 1539,
  "pre_line_start": 49,
  "pre_line_end": 49
}
Scanning secrets in Docker images with ggshield