Securely managing secrets within the CI/CD environment is super important. Mishandling secrets can expose sensitive information, potentially leading to unauthorized access, data breaches, and compromised systems.
CI/CD systems, like GitHub Actions, GitLab CI, and so on, automate the build and deployment processes of your projects. Unless your CI pipeline is only running some unit tests and nothing more, the chance is, that to make these pipelines more useful in the real world, they need to talk to other systems, such as artefact repositories, cloud providers, and testing or even production environments. To access and operate these systems, credentials, often in the form of secrets like API keys, passwords, etc., must be made available in the CI/CD pipelines.
Today, let's explore some ways to handle those secrets securely in your CI/CD pipeline.
1. DO NOT: Store Secrets as Plain Text
It's self-evident that we should never write our secrets as plaintext inside our code (or configuration files, CI/CD pipeline definitions, etc., for that matter). Because if we can read it just by opening a file or looking in the right channel, then anyone else who gains access can as well.
So, although we could define variables in major CI systems (for example, we can define environment variables for a single workflow in GitHub Actions' workflow YAML files, and define variable in a YAML file in GitLab CI as well), we should never do this.
It's a perfect example of "Just because you can, doesn't mean you should".
If you are interested, here is a video tutorial of how we can prevent secrets from being merged into git repos with a GitHub Actions workflow using GGShield that automatically scans commits and PRs for sensitive information.

2. Store Secrets in CI/CD Systems
Let's start with the bottom line: Using the CI/CD system's secrets feature is probably the least we can do to safeguard our secrets.
2.1 GitHub Actions
For example, if you are using GitHub Actions, to set up a secret, head to the repo's main page and click "Settings". Under "Security", find "Secrets and variables", then "Actions", and finally the "Secrets" tab. Click "New repository secret", give it a name, enter the value, and hit "Add secret", and that's it:
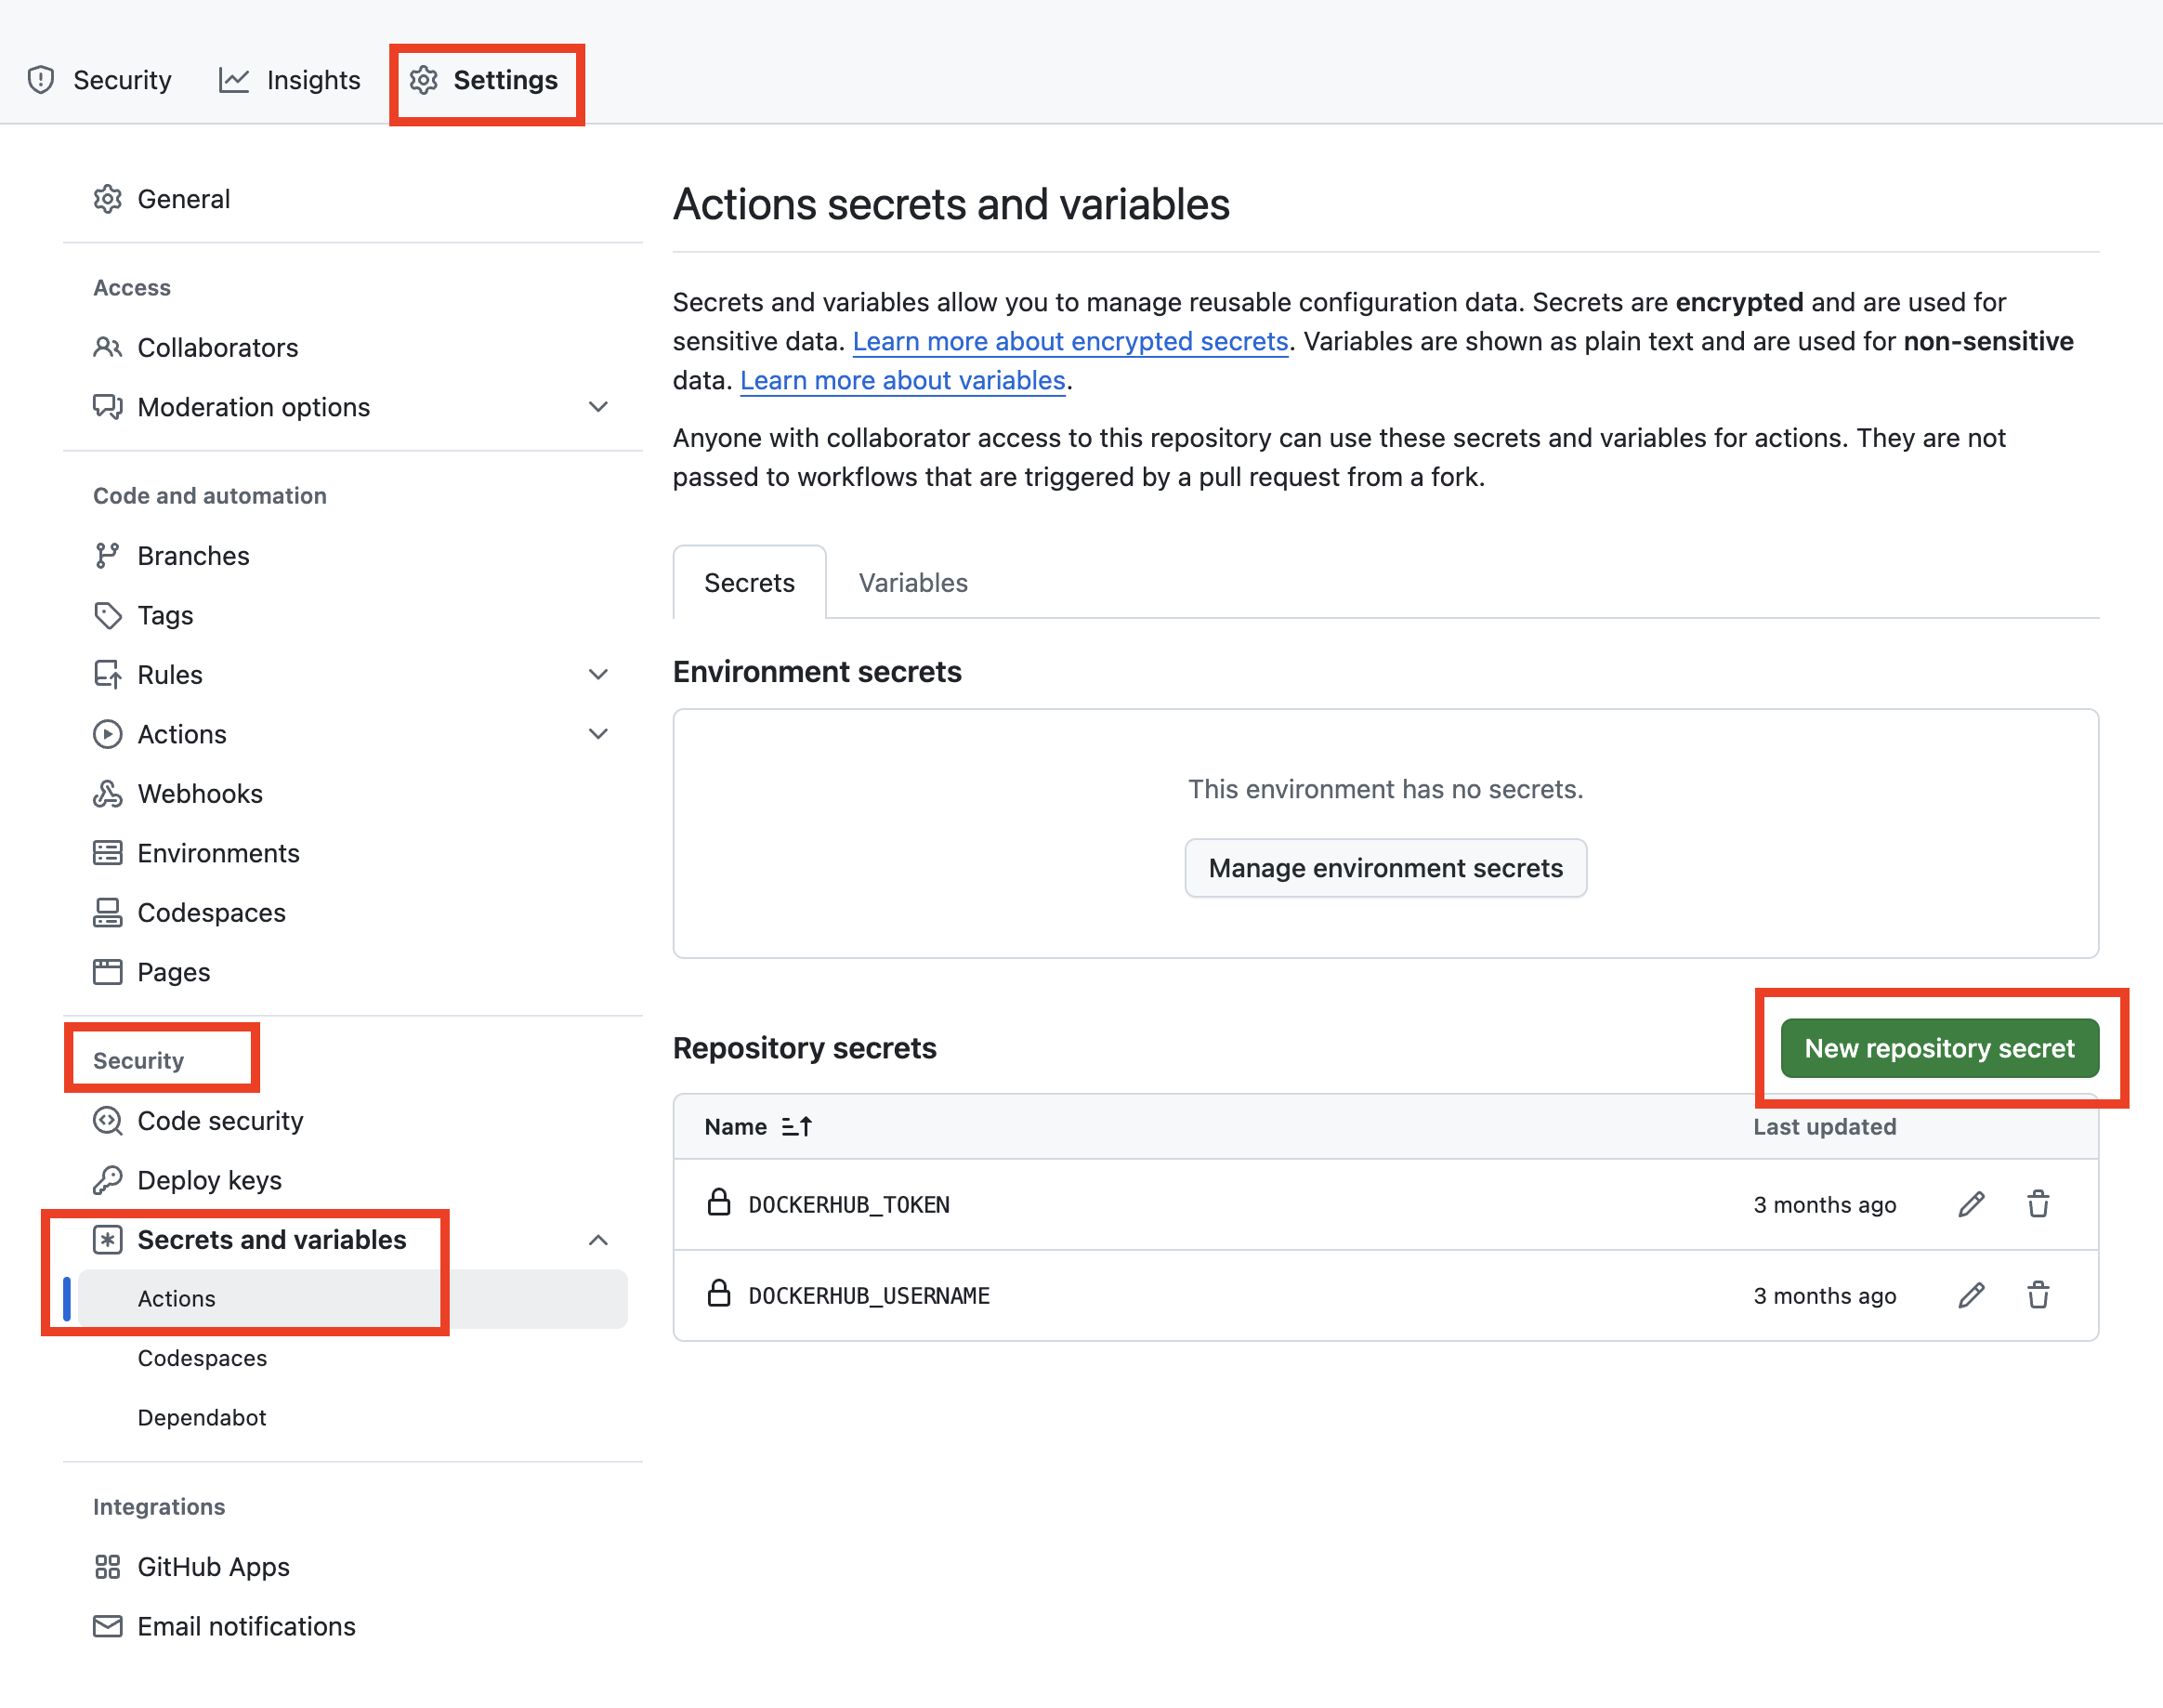
To use it in a workflow, we can use the secrets context to access secrets we've created in our repo. For example:
# ... omitted above
steps:
  - name: Hello world action
    with: # We can set the secret as an input:
      dockerhub_token: ${{ secrets.DOCKERHUB_TOKEN }}
    env: # Or, as an environment variable:
      dockerhub_token: ${{ secrets.DOCKERHUB_TOKEN }}
# ... omitted
If we need the secrets to run some commands, we can also use it in bash:
# ... omitted above
steps:
  - shell: bash
    env:
      DOCKERHUB_TOKEN: ${{ secrets.DOCKERHUB_TOKEN }}
    run: |
      example-command "$DOCKERHUB_TOKEN"
# ... omitted below
In this way, the secrets are not visible as plain text anywhere, stored within GitHub, and are available to the workflows with no extra configuration.
2.2 GitLab CI
We can achieve the same in GitLab CI. Similarly to GitHub Actions, we should not define/store secrets in the job's workflow definition (or the ``.gitlab-ci.yml` file); sensitive variables containing secrets should be added in the UI:
In our project, go to Settings > CI/CD, and expand the Variables section. Click "Add variable" and fill in the key (letters, numbers, or underscore, no spaces), value, type, scope, protection, and visibility:
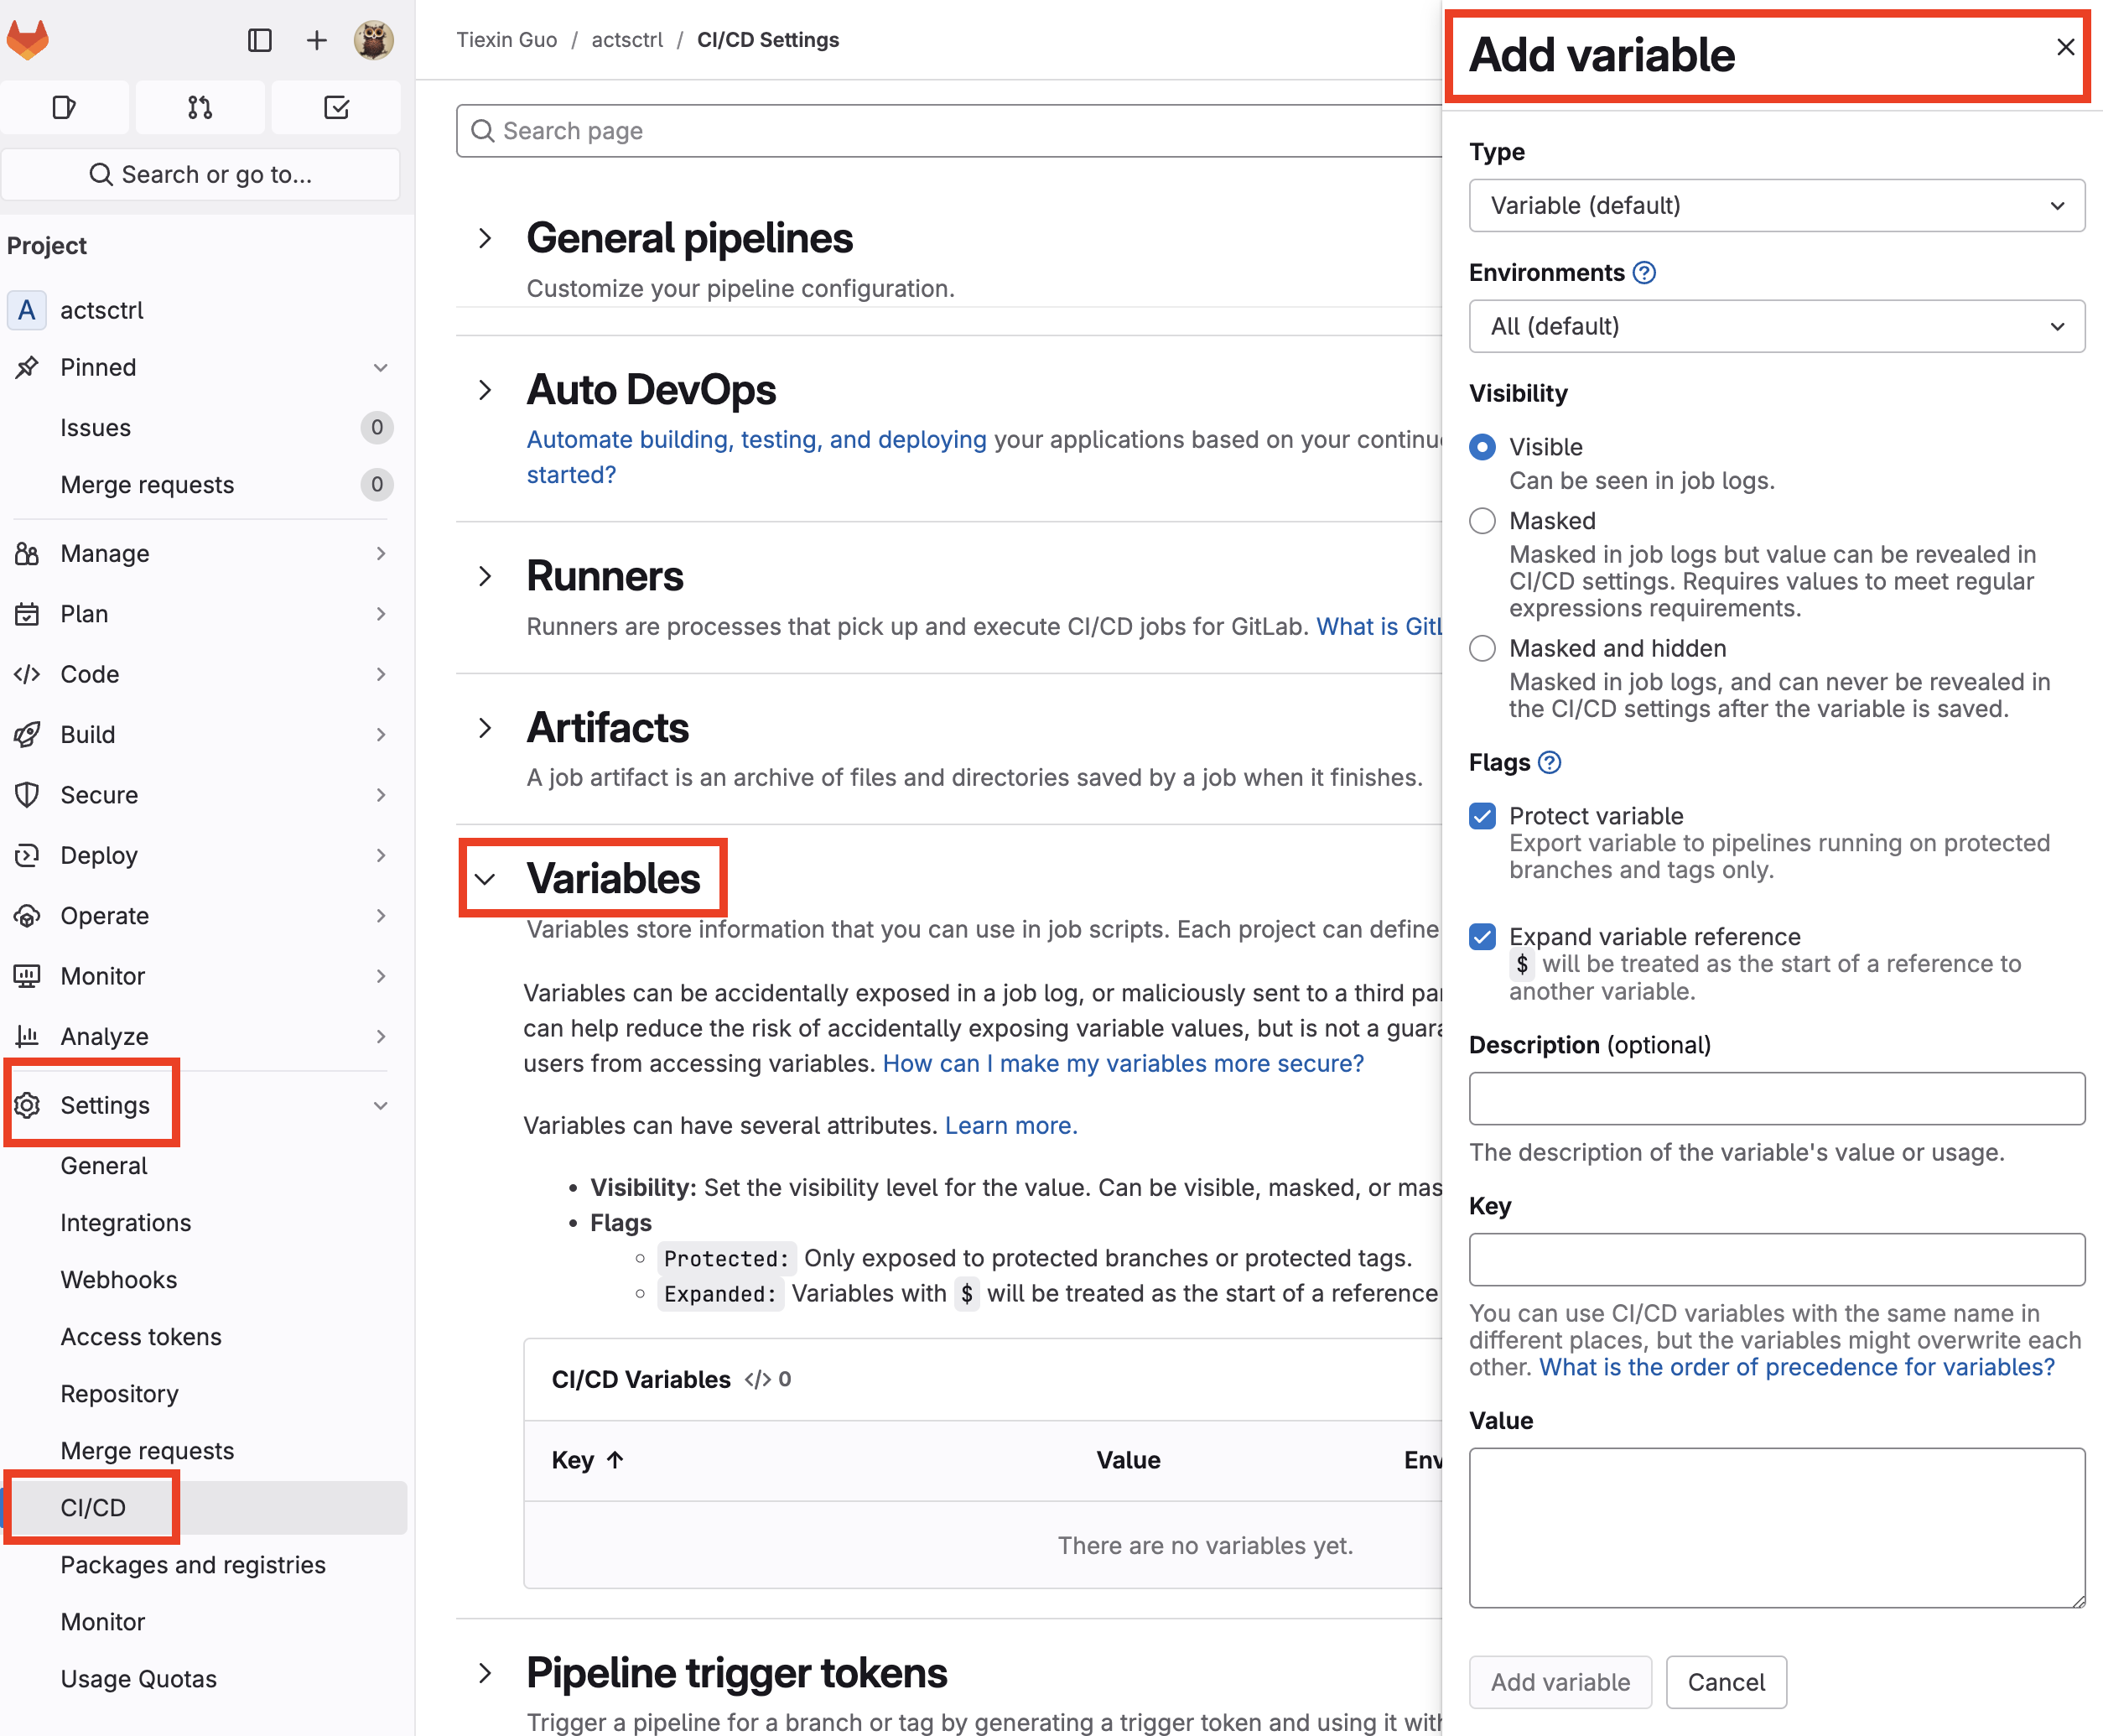
Once added, we can use the secrets in our pipelines. For example, to access environment variables in bash, sh, and similar shells, prefix the CI/CD variable with ($):
# ... omitted above
job_name:
  script:
    - example-command "$MY_SECRET"
# ... omitted below
2.3 Pros and Cons
The upside is the ease of configuration and usage: It requires no more than just a few clicks to set up a secret, and almost no overhead for accessing it in the workflows; after all, the secrets are stored within the CI/CD systems themselves.
However, there are a couple of downsides:
- CI/CD systems are great at automating stuff, but they're not perfect when it comes to security. Still, remember the CircleCI's breach? If the CI/CD systems are compromised, the secrets could leak. Read Five Ways Your CI/CD Pipeline Can Be Exploited for more details on this topic.
- Then, it's the "single origin of truth" problem. Even if you are fine with storing the secrets within the CI/CD systems, one problem remains: You probably can't use the CI/CD systems as your single source of truth for these secrets. What if other systems need to use the same set of secrets? Where to store the values for those secrets and then add them into CI/CD systems?
So, what's a better choice that is both more secure and can act as the single source of truth?
A secret manager, you say? Bingo! So, next, let's dive into that.
3. Use a Secret Manager with CI/CD Workflows
3.1 DO NOT: Use Long-Lived Tokens
If, for example, you are using AWS Secrets Manager to store secrets and want to access those secrets from your GitHub Actions workflows, the easiest way is probably to create a pair of access key id/token, then set AWS_ACCESS_KEY_ID and AWS_SECRET_ACCESS_KEY as environment variables in the workflow so that you can run AWS CLI or use SDK to fetch secrets.
Unfortunately, in this case, the easiest method isn't the best.
Using long-lived access tokens like this brings several security risks, making it generally a bad practice:
- Increased vulnerability window: A long-lived token grants access for an extended period。 The longer a token is valid, the longer the window of opportunity for an attacker to exploit it. A short-lived token, even if stolen, will only be useful for a limited time.
- Difficulty of revocation: Revoking a long-lived token can be problematic because if it's compromised and invalidated immediately, it can disrupt legitimate accesses if it's actively being used at the time of revocation. Short-lived tokens, on the other hand, naturally expire and are most likely different from workflow to workflow.
- Least privilege principle: Granting only the necessary access for the shortest possible time is more secure, which is violated because long-lived tokens grant continuous access, even when it's not needed.
- Increased risk of sharing: Users might be tempted to share long-lived tokens with others, because sometimes it's the easiest thing to do, bypassing security measures like multi-factor authentication. This practice significantly increases the risk of unauthorized access and compromises the integrity of the authentication system.
While long-lived tokens might offer some "convenience", in the long run, the security risks outweigh the short-term benefits.
3.2 DO: Short-Lived Tokens with OIDC
Instead of long-lived tokens, we can make use of OpenID Connect (OIDC).
In short, it allows us to use short-lived tokens instead of long-lived passwords.
Under the hood, when access is needed, authorization is done first, then upon successful authentication, a short-lived ID token containing user information and an access token is returned. Then these tokens are used to access protected resources.
For example, the following diagram gives an overview of how a CI/CD system's (in this case, GitHub) OIDC provider integrates with our workflows and cloud providers:
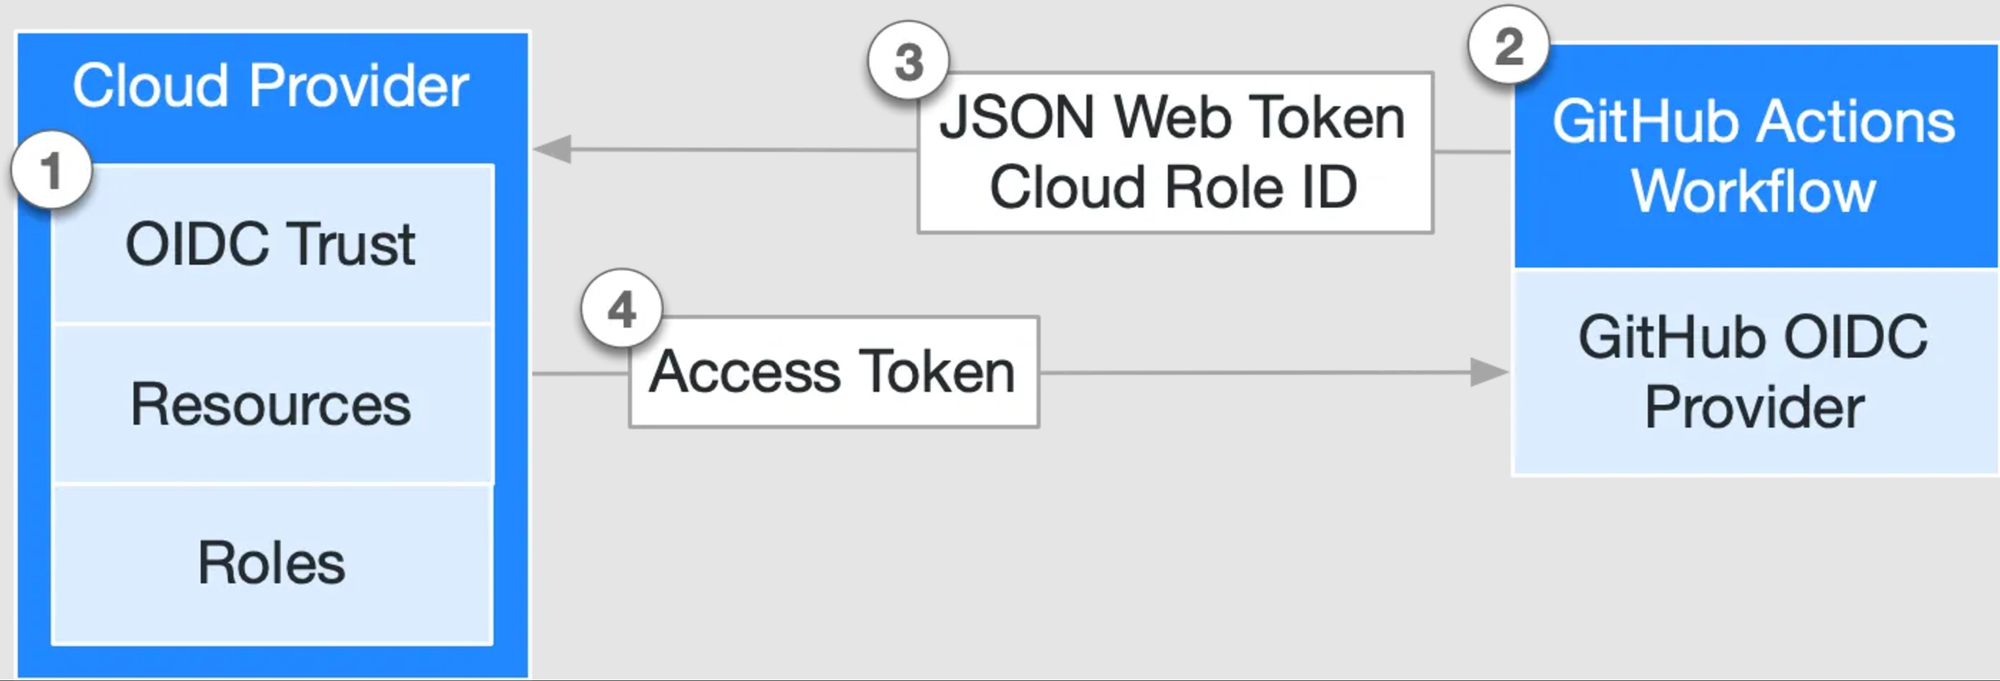
- In our cloud provider, create an OIDC trust between our cloud role and our GitHub workflow(s) that need access to the cloud.
- Every time our jobs run, GitHub's OIDC Provider auto-generates an OIDC token.
- We can also include a step or action in our job to request this token from GitHub's OIDC provider and present it to the cloud provider.
- Once the cloud provider successfully validates the claims presented in the token, it then provides a short-lived cloud access token that is available only for the duration of the job.
Next, let's have a look at how to integrate AWS with GitHub Actions.
3.3 Use AWS Secrets Manager with GitHub Actions
First, we need to create an OIDC provider. Open the IAM console, and in the left navigation menu, choose "Identity providers", then in the "Identity providers" pane, choose "Add provider":
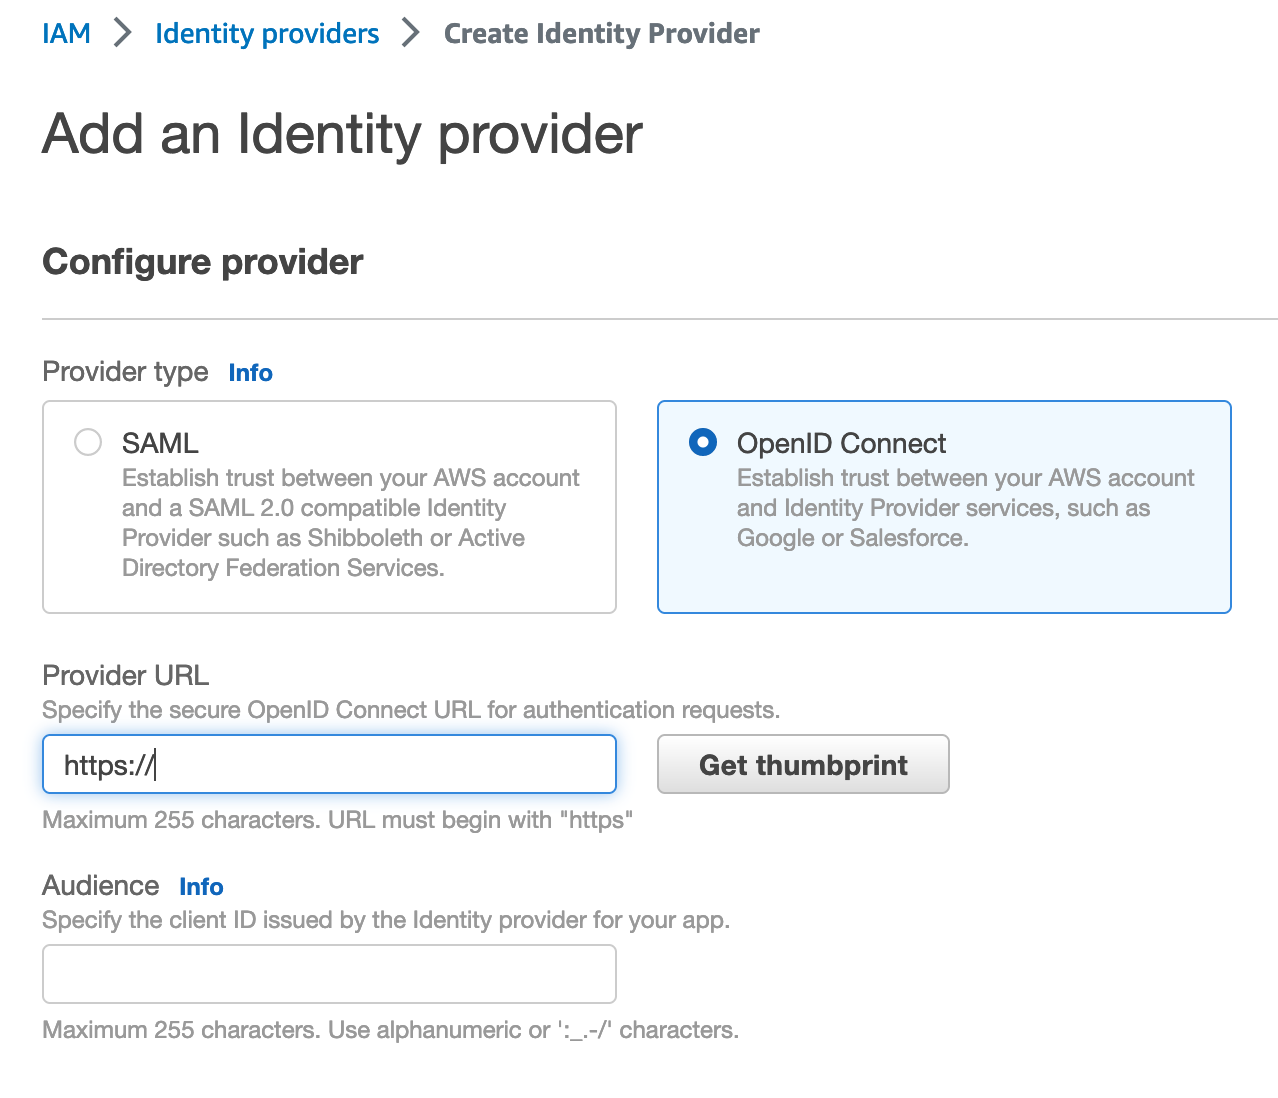
- For Configure provider, choose OpenID Connect.
- For the provider URL: Use https://token.actions.githubusercontent.com
- Choose "Get thumbprint" to verify the server certificate of your IdP.
- For the "Audience": Use sts.amazonaws.com.
After creation, copy the provider ARN, which will be used later.
Then, we need to create an IAM role and scope the trust policy. For example, we can create a role named "gha-oidc-role" and attach the AWS-managed policy "AmazonS3ReadOnlyAccess" to it. To scope the trust policy, on the "Edit trust policy" page, put something similar to this:
{
  "Version": "2012-10-17",
  "Statement": [
    {
      "Effect": "Allow",
      "Principal": {
        "Federated": "arn:aws:iam::737236345234:oidc-provider/token.actions.githubusercontent.com"
      },
      "Action": "sts:AssumeRoleWithWebIdentity",
      "Condition": {
        "StringEquals": {
          "token.actions.githubusercontent.com:aud": "sts.amazonaws.com"
        },
        "StringLike": {
          "token.actions.githubusercontent.com:sub": "repo:IronCore864/vault-oidc-test:*"
        }
      }
    }
  ]
}
The tricky part is:
- The Principal is the OIDC provider's ARN we copied from the previous step.
- The
token.actions.githubusercontent.com:subin the condition defines which org/repo can assume this role; here I usedIronCore864/vault-oidc-test.
After creation, copy the IAM role ARN, which will be used in our workflow.
The following GitHub Actions workflow demonstrates how we use OIDC to access AWS resources (in this case, AWS S3, instead of Secrets Manager, for easier demonstration):
name: AWS

on:
  workflow_dispatch:

jobs:
  s3:
    runs-on: ubuntu-latest
    permissions:
      id-token: write
      contents: read
    steps:
      - name: configure aws credentials
        uses: aws-actions/configure-aws-credentials@v2
        with:
          role-to-assume: arn:aws:iam::737236345234:role/gha-oidc-role
          role-session-name: samplerolesession
          aws-region: us-west-1
      - name: ls
        run: |
          aws s3 ls
After triggering the workflow, everything works with no access keys or secrets needed whatsoever:
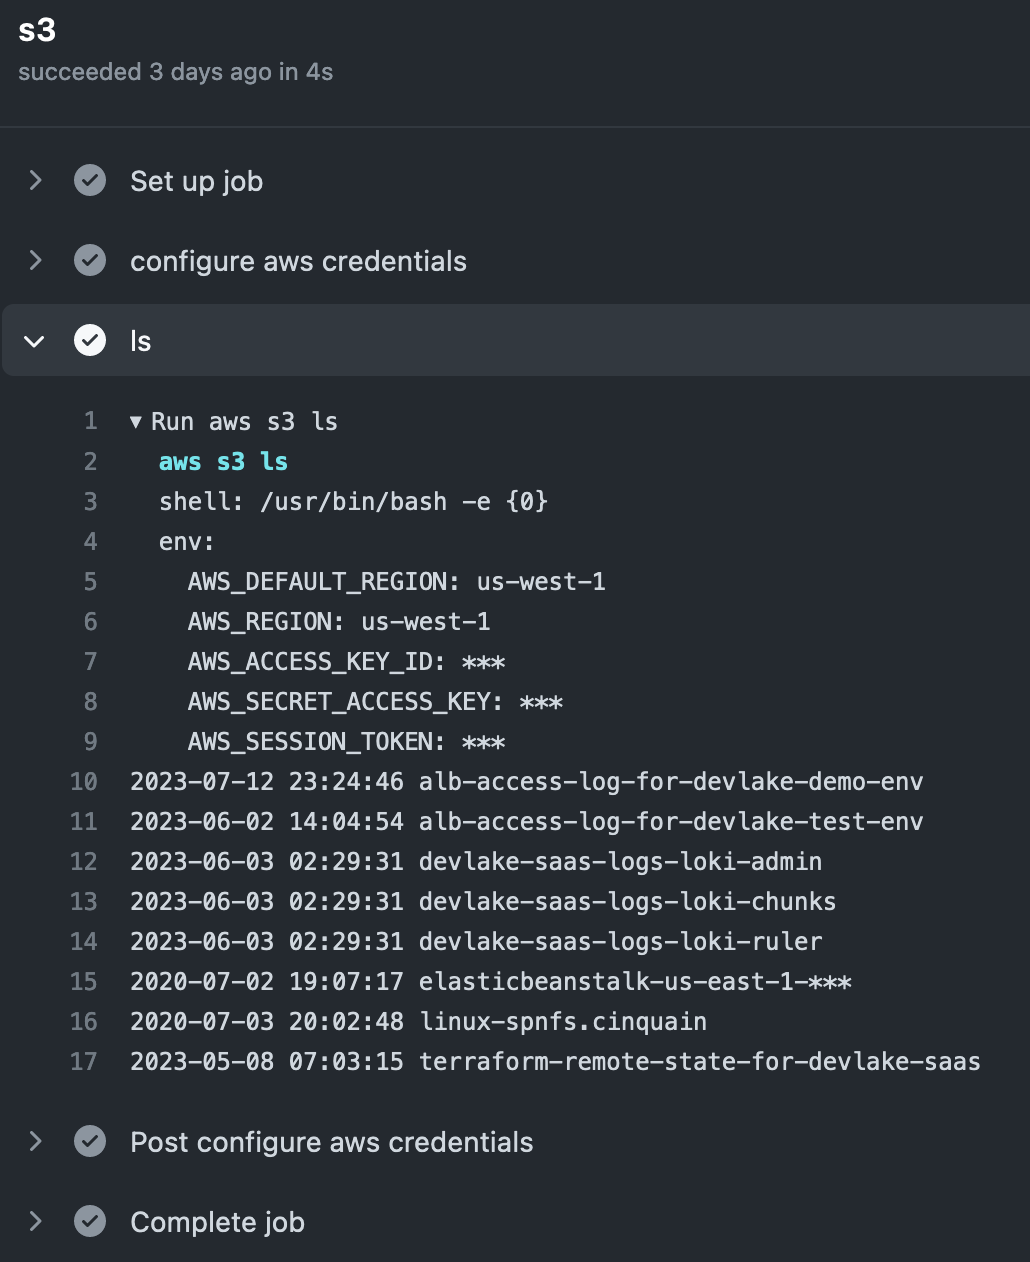
Although this example only accesses AWS S3, more can be achieved if you adjust the role and permission. Accessing Secrets Manager, deploying stuff to EC2, you name it. The point is, the integration requires no secrets stored in the CI/CD system whatsoever.
For more information, refer to the official doc here and here.
If you are interested in learning more about securing your GitHub Actions, read this blog here.
3.4 GitLab CI
If you are using GitLab CI, authentication with third-party services using GitLab CI/CD's ID tokens is also supported.
To do the same demo as the GitHub Actions example above, we need to create GitLab as an IAM OIDC provider in AWS. For the provider URL, it should be the address of your GitLab instance, such as https://gitlab.com or http://gitlab.example.com. And for "Audience", we shall put the address of our GitLab instance, such as https://gitlab.com or http://gitlab.example.com.
Then, similarly, we can configure a role and trust. The following is an example of the trust policy for GitLab CI:
{
  "Version": "2012-10-17",
  "Statement": [
    {
      "Effect": "Allow",
      "Principal": {
        "Federated": "arn:aws:iam::AWS_ACCOUNT:oidc-provider/gitlab.example.com"
      },
      "Action": "sts:AssumeRoleWithWebIdentity",
      "Condition": {
        "StringEquals": {
          "gitlab.example.com:sub": "project_path:mygroup/myproject:ref_type:branch:ref:main"
        }
      }
    }
  ]
}
After configuring the OIDC and role, the GitLab CI/CD job can already retrieve a temporary credential, as demonstrated in the following workflow:
assume role:
  id_tokens:
    GITLAB_OIDC_TOKEN:
      aud: https://gitlab.example.com
  script:
    - >
      export $(printf "AWS_ACCESS_KEY_ID=%s AWS_SECRET_ACCESS_KEY=%s AWS_SESSION_TOKEN=%s"
      $(aws sts assume-role-with-web-identity
      --role-arn ${ROLE_ARN}
      --role-session-name "GitLabRunner-${CI_PROJECT_ID}-${CI_PIPELINE_ID}"
      --web-identity-token ${GITLAB_OIDC_TOKEN}
      --duration-seconds 3600
      --query 'Credentials.[AccessKeyId,SecretAccessKey,SessionToken]'
      --output text))
    - aws sts get-caller-identity
For more real-world examples, see here. For more details on the integration, read the blog from AWS here.
If you are using Azure with GitLab CI, you can follow this doc here and here. For GCP Secret Manager users, refer to this doc.
Secrets Management Policy Framework for CI/CD Environments
Implementing a comprehensive secrets management policy is crucial for maintaining security across CI/CD pipelines. According to OWASP guidelines, organizations should consistently enforce policies defining minimum complexity requirements for passwords and approved encryption algorithms at an organization-wide level. A centralized secrets management solution enables companies to implement these policies effectively across all development environments.
Your secrets management policy should establish clear governance around secret lifecycle management, including creation, consumption, rotation, and deletion procedures. Define role-based access controls that align with the principle of least privilege, ensuring developers can execute required functions without administrative access to sensitive credentials. The policy must also specify approved secret storage locations, whether within CI/CD tooling like GitHub Actions or GitLab CI, or external secrets management systems such as AWS Secrets Manager or HashiCorp Vault.
Additionally, implement mandatory security event monitoring and establish procedures for regular policy compliance audits. This framework should include incident response protocols for compromised secrets and define clear ownership responsibilities for secret management across development teams.
Advanced Secret Detection and Remediation Strategies
Beyond basic scanning, implementing advanced secret detection requires a multi-layered approach that addresses the growing complexity of modern CI/CD environments. Organizations face increasing "secret sprawl" as applications communicate with more external services, multiplying the volume and variety of secrets embedded in code.
Automated scanning solutions should be integrated at multiple pipeline stages, not just during code commits. Implement pre-commit hooks, pull request scanning, and runtime monitoring to catch secrets before they reach production environments. Configure scanning tools to detect various secret types including API keys, SSH keys, database credentials, and personally identifiable information (PII) that may be inadvertently left as test data.
Establish automated remediation workflows that immediately revoke compromised credentials and notify relevant stakeholders. Your detection strategy should also include monitoring for secrets in configuration files, environment variables, and deployment artifacts. Consider implementing honeytoken strategies—fake credentials that trigger alerts when accessed—to detect potential breaches early. Regular scanning frequency should align with your deployment velocity, with high-frequency deployments requiring continuous monitoring capabilities.
Metadata Management and Secret Lifecycle Tracking
Proper metadata management is essential for maintaining visibility and control over secrets throughout their lifecycle in CI/CD pipelines. A robust secrets management solution should capture comprehensive metadata including creation timestamps, rotation schedules, and usage patterns to prevent vendor lock-in and ensure operational continuity.
Essential metadata elements include tracking when secrets were created, consumed, archived, rotated, or deleted, along with identifying both the actual producer and the engineer using the production method. Document what systems created, consumed, or modified each secret, and maintain contact information for troubleshooting purposes. Clearly define the intended purpose and designated consumers for each secret, along with the specific secret type (AES key, HMAC key, RSA private key).
This metadata framework enables effective secret rotation planning, compliance reporting, and incident response. When secrets require manual rotation, metadata should include scheduling information and responsible parties. Comprehensive metadata also supports audit requirements and helps identify unused or orphaned secrets that can be safely removed. Implement automated metadata collection wherever possible to reduce manual overhead while ensuring accuracy and completeness of secret tracking information.
4. Summary
In this blog, we explained why you shouldn't store secrets as plain text, then came up with two solutions for handling secrets in CI/CD systems:
- Store secrets within the CI/CD systems (less secure)
- Store secrets in secret managers and use OIDC/short-lived tokens to access them from CI/CD systems (better)
The examples given are mainly with GitHub Actions and GitLab CI, but if you are using other CI systems, there most likely exists an equivalent solution to achieve the same secure way of secrets handling.
This article is a guest post. Views and opinions expressed in this publication are solely those of the author and do not reflect the official policy, position, or views of GitGuardian, The content is provided for informational purposes, GitGuardian assumes no responsibility for any errors, omissions, or outcomes resulting from the use of this information. Should you have any enquiry with regard to the content, please contact the author directly.
FAQ
What are the main risks of storing secrets as plain text in CI/CD pipelines?
Storing secrets as plain text exposes sensitive credentials to anyone with access to the codebase or pipeline configuration. This increases the risk of unauthorized access, data breaches, and lateral movement by attackers. Plain text secrets are easily leaked through version control, logs, or misconfigured permissions, making robust secrets management essential.
How does using a dedicated secrets manager improve CI/CD secrets management?
Dedicated secrets managers centralize secret storage, enforce access controls, and facilitate rotation and auditing. Integrating secrets managers with CI/CD pipelines—using mechanisms like OIDC and short-lived tokens—minimizes exposure, ensures secrets are not stored in the pipeline itself, and supports compliance with organizational security policies.
Why are long-lived tokens discouraged in CI/CD workflows?
Long-lived tokens increase the attack surface by providing persistent access if compromised. They are harder to revoke without disrupting legitimate workflows and violate the principle of least privilege. Using short-lived, dynamically issued tokens via OIDC reduces risk and limits the window of opportunity for attackers.
What role does metadata management play in secrets lifecycle tracking?
Metadata management enables organizations to track secret creation, usage, rotation, and deletion events. Capturing metadata such as timestamps, usage patterns, and responsible parties supports auditability, incident response, and compliance. It also helps identify orphaned or unused secrets that can be safely removed.
How can organizations enforce a robust secrets management policy in CI/CD environments?
Organizations should define policies covering secret creation, storage, rotation, and deletion, with clear role-based access controls. Approved storage locations—such as secrets managers or CI/CD system vaults—should be mandated. Regular audits, event monitoring, and incident response protocols are critical for maintaining compliance and minimizing risk.
What are best practices for advanced CI/CD secrets management and detection?
Integrate automated secret scanning at multiple pipeline stages, including pre-commit, pull request, and runtime. Use tools that detect various secret types and implement automated remediation, such as revoking compromised credentials. Employ honeytokens to detect unauthorized access and align scanning frequency with deployment velocity.
How does OIDC enhance CI/CD secrets management compared to traditional methods?
OIDC enables dynamic issuance of short-lived tokens, eliminating the need to store static credentials in CI/CD pipelines. This approach reduces the risk of credential leakage, enforces least privilege, and simplifies secret rotation. OIDC integrations are supported by major CI/CD platforms and cloud providers, streamlining secure access to resources.
