

Learn how to safely remove confidential information from your git repository. Whether you need to excise an entire file or edit a file without removing it, this tutorial will guide you through the process. Plus, get tips on preventing future headaches with GitGuardian!
Table of contents
You know that adding secrets to your git repository (even a private one) is a bad idea, because doing so risks exposing confidential information to the world. But mistakes were made, and now you need to figure out how to excise confidential information from your repo. Because git keeps a history of everything, it’s not often enough to simply remove the secret or file, commit, and push: we might need to do a bit of deep cleaning.
Thankfully, for simpler cases, git provides commands that make cleaning things up easy. And in more complicated cases, we can use git-filter-repo, a tool recommended by the core git developers for deep cleaning an entire repository.
First and foremost, if there is reason to think that the secret has escaped into the world, and you can revoke the secret, do so. How to revoke a secret is going to vary quite a lot depending on what the secret protects. If you don’t know how to revoke it, you will need help from the owner of the resource protected by the secret.
Need to quickly see what scenario applies to you?
check out our cheatsheet flow chart below
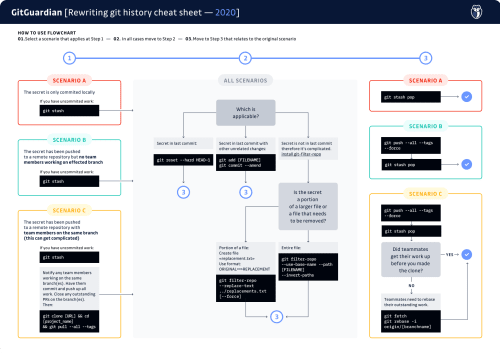 Download the git history cheatsheet
Now, let’s consider different scenarios to see how to clean things up.
Have you pushed your work up yet?
NO
No? That’s great. Please don’t push it up just yet.If you have any uncommited work, we can use git stash to save it. This sets your work aside in a temporary “stash” so that we can work with the git repository without losing anything you haven’t committed yet. When we’re done cleaning things up, you can use git stash pop to restore your work.
YES
If you have already pushed a commit containing a secret, or just discovered a secret in your existing history, things get more complicated if there are other people working on this branch. If you work alone, there’s nothing to do at this point, you can skip to the next step. If you work as part of a team, things get more complicated because we need everyone to act in a coordinated way.
First of all, we need to determine who else is affected by the secret’s presence, because we’ll need to coordinate everyone’s actions. If the secret only appears in the branch you’re working on, you only need to coordinate with anyone else who is always working off of that branch. However, if you found the secret lurking further back in git history, perhaps in your master or main branch, you’ll need to coordinate with everyone working in the repository.
Let the others affected know that a secret was found that needs to be excised from everyone’s git history. When you edit the git history to remove a file, it can cause problems with your teammates’ local clones; moreover, they can end up re-inserting the secret back into the public repository when they push their work. So it is important that everyone affected is in sync for the excision to work. This means that everyone needs to stop what they are doing, close outstanding PRs, and push up work that’s in progress.
Now, let’s make a fresh clone.
- Delete your existing clone in its entirety.
- Make a fresh clone with `git clone [repository URL]`
- Change into the project directory with `cd [project name]
- Download the entire repository history: `git pull --all --tags`.
The last step will look a little bit familiar. git pull tells git to grab updates from the remote repository, and apply them in the current branch (when it makes sense to do so, that is, when the local branch is set to track a remote branch). But git is smart, it doesn’t pull everything down, only what’s needed. This is where the --all flag comes in. This flag tells git to grab every branch from the remote repository. And the --tags flag tells git to grab every tag as well. So this command tells git to download the entire repository history, a complete and total clone. We have to do this, because it is possible that the commit containing the secret exists in more than one branch or tag. We need to ensure we don’t just scrub our secret from a portion of the repository history. As a result, this command can take a very long time, if the repository is very large.
Move on to the next step.
Git Remove File from Commit: Understanding the Difference Between Staged and Committed Files
Before diving into file removal techniques, it's crucial to understand the distinction between staged and committed files in Git's workflow. When you execute git add, files move to the staging area (index), but they're not yet part of the repository history. Once you run git commit, these staged changes become part of a commit object with a unique SHA hash.
This distinction is critical when you need to remove file from git commit because the approach varies significantly. For staged files that haven't been committed yet, simple commands like git reset HEAD <filename> or the newer git restore --staged <filename> will unstage the file without affecting your working directory. However, once files are committed, you're dealing with Git's immutable history, requiring more sophisticated techniques like git reset --soft HEAD~1 followed by selective staging, or git commit --amend for the most recent commit.
Understanding this workflow prevents common mistakes where developers accidentally delete files from their working directory when they only intended to remove them from a commit. Always verify your Git status with git status before executing removal commands to ensure you're targeting the correct state.
How complicated is the situation?
The secret is in the last commit, and there’s nothing else in the last commit
In this case, we can drop the last commit in its entirety. We do this with
git reset --hard HEAD~1
What does this command do? Let’s break it apart a little bit. git reset is how we tell git that we want to undo recent changes. Normally, this command by itself tells git to unstage anything we’ve added with git add, but haven’t committed yet. This version of resetting isn’t sufficient for our purposes. But git reset is more flexible than that. We can tell git to take us back in time to a previous commit as well.We do that by telling git which commit to rewind to. We can use a commit’s identified (it’s “SHA”), or we can use an indirect reference. HEAD is what git calls the most recent commit on the checked out branch. HEAD~1 means “the first commit prior to the most recent” (likewise HEAD~2 means “two commits prior to the most recent”).
Finally, the --hard tells git to throw away any differences between the current state and the state we’re resetting to. If you leave off the --hard your changes, including the secret, won’t be discarded. With --hard, the differences will be deleted, gone forever (which is precisely what we want!).
Once you’ve done a hard reset, that’s it! You’re done. Your work has been destructively undone, and you can pick back up where you were.
The secret is in the last commit, but there were other changes too
In this case, we don’t want to completely drop the last commit. We want to edit the last commit instead. Edit your code to remove the secrets, and then add your changes as usual. Then, instead of making a new commit, we’ll tell git we want to amend the previous one:
git add [FILENAME]
git commit --amend
We all know git commit, but the --amend flag is our friend here. This tells git that we want to edit the previous commit, rather than creating a new one. We can continue to make changes to the last commit in this way, right up until we’re ready to either push our work, or start on a new commit.
Once you’ve amended the commit, you’re done! The secret’s gone, you can carry on as you were.
The secret is beyond the last commit
It’s complicated
If you know you committed a secret, but have since committed other changes, things get trickier quickly. In anything but the simplest cases, we are going to want a more powerful tool to help us do a deep clean of the repository We’re going to use git-filter-repo, a tool recommended by the git maintainers that will help us to rewrite history in a more user-friendly way than the native git tooling.
A technical aside to those familiar with the concept of rebasing. (If you don’t know what that means, feel free to skip this paragraph.) All of the cases covered below can of course be managed using native git tools, particularly by rebasing. Sometimes rebasing is relatively painless, of course, but in the kinds of scenarios we're presenting here, rebasing is going to be a tedious and deeply error-prone process. This is why I am favoring purpose-built tools like git-filter-repo over rebasing. It is far better to avoid opening the possibility for making mistakes. From my own personal experience, recovering from a botched rebase is extremely time consuming, and often nearly impossible. Better to use the right tool for the job.
First, install
git-filter-repo
Next, let’s assess the situation to determine which technique is right for your situation. Sometimes secrets are files, and sometimes secrets are lines of code. For example, if you accidentally committed an SSH key or TLS certificate file, these are contained in specialized files that you’ll need to excise. On the other hand, maybe you have a single line of code containing an API key that’s part of a larger source file. In that case, you want to modify one or more lines of a file without deleting it.
Git-filter-repo can handle both cases, but requires different syntax for each case.
Excise an entire file
To tell git-filter-repo to excise a file from the git history, we need only a single command:
git filter-repo --use-base-name --path [FILENAME] --invert-paths
The --use-base-name option tells git-filter-repo that we are specifying a filename, and not a full path to a file. You can leave off this option if you would rather specify the full path explicitly.
Normally, git-filter-repo works by ignoring the filenames specified (they are, as the name suggests, filtered out). But we want the inverse behavior, we want git-filter-repo to ignore everything except the specified file. So we must pass --invert-paths to tell it this. If you leave off the --invert-paths, you’ll excise everything except the specified file, which is the exact opposite of what we want, and would likely be disastrous. Please don’t do that.
Edit a file without removing it
If you only need to edit one or more lines in a file without deleting the file, git-filter-repo takes a sequence of search-and-replace commands (optionally using regular expressions).
First, identify all the lines containing secrets that need to be excised. You’ll also need to work out a plan for how you will replace those lines. Perhaps just deleting them is enough. But perhaps they need to be modified to prevent a runtime crash.
Next, create a file containing the search-and-replace commands, called replacements.txt. Make sure it’s in a folder outside of your repo, for example, the parent folder.
The format of this file is one search-and-replace command per line, using the format:
ORIGINAL==>REPLACEMENT
For example, suppose that you’ve hard-coded an API token into your code, like this:
AUTH_TOKEN=’123abc’
Now suppose that you’ve decided that it’s better to load the API token from an environment variable, as such:
AUTH_TOKEN=ENV[‘AUTH_TOKEN’]
We can tell git-filter-repo to search for the hard-coded token, and replace with the environment variable by adding this line to replacements.txt:
‘123abc’==>ENV[‘AUTH_TOKEN’]
If you have multiple secrets you need to excise, you can have more than one rule like this in replacements.txt.
Finally, assuming you placed replacements.txt in the parent directory, we invoke git-filter-repo with our search-and-replace commands like this:
git filter-repo --replace-text ../replacements.txt
Sometimes you might get an error saying you’re not working from a clean clone. That’s OK. Git-filter-repo is making irreversible changes to your local repository, and it wants to be certain that you have a backup before it does that. Of course, we do have a remote repository, and we’re working from a local clone. And of course we are very interested in making irreversible edits to our commit history—we have a secret to purge! So there’s no need for git-filter-repo to worry. We can reassure it that we are OK with making irreversible changes by adding the --force flag:
git filter-repo --replace-text ../replacements.txt --force
And now you have a clean git history! You’ll want to validate your work by compiling your software or running your test suite. Then once you’re satisfied that nothing is broken, move on to the next step to propagate the new history to your remote repository and the rest of the team.
Advanced Scenarios: Removing Files from Multiple Commits
While the current article covers basic scenarios, many developers encounter situations where they need to git remove files from commit across multiple commits in their history. This commonly occurs when sensitive data like API keys or configuration files were committed multiple times before being detected.
For commits that aren't the most recent, you'll need to use interactive rebase with git rebase -i HEAD~n where n is the number of commits to review. During the interactive rebase, you can mark commits for editing with edit, then use git reset HEAD~1 to unstage files from that specific commit, remove the unwanted files, and continue with git rebase --continue.
Alternatively, for more complex scenarios involving the same file across many commits, git filter-repo --path <filename> --invert-paths provides a more robust solution. This tool rewrites the entire repository history, permanently removing the specified file from all commits. However, this approach requires careful coordination with your team since it fundamentally alters the repository's commit hashes, making it incompatible with existing clones.
Always create a backup branch before attempting multi-commit file removal: git branch backup-before-cleanup ensures you can recover if something goes wrong during the history rewriting process.
Do you need to coordinate with your team?
No
If you only just added the secret, and haven’t pushed any of your work yet, you’re done. Just keep working like you had been, and no one will ever know. Don’t forget if you need to restore uncommitted work by popping it from the stash with git stash pop.
Otherwise, we’ll need to overwrite what’s on your remote git repository (such as GitHub), as it still contains tainted history. We can’t simply push, however: The remote repository will refuse to accept our push because we’ve re-written history. So we’ll need to force push instead. Moreover, if our re-writes to history affect multiple branches or tags, we’ll need to push them all up. We can accomplish all of this like so:
git push --all --force && git push --tags --force
Note: The --all argument does not automatically push any updated tags. Git does not allow the push arguments --all and --tags to be used in the same call. If you need to run both commands, you can do so with the single line, thanks to the &&.
YES
If you work as part of a team, now comes the hard part. Everyone you identified as affected at the beginning of this process still has the old history. They need to synchronize against the revised history you just force-pushed. This is where errors can happen, and more importantly, where frustration can occur.
Ideally everyone pushed their work up before you edited the history. In that case, everyone can simply make a clean clone of the repo and pick up where they left off.
But if someone failed to push their work up before you re-wrote history, they’re going to find they have a number of conflicts that need to be resolved when they pull. Instead, they need to fetch the new history from the remote repository, and rebase their hard work on the re-written history. To do this:
git fetch
git rebase -i origin/[branchname]
If you aren't familiar with git fetch, this command tells git to download new data from the remote repository, but unlike git pull, it doesn’t attempt to merge new commits into your current working branch. So the fetch here is requesting all the newly re-written history.
I know I said I wasn’t going to talk about rebasing, but this is the one instance where it’s necessary. Once all the new history is pulled down, the developer will need to re-apply all their hard work on top of the re-written history. This is done by rebasing. Unfortunately, this can be a tedious and error-prone process, so care must be taken. For this reason, rebasing is out of scope for this tutorial. Instead, we recommend that you look at this tutorial for more information.
Security Implications: When File Removal Isn't Enough
From a cybersecurity perspective, simply knowing how to remove a file from git commit is only the first step when dealing with exposed secrets or sensitive data. Even after successful removal from Git history, the sensitive information may have already been exposed through various vectors that require immediate attention.
If the repository was ever public or accessible to unauthorized users, you must assume the sensitive data has been compromised. This means immediately revoking any exposed credentials, rotating API keys, and updating passwords. Git's distributed nature means that anyone who cloned or forked the repository before your cleanup still has access to the sensitive data in their local copies.
For organizations using GitGuardian's secrets detection capabilities, the platform can help identify when sensitive data has been exposed and provide guidance on proper remediation steps. This includes not just the technical Git operations, but also the security protocols necessary to minimize damage from the exposure.
Additionally, consider implementing pre-commit hooks and automated scanning to prevent future incidents. Tools like GitGuardian's pre-commit hooks can catch secrets before they enter your repository, eliminating the need for complex history rewriting operations and reducing security risks associated with exposed credentials in version control systems.
Conclusion
If you’ve made it this far, congratulations! You’ve successfully and securely eliminated a secret or file from your git history. But it didn’t have to be this way. You can prevent all this headache with GitGuardian.
GitGuardian is an automated secret detection solution that integrates with your git repos to scan your code for secrets. GitGuardian first makes an initial scan to clean your history, then integrates with your devops pipeline to scan all incremental changes as they arrive and notify you before you have to do complex surgery! Try it out here.
If you are interested in other cheat sheets about security we have put together these for you:
- How to improve your Docker containers security
- Best practices for managing and storing secrets including API keys and other credentials
This article is a guest post. Views and opinions expressed in this publication are solely those of the author and do not reflect the official policy, position, or views of GitGuardian, The content is provided for informational purposes, GitGuardian assumes no responsibility for any errors, omissions, or outcomes resulting from the use of this information. Should you have any enquiry with regard to the content, please contact the author directly.
FAQs
What is the safest way to remove a file from a Git commit after it has been pushed?
To safely remove a file from a Git commit after pushing, use history-rewriting tools like git filter-repo to purge the file from all relevant commits. After rewriting history, coordinate with your team and force-push the updated repository. Always revoke any exposed secrets immediately, as removal from Git does not prevent prior exposure.
How do I remove a file from a Git commit if it is only staged and not yet committed?
If a file is staged but not committed, use git reset HEAD <filename> or git restore --staged <filename> to unstage it. This removes the file from the staging area without affecting your working directory, ensuring it will not be included in the next commit.
What are the implications of using git filter-repo to remove files from multiple commits?
Using git filter-repo to remove files from multiple commits rewrites the repository history, changing commit hashes. This requires all collaborators to re-clone or rebase their work on the new history. Always create a backup branch before proceeding and communicate changes to your team to avoid workflow disruptions.
How do I remove sensitive data from a single recent commit without losing other changes?
To remove sensitive data from the most recent commit without discarding other changes, edit the file to remove the secret, stage the updated file, and run git commit --amend. This updates the last commit with your modifications, effectively removing the sensitive data.
What security steps should be taken after you remove file from git commit containing secrets?
After removing a file from a Git commit that contained secrets, immediately revoke or rotate any exposed credentials. Assume the secret may have been accessed if the repository was public or shared. Implement automated secrets detection and pre-commit hooks to prevent future exposures and ensure compliance with security policies.
How do I coordinate with my team when rewriting Git history to remove sensitive files?
Before rewriting history, notify all affected team members and ensure they push any outstanding work. After force-pushing the cleaned history, teammates must re-clone the repository or rebase their changes onto the new history. Clear communication and a coordinated process are essential to prevent conflicts and data loss.
This article is a guest post. Views and opinions expressed in this publication are solely those of the author and do not reflect the official policy, position, or views of GitGuardian. The content is provided for informational purposes; GitGuardian assumes no responsibility for any errors, omissions, or outcomes resulting from the use of this information. For any enquiries, please contact the author directly.

![How To Use ggshield To Avoid Hardcoded Secrets [cheat sheet included]](/content/images/size/w600/2022/10/22W44-blog-SecuringYourSecretsWithGGshield-Cheatsheet.jpg)

![How to Handle Secrets at the Command Line [cheat sheet included]](/content/images/size/w600/2022/10/22W40-blog-SecretsAtTheCommandLine-Cheatsheet.jpg)


![Using GitGuardian Honeytoken [cheat sheet included]](/content/images/size/w600/2023/07/Using-GitGuardian-Honeytoken-Cheat-Sheet-article.png)
