The decision to open-source a piece of internal software can always be daunting. You’ve weighed the pros and cons, you’ve gathered support from all the stakeholders and you’ve got the green light to open-source that project you really believe would benefit from the flourishing open-source ecosystem and community.
The only thing that’s left to do is to put it up on a public platform and you’re done, right? Maybe, but we should go through some final checks.
On this post we’ll be focusing on a few essentials that should be done before making your project open-source:
- Scan your repository for secrets
- Replace internal names and emails with public ones
- Write your contribution guidelines (CONTRIBUTING.md)
- Write a bug report template and a pull request template
- Choose your License (LICENSE.md)
- Write your security policy (SECURITY.md)
- Write your project’s introduction (README.md)
Scan your repository for secrets
One of the first things you should do before making your repository public is to verify there are no secrets in your git history.
It is always important to remember with git that it is not just the current version of your project you are making public. You are making every change and iteration ever made public too.
Even in internal repositories, secrets should not be stored.
The idea of an internal repository being private and behind authentication lures you into a false sense of security. In case of a breach of credentials belonging to anyone with read access to the repository, a repository with secrets then compromises more internal perimeter and generally more sensitive areas of the perimeter (Check out our video on the UN’s data breach for more information on this type of deeper infiltration)
If you are using GitGuardian’s Internal Monitoring you can easily scan your entire repository’s history on demand.
But maybe this repository is not on a platform monitored by GitGuardian or you want to scan a local branch with some git history rewrites before you push it. For that, you can use GitGuardian Shield, which allows you to scan various types of data on demand using GitGuardian’s public API.
A secret may be deeply nested in the history of the repository, you can follow our cheatsheet on removing secrets from git history.
Using GitGuardian Shield to scan your repository for secrets
As an example, we’ll scan Gitguardian’s sample repository. This repository has some sample secrets we can use to analyze gg-shield’s output.
First, let’s install GitGuardian Shield, you can follow the relevant guide for your platform on our Getting started with GitGuardian Shield documentation page.
Once that’s done let’s scan our repository.
$ ggshield scan repo https://github.com/GitGuardian/sample_secrets.git
Yes, it’s that simple. This command will clone the repository to a temporary location and scan every commit in your git repository.
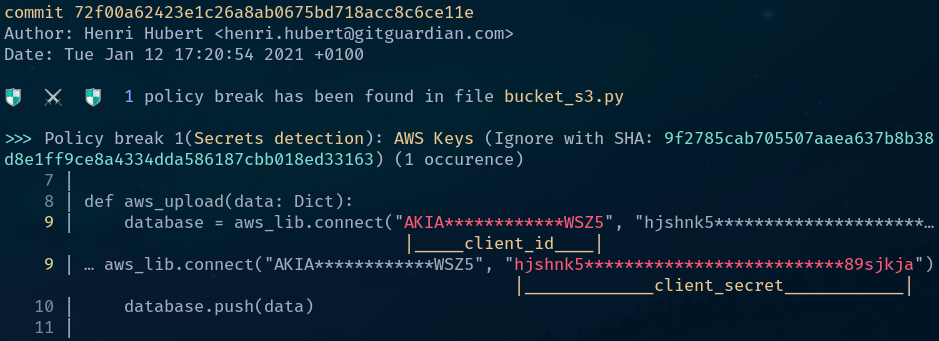
The output shows us the commit this incident was found in, its author, and its date.
This may be the perfect moment to whip out our secret removal cheatsheet to remedy this incident.
What If I have already rewritten git history locally to remove some secrets and want to verify no secrets remain in my branch?
In that case, let’s scan a repository already existing on your development platform.
$ cd sample_secrets
$ git checkout main-fixed
We navigate to the repository’s directory first and checkout the branch where we’ve already performed some history rewriting.
$ ggshield scan repo .
This command will scan the repository in the current working directory.
Replace internal names and emails with public ones
Although not a security issue (unless security through obscurity is considered security) you might want to replace some information in your repository history with more up-to-date information in order not to confuse future contributors or to link it to the correct author. This information can be for example:
- Internal emails used in development that don’t match the authors’ public email addresses on the public hosting platform (GitHub, GitLab).
- Internal product names that don’t match the public ones
- Censoring internal domains used in tests
- Replacing internal bot emails with accountable developer emails
Listing emails used in the repository
$ git shortlog --summary --numbered --email
    4  Jorge Lampos <jorge.lampos@gitguardian.com>
    3  Henry Humbert <hh@gitguardian.com>
Using git shortlog we’re able to verify all of the author emails present in our branch, if we want to verify committer emails we can add the option --committer to the command.
On this example output, we verify that jorge.lampos@gitguardian.com has authored 4 commits, but we know this user’s email on GitHub the platform where we want to open-source our repository is jlampos@gg.com
Filtering an email in git history
$ git filter-branch --env-filter '
OLD_EMAIL="jorge.lampos@gitguardian.com"
NEW_EMAIL="jlampos@gg.com"

if [ "$GIT_COMMITTER_EMAIL" = "$OLD_EMAIL" ]
then
    export GIT_COMMITTER_EMAIL="$NEW_EMAIL"
fi
if [ "$GIT_AUTHOR_EMAIL" = "$OLD_EMAIL" ]
then
    export GIT_AUTHOR_EMAIL="$NEW_EMAIL"
fi
' --tag-name-filter cat -- --branches --tags
This command will replace the author email and committer email in your branch if it matches the OLD_EMAIL variable with the NEW_EMAIL variable.
Attention: This command will unsign any commit affected.
Push your repository as private
Once all of the git history rewriting is done (the less the better), we need to find your repository a new home. There are many hosting solutions available for your open-sourced repository such as github.com, gitlab.com, and bitbucket.org. If you’re already using GitHub Enterprise or a self-hosted GitLab instance you may want to choose the cloud version of these solutions to avoid having to spend time getting familiar with a new platform.
For our example, we’ll be using github.com.
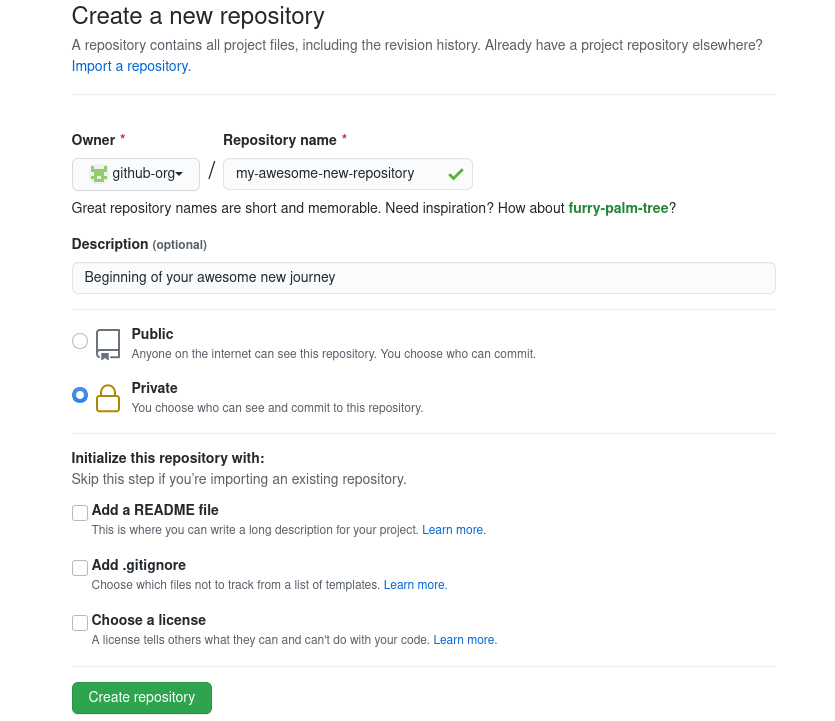
Once your bare repository is created you’ll be able to push an existing repository to it. GitHub even helps us with that.

The next thing you should take care of is making sure that some files exist at the root of your repository.
Write your contribution guidelines (CONTRIBUTING.md)
Your contributing.md is the entry point for developers wanting to participate in your project. It should not be overly extensive but answer a few key questions from the developer’s perspective:
- What’s the development workflow?
- Do I have to create an issue for a feature or a bug fix and discuss it with the existing contributors?
- Should I just present a merge request with my modifications?
- Should my changes be accompanied by documentation?
- What are some short links I should be aware of? (documentation, bug tracker, roadmap)
- How can I get in touch with the development team?
- What are the code conventions?
- Does this repository follow a certain code style?
- Does this repository follow a certain commit message pattern?
- How do I set up the development environment for this project?
Some examples of contribution guidelines can be found here:
Write a bug report template and a pull request template
It is useful to write these two basic templates in order to streamline contributions to your project. Both GitHub and GitLab have specific support for integrating templates into their interface.
Some basic questions your bug report template should ask the person reporting the bug:
- What version of the project was it found on?
- Can it be reproduced in the nightly/development version of the project?
- How would you describe the bug?
- What are the reproduction steps of this bug?
- What’s the expected behavior of this feature?
Some basic questions for your pull request template:
- Where has this change been discussed?
- What is the feature or area of the project impacted by this PR?
- What are some gotchas the reviewer should be aware of?
Also include a checklist a contributor can tick of steps necessary for acceptance of the Pull request (code style followed, documentation added, corresponds to what was discussed).
You can check some examples of the Atom project as good starting points.
BONUS: Write a feature request template as well
Choose your License (LICENSE.md)
The LICENSE is a focal part of an open-source project. You can use https://choosealicense.com/ to help with this choice. Each open-source license has its own unique set of limitations, conditions, and permissions. Licenses address issues like:
- What kind of recognition is given to the code’s creator?
- What permissions are granted to the project’s users?
- How should the source code be distributed and made available to other developers?
- Are there conditions under which users aren’t required to distribute the source code?
- Under what conditions can users distribute their software commercially?
Pay attention to make sure the license you have chosen does not conflict with one of your project’s dependencies. Generally, open-source licenses are divided into two main types: permissive and copyleft. Permissive licenses are nearly always compatible with each other whereas copyleft licenses are often not.
Write your security policy (SECURITY.md)
The security policy of your repository is targeted at security researchers and any contributor who has found a security vulnerability on your project.
It should contain a point of contact for responsible disclosure of vulnerabilities at a minimum and a step by step of the process the team will follow once the vulnerability is acknowledged if possible.
It is also a good place to point out any existing bug bounty programs related to the project.
Write your project’s introduction (README.md)
This file is targeted at the end-user of your project and should be a presentation of the project. It should answer the following questions:
- What does the project do?
- How can I install it?
- What are some frequently asked questions about its usage?
- Where can I find more in-depth information about the project?
You should also take the opportunity to link to your security policy, license, and contribution guidelines as your README.md serves as an index to the repository.
GitGuardian Shield is an example of a fully fleshed-out README.md which serves as a presentation to the project but also as in-depth documentation. VSCode is an example of a repository that takes the simple index approach to the README.md.
What’s next?
In this small post, we’ve covered some essential tasks to do before open-sourcing your internal project. These should give your repository a healthy start for open-source contributions and development. Overlooking security in the early life of an open-source project can turn it into an attractive and easy target for hackers later on. Learn more about open-source projects’ security and threats in this customer story — How does Bokeh, the Python Interactive Visualization Library, Secure its Open-Source Repositories?.
Next post we’ll cover some tasks you can do on repositories that are already open-sourced such as checking your dependencies are up-to-date on a regular basis, keeping your repository secrets free and cleaning up your issue tracker.
