Lots of businesses are adopting containers as a foundational technology used to manage and run their applications. If you’ve worked much with containers, it’s easy to see why: they enable entirely new levels of portability and scalability. But the adoption of containers, like any other new technology, also means new ways to exploit applications.
Depending on the container’s configuration, an exploited application can eventually lead to the compromise of the host that the container is running on. There are also other implications to consider, such as potential secrets stored as environment variables in the container and what they have access to. If you want to know more about Docker containers security best practices specifically, GitGuardian proposes a useful cheat sheet:
A mature software development lifecycle already includes security processes such as vulnerability scanning and software composition analysis, but there is a need for more. Most available application security technology exists to prevent an application from being vulnerable, but not many will contain the damage that can be done when an application is successfully exploited. To help with that, I’ve been researching a novel way to protect your container applications post-exploitation. In this post, I’ll be sharing what it is and how it can be seamlessly integrated into your software development processes that are already established. The additional protection I’m referring to is called Seccomp-BPF, and I need to explain a little about what it is before diving into how to use it.
Background
The programs that we run on computers rely heavily on the underlying operating system to do anything. Tasks like opening files and spawning new processes are abstracted in modern programming languages, but under the hood, the code is making kernel requests called system calls (or syscalls). How important are syscalls for a program to function? Well, there are around 400 syscalls available in the Linux kernel, and even a basic “Hello World” program written in C makes 2 of them: write and exit.
Code running in so-called “user space” can’t do anything without going through the kernel to do it. Eventually, some smart Linux kernel developers decided to use that fact to create a powerful security feature. In July 2012, Linux version 3.5 was released which added support for something called Seccomp-BPF.
Seccomp-BPF is a Linux kernel feature that allows you to restrict the syscalls that a process can make by creating a special filter.
In theory, you can create a Seccomp-BPF filter that only allows a process to make the exact syscalls that it needs to function and nothing more. This would be useful in cases where an app is accidentally exploitable in a way that allows an adversary to spawn additional processes. If Seccomp isn’t allowing the process to make new syscalls, there’s a good chance it could thwart the attacker.
Seccomp is super cool, and it’s even integrated into container runtime and orchestration tools like Docker and Kubernetes. It begs the question: “Why isn’t Seccomp widely used?” I think the answer is that there aren’t enough resources out there that bridge the gap between a low-level kernel feature like Seccomp and modern software development processes. Not every organization has a low-level code developer who knows a ton about syscalls. There’s also the overhead of figuring out which syscalls your program needs and updating that with every new feature you implement in your code.
I was thinking about how to solve that problem, and I thought of an idea: “What if we record the syscalls that a program makes while it’s running?” I was telling one of my co-workers about my idea, and the next day he sent me a link to a tool he found on GitHub. It turned out that some folks at Red Hat had already made a tool called oci-seccomp-bpf-hook that does exactly what I wanted!
Creating a Seccomp-BPF Filter
The tool oci-seccomp-bpf-hook was made to work with Linux containers. OCI stands for “Open Container Initiative,” and it’s a set of standards for container runtimes that defines what kinds of interfaces they should be able to provide. OCI-compliant container runtimes (like Docker) provide a mechanism called “hooks” that allows you to run code before a container is spun up and after a container is torn down. Rather than explain how Red Hat’s tool uses these hooks, I think a demonstration will be clearer.
Red Hat developed oci-seccomp-bpf-hook for use with their container runtime, podman. Podman is backward-compatible with Docker, for the most part, so the syntax in my examples will look mostly familiar if you’ve used Docker. Additionally, the oci hook is currently only available in Red-Hat-related dnf repositories unless you install it from source. To make things less complicated for this demo, I’m just using a Fedora server (if you don’t have a Fedora environment, I recommend running a Fedora virtual machine on something like Virtualbox or VMware to follow).
The first thing you’ll need to do to start using oci-seccomp-bpf-hook is to make sure you have it installed along with podman. To do that, we can run the following command:
sudo dnf install podman oci-seccomp-bpf-hookNow that we have podman and the oci hook, we can finally dive into how to generate a Seccomp-BPF filter. From the readme, the syntax is:
sudo podman run --annotation io.containers.trace-syscall="if:[absolute path to the input file];of:[absolute path to the output file]" IMAGE COMMANDLet’s run the ls command in a basic container and pipe the output into /dev/null. While we’re doing that, we’re going to be recording the syscalls that the ls command makes and saving them to a file at /tmp/ls.json.
sudo podman run --annotation io.containers.trace-syscall=of:/tmp/ls.json fedora:35 ls / > /dev/nullSince we are piping the output of the ls command to /dev/null, there should be no output in the terminal. But after the command is done, we can look at the file that we saved the syscalls to. There we see that the command did work, and the syscalls were captured:
cat /tmp/ls.json
{"defaultAction":"SCMP_ACT_ERRNO","architectures":["SCMP_ARCH_X86_64"],"syscalls":[{"names":["access","arch_prctl","brk","capset","chdir","close","close_range","dup2","execve","exit_group","fchdir","fchown","fstatfs","getdents64","getegid","geteuid","getgid","getrandom","getuid","ioctl","lseek","mmap","mount","mprotect","munmap","newfstatat","openat","openat2","pivot_root","prctl","pread64","prlimit64","pselect6","read","rt_sigaction","rt_sigprocmask","seccomp","set_robust_list","set_tid_address","sethostname","setresgid","setresuid","setsid","statfs","statx","umask","umount2","write"],"action":"SCMP_ACT_ALLOW","args":[],"comment":"","includes":{},"excludes":{}}]}
This file is our Seccomp filter, and we can now use it with any container runtime that support supports it. Let’s try using the filter with the same containerized ls command that we just ran:
sudo podman run --security-opt seccomp=/tmp/ls.json fedora ls / > /dev/nullThere’s no output or errors, indicating that the command was able to successfully run with the Seccomp filter applied. Now comes the fun part. We will add some capability to the container that wasn’t present when we recorded the syscalls to make our Seccomp filter. All we’re going to do is add the “-l” flag to our ls command.
sudo podman run --security-opt seccomp=/tmp/ls.json fedora ls -l / > /dev/null
ls: /: Operation not permitted
ls: /proc: Operation not permitted
ls: /root: Operation not permitted
…
As you can see, we now get a bunch of errors telling us that we can’t perform some operation that our command was trying to do. The addition of the “-l” flag to our ls command added a few new syscalls to the process that weren’t in our Seccomp filter’s allow list. If we generate a new Seccomp filter with the ls -l command, we can see that the new filter works because it now has all the required syscalls.
sudo podman run --annotation io.containers.trace-syscall=of:/tmp/lsl.json fedora ls -l / > /dev/null
sudo podman run --security-opt seccomp=/tmp/lsl.json fedora ls -l / > /dev/null
As you can see, applying Seccomp filters to your containers greatly restricts its capabilities. In a scenario where an attacker can exploit your application, it may stop them from doing damage or even prevent exploitation altogether.
By using Red Hat’s OCI hook, you no longer need to have a deep knowledge of the Linux kernel’s syscalls to create a Seccomp filter. You can easily create an application-specific filter that doesn’t allow your container to do anything more than what it needs to be able to do. This is a huge step in bridging the gap between the kernel feature and high-level software development.
Conclusion
As great as oci-seccomp-bpf-hook is, the tool alone doesn’t fully live up to my expectations for integrating Seccomp into a mature software engineering workflow. There is still overhead involved in running the tool, and as a software developer, you don’t want to spend time manually updating your Seccomp filter for every update of your application. To bridge that final gap and make it as easy as possible to use Seccomp in enterprise applications, we need to find a way to automate the generation of Seccomp-BPF filters. Fortunately, when we look at how modern software development happens, there is already a perfect place for this automation to happen: during Continuous Integration (CI).
CI workflows are already a well-established part of a mature software development lifecycle. For those that aren’t familiar with CI, it enables you to do things like automated unit testing and code security scanning every time you commit code to your git repository. There are lots of tools for CI out there, so it’s the perfect place to automate the generation of a Seccomp filter for your containerized application.
 Guest Expert
How to create a CI workflow that generates a Seccomp filter every time you update your code
In the first part of this blog, I introduced Seccomp-BPF, which is a Linux kernel feature that allows you to create filters that restrict which syscalls a process can make. This allows you to prevent a process from being able to do something that it was not intended to do if it requires a new syscall. Seccomp-BPF filters can also be applied to container runtimes and orchestration tools to limit what your containers can do while they’re running. That gives you an opportunity to add an additional layer of protection against the potential exploitation of your applications and services.
The biggest roadblock with learning about and popularizing the use of this awesome feature has been the lack of tools and processes that bridge a low-level kernel feature like Seccomp-BPF to modern software development practices. In my last article, I explored a tool created by Red Hat called oci-seccomp-bpf-hook. It helps simplify the creation of Seccomp filters by recording syscalls made by a container during runtime and pumping them into a filter that you can use with Seccomp. The OCI hook dramatically reduces the knowledge about syscalls that you’d need to create a Seccomp filter, but there’s still quite a bit of overhead involved in updating your Seccomp filter with the tool every time you update your code.
To solve that problem, I’m going to show you how to automate the creation of a Seccomp filter for your app every time your code gets updated. We’re going to create a Continuous Integration (CI) workflow via GitHub Actions that utilizes Red Hat’s oci-seccomp-bpf-hook. Let’s dig in!
The Example Application
To paint a picture of what this automation looks like in the context of modern software development, I created an example application. The application is a simple Python flask API service. You can find all the example and workflow code in my GitHub repo, and you can fork the project if you want to test it yourself.
The REST API has two endpoints. One is at /dummy and is just a dummy function that responds successfully if you send it “valid input :)”.
@app.post("/dummy")
def dummy():
    """ Dummy function for testing """
    if missingParams := missing(request, data=["input"]):
        return {"error": missingParams}, 400
    if request.json["input"] == "valid input :)":
        return {"success": "nice input"}, 200
    else:
        return {"error": "bad input"}, 400
The API’s second endpoint was made to be intentionally vulnerable for the purpose of this demonstration. The vulnerable API call is at /command and will run any command sent to it in a shell subprocess.
@app.post("/command")
def command():
    """ Execute the command and return the output """
    if missingParams := missing(request, data=["command"]):
        return {"error": missingParams}, 400
    command = request.json["command"]
    process = subprocess.Popen(command, shell=True, stdout=subprocess.PIPE, stderr=subprocess.PIPE)
    stdout, stderr = process.communicate()
    return {"stdout": stdout.decode("utf-8"), "stderr": stderr.decode("utf-8")}
A Dockerfile was also created for the application so it can be run in a container and used with oci-seccomp-bpf-hook. Now that we have a containerized application to generate a Seccomp filter for, let’s work on automating the creation of the filter.
Setting up the Actions Runner
The first thing we need to do is set up our self-hosted Actions Runner on a Fedora server. If you remember from the first blog post, oci-seccomp-bpf-hook was made to run with Podman, Red Hat’s container runtime. GitHub’s default automation runners are Ubuntu-based, and even though we could use them and install podman and the OCI hook from source, it’s a lot easier, in the long run, to use our own Fedora server with the tools pre-installed. This shouldn’t be a problem to set up in a professional software development environment.
If you want to quickly stand up a build server to test this tutorial, you can use a virtual machine, an old desktop/laptop, or even a Raspberry Pi to host your Fedora server. You just need to make sure it’s connected to the internet when your automation kicks off.
Once you have a Fedora server, you’ll need to create a secure account on it for your GitHub Actions to use when running. First, let’s become the root user to simplify the rest of the setup:
sudo su
Next, we’ll create an unprivileged account with a home directory:
useradd -m github
And create a secure password for the account:
passwd github
Now we need to make sure that the ‘github’ user has the proper permissions to run the programs it needs. To do that, we’ll use ‘visudo’ to edit the /etc/sudoers file:
visudo
Add the following line to the bottom of the sudoers file to allow the user ‘github’ to execute dnf and podman as root without needing a password:
github ALL=(ALL) NOPASSWD: /usr/bin/podman, /usr/bin/dnf
The reason we must not require a password is because GitHub actions can’t enter a password while automating our steps. Once we have the sudoers entry saved, we are done with our Fedora setup for now.
Next, it’s time to set up the Actions runner. For this part, you’ll need to make sure that your repository is set to Private rather than Public. For security reasons, GitHub doesn’t allow you to use self-hosted runners on public repositories unless you are an organization. To begin setting up our self-hosted runner, we’ll need to go to our GitHub repository and click “Settings.”

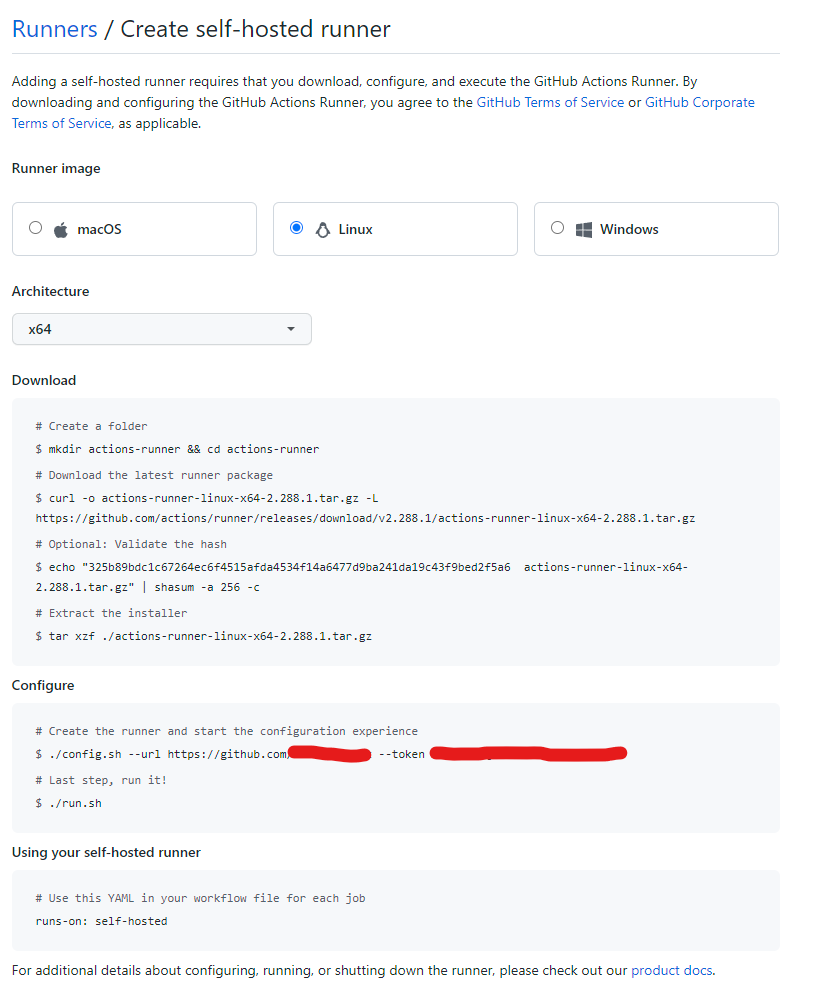
In the repository settings, go to Actions > Runners. From there, click the green “New self-hosted runner” button in the top right.

Select Linux as the operating system, and select the CPU architecture that your Fedora server is running on. If you are using a Raspberry Pi, you’ll need to do ARM64. Otherwise, you are probably using x64. After that, we need to follow GitHub’s instructions on our Fedora server as the ‘github’ user that we just set up. To switch accounts, you just need to run the following command:
su github
When configuring the GitHub runner, press Enter to accept both the default runner group and the default runner name. When it asks if you want to add additional labels, type ‘fedora’ and then hit Enter. Lastly, press Enter to accept the default work folder.
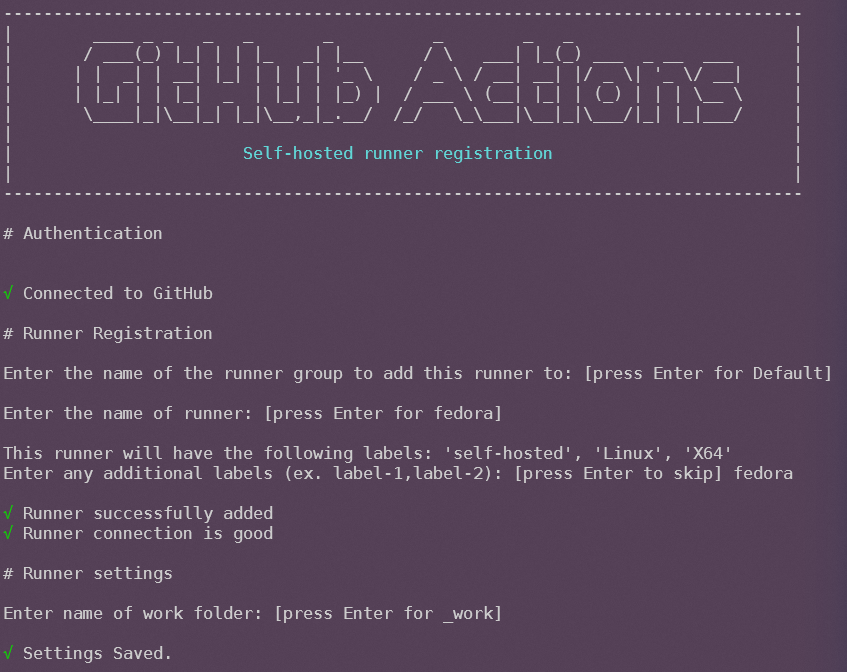
After configuring the runner, it should be registered with our GitHub repo. We need to make sure to finish the instructions from GitHub and launch the runner with the provided script. The ‘run.sh’ script will make the runner available for Actions to be deployed to it. Once the runner is all set up, we’re ready to set up our automation!
Creating the Seccomp Filter Generation Workflow
GitHub Actions are kept in a specific folder of your repository at {root}/.github/workflows. You need to define each workflow in the YAML file format. In our example repo, I created a file called “seccomp.yml” and put it in the Actions folder. This is how the file starts:
name: "Generate Seccomp Filter"

on:
  push:
    paths-ignore:
      - seccomp.json
At the top of the file, we name our workflow “Generate Seccomp Filter” and specify when our automation should kick-off. We are going to run the workflow every time we push code to the GitHub repo, except when the only change is the “seccomp.json” file. The exception prevents GitHub Actions from running the workflow again after generating the Seccomp filter.
Next, we start to define the actions that need to happen in our workflow:
jobs:
  generate-seccomp-filter:
    runs-on: fedora  # self-hosted
“Generate-seccomp-filter” is the name of the action we are about to create, and we specify that the action runs on our self-hosted Fedora server that we set up earlier. The last thing to do is to define the steps we want to take during our automation. First, we want to check out our code, make sure we have the tools we need installed and build the container image that holds our flask API:
steps:
  - name: Check out repository
    uses: actions/checkout@v2
  - name: Install tools
    run: sudo dnf install podman oci-seccomp-bpf-hook
  - name: Build Container
    run: sudo podman build --tag demo -f ./Dockerfile
Next, we need to run the container and record the syscalls it makes with the OCI hook… But wait, we’re missing something… How do we make sure that our application makes all the syscalls that it needs while we are recording? If we just launch our API server, that doesn’t necessarily record the syscalls that are made when an API endpoint is called. Fortunately, there’s a solution to this problem. We’ll run our unit and functional tests while recording syscalls with the OCI hook!
A mature software development lifecycle includes unit tests written for the application to ensure code quality. We can piggyback off that effort and use the automated tests to make sure we are hitting all the functionality of our application while we record syscalls. For our example app, I wrote unit tests using pytest and have a script that kicks them off. In our Action workflow, we can run the tests in our container, capture the syscalls in a Seccomp filter, and commit the filter back to our GitHub repository:
- name: Record syscalls
  run: "sudo podman run --annotation io.containers.trace-syscall=of:/tmp/seccomp.json demo /opt/demo/test.sh"

# Commits updated seccomp filter back to the same branch (commit || echo to not fail on no changes)
- name: Commit seccomp filter to repo
  run: |
    cp /tmp/seccomp.json .
    git config --global user.name "github-runner[bot]"
    git config --global user.email "github-    runner[bot]@users.noreply.github.com"
    git add .
    git commit -m "generated new seccomp filter" || echo
    git push origin ${GITHUB_REF##*/} -f
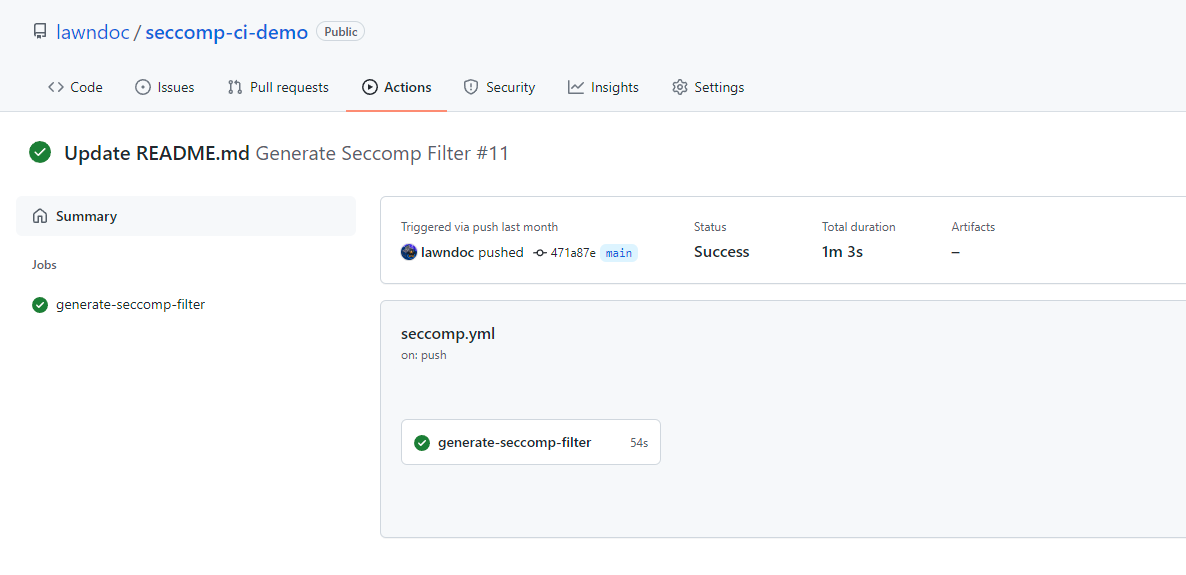
That’s the end of our seccomp.yml workflow file. Now every time we push new code to our GitHub repository, it will generate a Seccomp filter for our app! It required some setup to get to this point, but now that it’s done there’s no more effort required to keep an up-to-date Seccomp profile for our application. Below you can see a screenshot from my example repo of the workflow running successfully after I updated my repository’s README.
Conclusion
You now have everything you need to automatically create your own application-specific syscall whitelist filters. Running your applications with the generated Seccomp-BPF filters will dramatically reduce the risk of them being successfully exploited. The best part of this demonstration is that the GitHub Actions workflow that we created isn’t specific to my example app – it’s mostly generic and can be easily modified for any other project. You only need to make sure that your ‘podman build’ and ‘podman run’ steps reflect the way you build your container image and run your tests. Other than that, you just need to keep in mind one requirement.
The important thing to remember when generating Seccomp filters for your application is that you NEED to have a very high percentage of your code getting executed in your automated unit and functional tests. If your application has some functionality that isn’t being executed when you are generating the Seccomp filter, there’s a chance that you could be missing some syscalls in your filter. This means they will get blocked when your code tries to run with the Seccomp filter applied.
Luckily, there’s a tip-off that will indicate that your application isn’t working because of Seccomp. If Seccomp is preventing your app from making a needed syscall, the error that your application throws will always include a message about not having permission to do something. In that case, you just need to figure out which part of your code you missed in your automated testing. Then you add a test for the missed case, and your new Seccomp filter will be generated as soon as you push the new test to your repo. There are tools out there that help you monitor your test coverage, and I recommend you use them if you are generating Seccomp filters for your app.
That concludes the demonstration on how to automate the generation of Seccomp filters. Because there aren’t many resources out there for Seccomp yet, this is a new concept for most developers and security professionals. However, the security gained from this practice could be a game-changer for businesses trying to protect their mission-critical services. The technology already exists to make Seccomp a standard. I hope that my explanations and examples have made it easier to dive into this new way of securing your applications!
This article is a guest post. Views and opinions expressed in this publication are solely those of the author and do not reflect the official policy, position, or views of GitGuardian, The content is provided for informational purposes, GitGuardian assumes no responsibility for any errors, omissions, or outcomes resulting from the use of this information. Should you have any enquiry with regard to the content, please contact the author directly.