From entering passwords with getpass to using secret managers like AWS Secrets Manager, this guide covers best practices for protecting sensitive information in your notebooks.
With the rise of big data and machine learning, project Jupyter is becoming increasingly popular among data scientists and machine learning engineers. Jupyter Notebooks, together with IPython, provide an interactive workflow for developing, visualizing data, and writing texts and documentation, all in a single place and stored as a single document.
However, data science and machine learning projects often need to access third-party APIs, read data from a data store, or interact with cloud services. This means that, just like normal code, the code in Jupyter Notebooks also needs to use secrets and credentials.
These notebooks are nothing more than code, and, as you know, storing plaintext credentials in code is not acceptable. If you don't know why, I encourage you to have a look here to understand why it's urgent to deal with your hard-coded secrets, as well as this cheat sheet for managing and storing secrets in Git repositories.
Today, we will look at different ways of securely handling secrets in Jupyter notebooks. Whether you are using Jupyter Notebook, JupyterLab, or JupyterHub, these methods work across them all. Without further ado, let's get started.

Security Risks of Hardcoded Secrets in Jupyter Notebooks
Jupyter notebooks present unique security challenges when handling secrets due to their interactive nature and common sharing practices. Unlike traditional code repositories, notebooks often contain execution outputs, cell histories, and metadata that can inadvertently expose sensitive information even when the source code appears clean.
The most critical risk occurs when developers hardcode API keys, database passwords, or authentication tokens directly in notebook cells. These secrets become permanently embedded in the notebook's JSON structure, persisting even after cell outputs are cleared. When notebooks are shared via email, uploaded to platforms like GitHub, or stored in collaborative environments, these hardcoded credentials become accessible to unauthorized users.
Additionally, Jupyter's auto-save functionality can capture secrets in temporary files and checkpoint data, creating multiple exposure points across the file system. The interactive execution model means secrets can leak through print statements, error messages, or variable inspection tools that display sensitive values in plain text.
Organizations must recognize that Jupyter Notebook secrets require the same rigorous protection standards as production code. Implementing proper secrets management from the development phase prevents costly security incidents and ensures compliance with data protection regulations.
Entering Passwords on the Fly in Jupyter Notebooks: getpass
This is probably the most intuitive method for handling secrets in Jupyter notebooks: entering secret values interactively on the fly.
Luckily, we have a native solution for that: getpass. It's been part of the Python standard library for a long time, meaning that you don't have to install anything, and it's already there. The use case is simple: it prompts you for a password when you run the cell and doesn't log this password even when printed out, so it's safe even if someone else takes a glance at your screen:
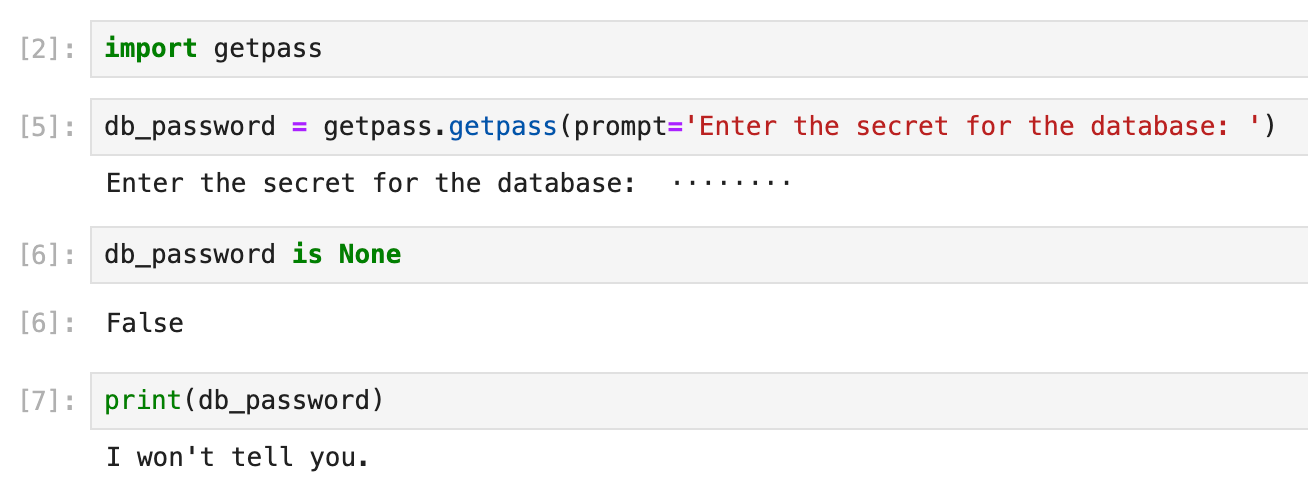
The advantage is you don't have any secret stored inside the notebook, so it's safe to push your code to any git repository. Even if the code repo is compromised, no critical information will be leaked. There are, however, a couple of downsides:
- you will always have to enter it manually every time you run your Jupyter notebook. As you probably know, it's not unusual to run your cells dozens of times when you are developing and debugging your code. So, this can be a major burden.
- you still have to store the actual value of the password somewhere. In a local file? But how do you keep the file safe and secure? What if it's lost? Where to back it up securely? And how do you share it?
So, although getpass is a great choice for a quick start when you're just starting a simple project, but it's hardly the most convenient. Let's move on to the next choice.
Reading Secrets from a File Uploaded to JupyterHub
One of the downsides of the previous approach is that you'd have to enter the secret values manually every time you run your notebook. To avoid this, it's natural to think of a solution where secrets are stored in a file (typically, a .env environment file) and loaded from the code.
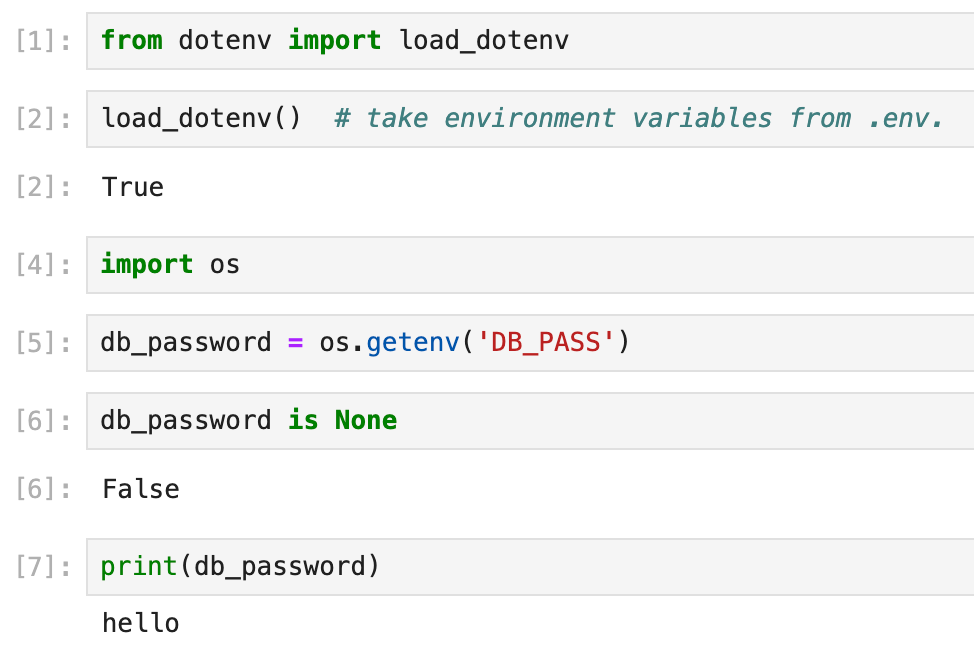
The Python module python-dotenv does just that: it reads key-value pairs from a .env file and sets them as environment variables. This helps in the development of applications following the 12-factor principles.
If you are using Jupyter Notebook or JupyterLab locally, you can create a .env file locally:
# .env example
DB_PASS=hello
Then it's simply a matter of calling load_dotenv() to read the .env values and making them accessible to your notebook code, just like accessing any environment variables with os.getenv(). Example:
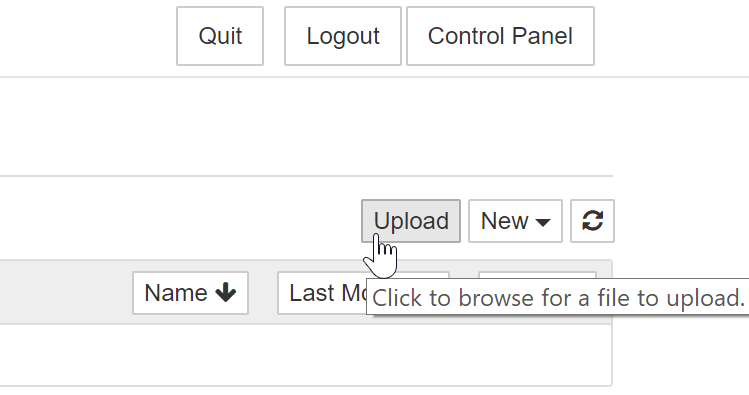
Better still, if you are using JupyterHub (a SaaS version of JupyterLab for groups of users)—or any cloud-based Jupyter service— you can upload the .env file from your local computer and host them online, making it shared amongst your teammates.
To do so, first, navigate to the Jupyter Notebook interface home page. Then you can add files by clicking the "Upload" button to open the file chooser modal:
Compared to getpass, this approach eliminates the toil of entering a password manually.
However, it's still far from perfect. Using a file as a single source of trust comes with its own caveats: What if you need to update a secret in the file? What if a value is updated on a local machine but not on the online one? And how can you share the file securely? Manually creating new backups sounds like a lot of trouble.
Theoretically, we have known the solution to these problems for a long time: use a version control system like Git. But we can't store hard-coded plaintext secrets in a Git repo. Or can we? What if we encrypt the .env file? Let's move on to the next method.
Encrypt Jupyter Notebook Secrets Files in Git
We can't store a file full of secrets in a Git repo, except if the file is encrypted. Yet encrypting a file brings its own set of challenges:
- Where to store the key to decrypt the file?
- If there is a new team member, how to allow his key to decrypt an existing file?
- If I need to update some content in the encrypted file, I need to decrypt, change, and then encrypt it. That sounds like a lot of trouble.
Luckily, there is a tool that handles this overhead for us: SOPS. Simply put, SOPS (short for Secrets OPerationS) is an open-source text file editor that encrypts/decrypts files automatically and supports various encryption methods, like GPG keys, AWS KMS, etc.
After setting up proper encryption methods, you can open an encrypted file, edit it, and then save it encrypted again with no overhead at all. It supplements the previous dotenv method because now you can store the .env file safely and securely in a Git repository with minimum operational overhead when managing the file itself.
For a detailed tutorial on how to use sops, read this tutorial here.
SOPS is a great tool, but it's not the ultimate solution. You still have to decrypt the file before loading it. Also, as your project grows larger, managing encryption keys for all team members can become an added overhead.
That said, let's move on to secret managers.
The Ultimate Solution: Access Secret Managers from Jupyter Notebooks
As we can see from the previous section, storing secrets in an encrypted file is not ideal. Managing secrets is not a trivial task: We need to store them securely and use them securely; there is encryption, there is encryption at rest, encryption in transit, and encryption end-to-end; we need to do backup-restore properly... I could go on, but you get the gist.
Secret managers come to the rescue: they act as a single source of truth to store secrets securely, and we can store, manage, and access secrets from our code. Secret managers also make sharing secrets among team members easy, because we can configure different permissions for different secrets and members.
The bottom line is that thanks to secret managers, we completely remove ourselves from the overhead of managing secrets themselves, we simply use them.
Using Secret Managers in Jupyter Notebooks
Most secret managers support different ways of creating secrets: you can do it in the web UI, in the CLI console, etc, and accessing the secrets takes only a couple of lines of code.
Take AWS Secrets Manager as an example, with a couple of lines of code, you can easily read from it:
import botocore
import botocore.session
from aws_secretsmanager_caching import SecretCache, SecretCacheConfig


client = botocore.session.get_session().create_client('secretsmanager')
cache_config = SecretCacheConfig()
cache = SecretCache(config=cache_config, client = client)

secret = cache.get_secret_string('MyTestSecret1')
print(secret)
In this way, your Jupyter notebooks contain no secret, no encryption is needed, and they can be easily shared without worrying about leaking sensitive information.
If you are running Jupyter Notebook or JupyterLab locally, you simply set up your access to AWS and that's it. Accessing other secret managers from your local machine is more or less the same.
Using Cloud-Based Jupyter Service to Access Secret Managers
If you are using JupyterHub or some cloud-based Jupyter service like AWS SageMaker, there might be some extra configuration, but it's a one-time-only job.
For example, with AWS SageMaker, you need to know the IAM role used by your SageMaker instance to set up the API key for it (which can be found in the overview of the SageMaker notebook instance of the AWS Management Console), then grant access to the AWS Secrets Manager to the SageMaker notebook role. Granted, AWS is not the easiest platform. So here are a few resources to help you navigate their services if you are new to them:
- To know more about AWS IAM and security best practices, read this blog
- To know more about how to manage IAM roles with Infrastructure as Code (IaC), read this tutorial and the second part of it.
- To know more about handling secrets in AWS Secrets Manager, see this blog post here.
If you are using Secret Manager from Google Cloud (GCP), you need to install the Secret Manager client library for Python by running pip3 install google-cloud-secret-manager, then you can access the secrets with a simple piece of code. See an example here. To learn more about how to handle secrets with Google Cloud Secret Manager, read this blog here.
For Microsoft Azure, it's more or less the same: set up permissions, install a client library, and then some simple code. For a detailed tutorial on handling secrets with Azure Key Vault, see this blog here.
Handling Secrets in Kaggle Notebooks
Since many machine learners and data scientists compete on Kaggle, it's worth talking about how to handle secrets in Kaggle.
Kaggle has a feature that allows you to use secrets more securely: In the "Add-ons" menu, choose "Secrets", then you can add key-value pairs, and Kaggle will store these secrets for you, acting like a secret manager:

When you need to read it from your notebook, it's only a couple of lines:
from kaggle_secrets import UserSecretsClient

secret_label = “your-secret-label”
secret_value = UserSecretsClient().get_secret(secret_label)
Jupyter Notebook Security in CI/CD Pipelines
Data science workflows increasingly integrate Jupyter notebooks into automated CI/CD pipelines for model training, data processing, and report generation. This integration introduces additional security considerations for managing Jupyter Notebook secrets in production environments.
When notebooks execute in automated pipelines, traditional interactive secret entry methods like getpass become impractical. Instead, organizations must implement programmatic secret retrieval that maintains security while enabling automation. This typically involves integrating with enterprise secret management platforms or cloud-native solutions like GitGuardian, AWS Secrets Manager, Azure Key Vault, or HashiCorp Vault.
Pipeline security requires careful consideration of secret scope and lifecycle management. Secrets should be injected at runtime with minimal privileges and automatically rotated according to organizational policies. Container-based execution environments must be configured to prevent secret persistence in image layers or temporary storage.
Implementing proper secret scanning tools in CI/CD workflows helps detect accidentally committed credentials before they reach production systems. GitGuardian's secrets detection capabilities can identify over 350 types of secrets in notebook files, providing automated protection against credential leaks in collaborative development environments.
Advanced Secret Management Patterns for Data Science Teams
Enterprise data science teams require sophisticated approaches to handle jupyter notebook secrets across diverse computing environments, from local development to cloud-based analytics platforms. Advanced patterns go beyond basic environment variables to provide comprehensive security and operational efficiency.
Secret injection frameworks enable dynamic credential provisioning based on execution context, user identity, and resource requirements. These systems automatically provide appropriate database connections, API credentials, and service account tokens without exposing underlying secrets to notebook code. Integration with identity providers ensures that access controls align with organizational policies and compliance requirements.
Notebook templating systems can standardize secret handling patterns across teams while maintaining flexibility for different use cases. These templates incorporate secure credential retrieval methods, logging configurations, and error handling that prevents accidental secret exposure in outputs or error messages.
For organizations processing sensitive data, implementing secret rotation and audit trails becomes critical. Advanced secret managers provide detailed logging of credential access, automatic rotation schedules, and integration with security information and event management (SIEM) systems. This comprehensive approach ensures that jupyter notebook secrets remain protected throughout their lifecycle while enabling productive data science workflows.
Summary
OK, so far, we've covered a couple of different methods on how to handle secrets in Jupyter notebooks, from the simple, enter-on-the-fly method getpass, all the way to the full-blown enterprise-grade secret managers.
To sum up, there are a few best practices to keep in mind when handling secrets safely in Jupyter notebooks:
- Instead of hard-coded secrets in the code, use the
getpasslibrary to securely prompt you on the fly, or use environment variables to access them. - Keep your secrets in a separate configuration file that is not visible to Git; if you have to store it in Git, store it encrypted, and use
sopsor equivalents to minimize the overhead. - To securely use and share secrets in a big project, especially when sharing secrets across teams is necessary, secret managers are worth considering.
FAQs
What are the main security risks of hardcoding secrets in Jupyter notebooks?
Hardcoding secrets such as API keys or passwords in Jupyter notebooks exposes them in the notebook's JSON structure, outputs, and metadata. These values often persist even after clearing outputs and may be unintentionally shared through version control, email, screenshots, or collaborative notebook platforms. This significantly increases the risk of credential leaks and unauthorized access.
How can I securely manage Jupyter notebook secrets in automated CI/CD pipelines?
In CI/CD pipelines—where interactive input is not possible—integrate with enterprise secrets managers such as AWS Secrets Manager, Azure Key Vault, or HashiCorp Vault. Inject secrets programmatically at runtime, enforce least privilege, rotate them regularly, and ensure they never appear in logs or build artifacts.
What are best practices for handling Jupyter notebook secrets in collaborative environments?
Avoid storing secrets in notebook cells or unencrypted files. Use environment variables, encrypted configuration files (e.g., SOPS), or enterprise secrets managers. Implement strong access controls, audit trails, and automated rotation policies to ensure secrets remain protected when notebooks are shared across teams or platforms.
How do secret managers improve security for Jupyter notebook workflows?
Secret managers centralize credential storage, enforce fine-grained access controls, and provide secure APIs to retrieve secrets at runtime. This removes the need for developers to manually manage sensitive values, reduces operational overhead, and prevents secrets from being exposed in notebook code, outputs, or version control systems.
Can I use encrypted .env files with Jupyter notebooks, and what are the operational considerations?
Yes. Encrypted .env files managed with tools like Mozilla SOPS allow secure storage of secrets in version control. However, encryption keys must be tightly controlled, and team-wide key distribution must be managed securely. As teams grow, coordinating access may introduce operational complexity and compliance overhead.
What advanced patterns exist for managing Jupyter notebook secrets in enterprise data science teams?
Advanced practices include dynamic secret injection, integration with identity providers for context-aware access, notebook templates enforcing secure retrieval patterns, and automated audit trails for compliance. These approaches standardize secret handling across teams and reduce the likelihood of accidental data exposure in large, distributed data science organizations.
This article is a guest post. Views and opinions expressed in this publication are solely those of the author and do not reflect the official policy, position, or views of GitGuardian, The content is provided for informational purposes, GitGuardian assumes no responsibility for any errors, omissions, or outcomes resulting from the use of this information. Should you have any enquiry with regard to the content, please contact the author directly.