

In my previous article on AWS IAM Security Best Practices, we covered a bunch of theoretical best practices on AWS IAM. In this tutorial, we will cover the basics of managing AWS IAM using Terraform.
Side note: this blog post assumes that you already understand what Terraform is and know the basics of it. If not, start with a Terraform official tutorial.
We'll see:
- Why and how to delete the Root user access key.
- How to create Admin Group/User
- How to enforce MFA with Customer-Managed Policy & Policy Condition
- How to customize password policy
- how to centralize IAM to reduce operational overhead for multiple AWS accounts
- how to create an EC2 instance profile
- how to use the HashiCorp Vault AWS engine for Just-In-Time access
Let'go!
1. Delete Access Keys of the Root User
OK, in fact, we'll start by breaking the rules. How? By using the console. Why? Because we need to use the AWS Management Console to delete access keys for the root user:
- Use your AWS account email address and password to sign in to the AWS Management Console as the AWS account root user.
- Choose your account name in the navigation bar, and then choose "Security credentials".
- Under the "Access keys for CLI, SDK, & API access" section, find the access key, and then, under the "Actions" column, choose Delete.

The access key for your AWS account root user gives full access to all your resources for all AWS services. You cannot reduce the permissions associated with your AWS account root user access key.
For most day-to-day operations, you don't need to use the root user: admin users are more than enough.
That's why you should lock it away by deleting the Access key.
We should try to avoid the usage of root users unless we absolutely have to. One such corner case would be if you had only one administrator user and that user accidentally removed admin permissions from themselves. In that case, you'd have to log in with your root user and restore their permissions.
Now, let's see how to create admin users using Terraform.
2. Create Admin Group/User
Prepare a file admin_user_group.tf with the following content (you can get all the code of this tutorial from this repo here):
resource "aws_iam_group" "administrators" {
  name = "Administrators"
  path = "/"
}

data "aws_iam_policy" "administrator_access" {
  name = "AdministratorAccess"
}

resource "aws_iam_group_policy_attachment" "administrators" {
  group      = aws_iam_group.administrators.name
  policy_arn = data.aws_iam_policy.administrator_access.arn
}

resource "aws_iam_user" "administrator" {
  name = "Administrator"
}

resource "aws_iam_user_group_membership" "devstream" {
  user   = aws_iam_user.administrator.name
  groups = [aws_iam_group.administrators.name]
}

resource "aws_iam_user_login_profile" "administrator" {
  user                    = aws_iam_user.administrator.name
  password_reset_required = true
}

output "password" {
  value     = aws_iam_user_login_profile.administrator.password
  sensitive = true
}
In the code snippet above, we:
- create a group intended for administrators
- read the ARN of the "AdministratorAccess," which is an AWS-managed policy
- attach the "AdministratorAccess" policy to the group
- create an admin user
- add that user to the admin group
- enable console login for that admin user
- add the initial password as a sensitive output
If we apply it:
terraform init
terraform apply
terraform output password
We will create all those resources and print out the initial password.
Do I Need to Use Groups?
Short answer: yes.
Well, technically, if you never need more than one admin user across your AWS account, you don't have to create an admin group and then put a single user into that group. I mean, you can do it, but maybe it doesn't make much sense to you in the first place.
In the real world, though, you probably would have a group of admins instead of only one, so, the easier way to manage access for all admins is to create groups. Even if you have only one admin user at the moment, you need to bear in mind that your company, team, and project are subject to growth (maybe quicker than you'd imagine,) and although using a group to manage merely one user at the moment can seem redundant, it's a small price to pay to be a bit more future-proof.
The same principle applies to managing non-admin users. With the same method, we can create job function/project/team/etc., dedicated groups that will share the same sets of permissions, which is more secure and easy than user-level permission management.
Sensitive Output
In the example above, we have an output marked as sensitive = true:
output "password" {
  value     = aws_iam_user_login_profile.administrator.password
  sensitive = true
}
In Terraform, an output can be marked as containing sensitive material using the optional sensitive argument. Terraform will hide values marked as sensitive in the messages from terraform plan and terraform apply.
In the above example, our admin user has an output which is their password. By declaring it as sensitive, we won't see the value when we execute terraform output. We'd have to specifically ask Terraform to output that variable to see the content (or use the -json or -raw command-line flag.)
Here are two best practices for managing sensitive data with Terraform:
- If you manage any sensitive data with Terraform (like database passwords, user passwords, or private keys), treat the state itself as sensitive data because they are stored in the state. For resources such as databases, this may contain initial passwords.
- Store the state remotely to avoid storing it as plain-text JSON files. If we use a remote state, Terraform does not persist state to the local disk. We can even use some backends that can be configured to encrypt the state data at rest. Read this blog to know more about encryption at rest and encryption in transit.
Advanced Policy Validation and Testing with aws_iam_policy_document
When managing AWS IAM policies with Terraform, implementing proper validation and testing workflows is crucial for maintaining security posture. The aws_iam_policy_document data source provides built-in validation capabilities that can prevent common policy misconfigurations before deployment.
data "aws_iam_policy_document" "validated_policy" {
  statement {
    sid    = "ValidateS3Access"
    effect = "Allow"
    actions = [
      "s3:GetObject",
      "s3:PutObject"
    ]
    resources = [
      "${aws_s3_bucket.example.arn}/*"
    ]

    condition {
      test     = "StringEquals"
      variable = "s3:x-amz-server-side-encryption"
      values   = ["AES256"]
    }
  }
}
This approach enables policy validation during the Terraform planning phase, catching syntax errors and logical inconsistencies before they reach production. Additionally, you can implement automated testing using tools like terraform validate and custom policy linting to ensure adherence to the principle of least privilege and organizational security standards.
3. Enforcing MFA: Customer-Managed Policy & Policy Condition Use Case
The way to enforce MFA in AWS isn't as straightforward as it can be, but it can be achieved with a single policy:
enforce_mfa.tf:
data "aws_iam_policy_document" "enforce_mfa" {
  statement {
    sid    = "DenyAllExceptListedIfNoMFA"
    effect = "Deny"
    not_actions = [
      "iam:CreateVirtualMFADevice",
      "iam:EnableMFADevice",
      "iam:GetUser",
      "iam:ListMFADevices",
      "iam:ListVirtualMFADevices",
      "iam:ResyncMFADevice",
      "sts:GetSessionToken"
    ]
    resources = ["*"]
    condition {
      test     = "BoolIfExists"
      variable = "aws:MultiFactorAuthPresent"
      values   = ["false", ]
    }
  }
}

resource "aws_iam_policy" "enforce_mfa" {
  name        = "enforce-to-use-mfa"
  path        = "/"
  description = "Policy to allow MFA management"
  policy      = data.aws_iam_policy_document.enforce_mfa.json
}
There are a couple of important things to notice here.
Customer-Managed Policy
Contrary to the AdministratorAccess policy we used in the previous section (which is an AWS-managed policy), here we have defined a "customer-managed policy".
Note: we should try to use customer-managed policies over inline policies For most cases, you do not need the inline policy at all. If you are still interested, see an example of an inline policy here.
Multiple Ways to Create a Policy
There are multiple ways to create a policy, and the example above is only one of them: in this example, we created it using Terraform data.
We could also:
- create a policy using JSON strings
- convert a Terraform expression result to valid JSON syntax (see the example here)
The benefit of using "aws_iam_policy_document" data is that the code looks nice and clean because they are Terraform/HashiCorp's HCL syntax. However, it isn't always as straightforward as it seems, and debugging it would be especially painful if you don't use it regularly.
Sometimes, it's easier to write a JSON string and use that to create a policy. However, JSON strings in a Terraform source code file can look a bit weird and not clean (after all, they are multiline strings,) especially when they are of great length.
There isn't a one-size-fits-all choice here; you'd have to decide on your own which is best for your use case.
There is, however, an interesting advantage of using JSON strings: you can validate JSON policy in the AWS IAM console. See here for more information.
Policy Condition
In this example above, we used a "policy condition," which only makes the policy effective when there isn't a multi-factor authentication.
This policy loosely translates to:
"deny any operation that isn't MFA device-related if you don't have multi-factor authentication."
We can use aws_iam_group_policy_attachment to attach it to a group, then all the users in that group are affected. For example:
resource "aws_iam_group_policy_attachment" "enforce_mfa" {
  group      = aws_iam_group.administrators.name
  policy_arn = aws_iam_policy.enforce_mfa.arn
}
This makes sure the administrator group must enable MFA.
Policy Versioning and Rollback Strategies for terraform aws_iam_policy
Effective IAM policy management requires robust versioning and rollback capabilities, especially in production environments where policy changes can impact service availability. Terraform's state management combined with AWS IAM policy versioning provides a comprehensive solution for policy lifecycle management.
resource "aws_iam_policy" "versioned_policy" {
  name        = "application-access-policy-v${var.policy_version}"
  description = "Versioned policy for application access - Version ${var.policy_version}"

  policy = data.aws_iam_policy_document.application_access.json

  lifecycle {
    create_before_destroy = true
  }

  tags = {
    Version     = var.policy_version
    Environment = var.environment
    LastUpdated = timestamp()
  }
}
Implement policy versioning by maintaining separate policy resources with version identifiers, enabling quick rollbacks through Terraform state manipulation. This strategy ensures that authentication and authorization changes can be rapidly reverted if issues arise, maintaining system availability while preserving audit trails for compliance requirements.
Dynamic Policy Generation with terraform aws_iam_policy_document Conditions
Complex enterprise environments often require dynamic policy generation based on runtime conditions and organizational hierarchies. The aws_iam_policy_document data source supports sophisticated conditional logic that enables context-aware access control patterns.
data "aws_iam_policy_document" "dynamic_access" {
  statement {
    sid    = "ConditionalResourceAccess"
    effect = "Allow"
    actions = ["s3:*"]

    resources = [
      for env in var.environments :
      "arn:aws:s3:::${var.project}-${env}-*"
    ]

    condition {
      test     = "StringEquals"
      variable = "aws:RequestedRegion"
      values   = var.allowed_regions
    }

    condition {
      test     = "DateGreaterThan"
      variable = "aws:CurrentTime"
      values   = ["2024-01-01T00:00:00Z"]
    }
  }
}
This approach enables fine-grained authorization controls that adapt to organizational changes, time-based access restrictions, and geographic compliance requirements. By leveraging Terraform's expression capabilities with IAM policy conditions, you can create self-maintaining access control systems that reduce operational overhead while enhancing security posture.
4. Strong Password Policy & Password Rotation
The AWS default password policy enforces the following:
- Minimum password length of 8 characters and a maximum length of 128 characters.
- Minimum of three of the following mix of character types: uppercase, lowercase, numbers, and ! @ # $ % ^ & * ( ) _ + - = [ ] { } | ' symbols.
- Not be identical to your AWS account name or email address.
We can, however, use a customized and strongerpassword_policy.tf:
resource "aws_iam_account_password_policy" "strict" {  minimum_password_length        = 10
require_uppercase_characters   = true
require_lowercase_characters   = true
require_numbers                = true
require_symbols                = true
allow_users_to_change_password = true
}```
By using aws_iam_account_password_policy, we can also specify how often the users should change their password, and whether they could reuse their old passwords or not:
resource "aws_iam_account_password_policy" "strict" {
# omitted
max_password_age               = 90
password_reuse_prevention      = 3
}
5. Centralized IAM: Cross-Account Access
5.1 Why Do I Need This
In a medium to large-sized team or company, using a multi-account strategy is common to ensure maximum resource separation and precise permission management.
For example, it's common to see the following 3 accounts in an organization:
- dev
- test
- prod
Creating a user in each account for each team member can be tedious. Yes, we can use Terraform to automate the process, but there are still two major drawbacks:
- you'd have to create three different sets of Terraform scripts, one for each environment;
- each team member would have to use three different sets of username/passwords to log in to each environment.
Solution: create a "central" account, and only create users there; for other accounts like dev/test/prod, we grant access to the users inside the "central" account.
The idea is to use a role to delegate access to resources in different AWS accounts. By setting up centralized cross-account access in this way, you don't have to create individual IAM users in each account. In addition, users don't have to sign out of one account and sign in to another to access resources in different AWS accounts.
5.2 Prerequisites
We will use two AWS accounts in this tutorial:
- Central account: this is where we create a user. This user will try to access resources in the dev account. Remember to create a test user here first before proceeding to the next section.
- Dev account: this is where we run the Terraform scripts to create roles, to allow central account users to access the dev account resources. Note that the Terraform stuff in the following section (1.3) is executed in this account.
5.3 Setup Cross-Account Access with Terraform
Prepare the following files:
main.tfoutput.tfvariables.tf
You can get all the code of this tutorial from this repo here.
Content of main.tf:
data "aws_iam_policy_document" "assume_role" {
  statement {
    actions = [
      "sts:AssumeRole",
    ]
    principals {
      type        = "AWS"
      identifiers = [var.account_id]
    }
    effect = "Allow"
  }
}

resource "aws_iam_role" "test_role" {
  name               = "test_role"
  assume_role_policy = data.aws_iam_policy_document.assume_role.json
}

resource "aws_iam_role_policy" "test_policy" {
  name = "test_policy"
  role = aws_iam_role.test_role.id

  policy = jsonencode({
    "Version" : "2012-10-17",
    "Statement" : [
      {
        "Effect" : "Allow",
        "Action" : "s3:ListAllMyBuckets",
        "Resource" : "*"
      }
    ]
  })
}
The code snippet above means:
- We created a test role, with permission to list S3 buckets in the AWS dev account.
- We used Terraform
dataaws_iam_policy_documentto allow users from the AWS central account to assume the test role so that users from the central account have access to the dev account.
Content of variables.tf:
variable "account_id" {
  type        = string
  description = "allow this account to assume roles"
}
Content of output.tf:
output "role_arn" {
  value = aws_iam_role.test_role.arn
}
Then create a terraform.tfvars:
account_id = YOUR_CENTRAL_ACCOUNT_ID_HERE
Put your central account ID in the terraform.tfvars file before continuing.
Then, with your dev account AWS access keys, execute:
terraform apply
And in the output, we will get an AWS role ARN like the following:
arn:aws:iam::858104165444:role/test_role
5.4 Testing the Access
Let's test the cross-account access with AWS CLI. Note that assume role can also work in the AWS Console.
First, with the central account AWS access key set up, we can run:
aws sts assume-role --role-arn "arn:aws:iam::858104165444:role/test_role" --role-session-name "tiexin-test-access"
The role ARN is the Terraform output from the previous section.
You will see output like the following:
{
    "Credentials": {
        "SecretAccessKey": "wJalrXUtnFEMI/K7MDENG/bPxRfiCYEXAMPLEKEY",
        "SessionToken": "AQoDYXdzEGcaEXAMPLE2gsYULo+Im5ZEXAMPLEeYjs1M2FUIgIJx9tQqNMBEXAMPLE
CvSRyh0FW7jEXAMPLEW+vE/7s1HRpXviG7b+qYf4nD00EXAMPLEmj4wxS04L/uZEXAMPLECihzFB5lTYLto9dyBgSDy
EXAMPLE9/g7QRUhZp4bqbEXAMPLENwGPyOj59pFA4lNKCIkVgkREXAMPLEjlzxQ7y52gekeVEXAMPLEDiB9ST3Uuysg
sKdEXAMPLE1TVastU1A0SKFEXAMPLEiywCC/Cs8EXAMPLEpZgOs+6hz4AP4KEXAMPLERbASP+4eZScEXAMPLEsnf87e
NhyDHq6ikBQ==",
        "Expiration": "2014-12-11T23:08:07Z",
        "AccessKeyId": "AKIAIOSFODNN7EXAMPLE"
    }
}
The AccessKeyId, SecretAccessKey, and SessionToken are what we need to proceed with. Run:
export AWS_ACCESS_KEY_ID="PASTE_THE_VALUE_FROM_THE_ABOVE_OUTPUT_HERE"
export AWS_SECRET_ACCESS_KEY="PASTE_THE_VALUE_FROM_THE_ABOVE_OUTPUT_HERE"
export AWS_SESSION_TOKEN="PASTE_THE_VALUE_FROM_THE_ABOVE_OUTPUT_HERE"
(remember to clean your bash history after the session!)
At this point, any following commands will run under the permissions of the role identified by those credentials. We can run aws sts get-caller-identity to check that we are already assuming a role under the dev account and not our original user in the central account.
If we execute:
aws s3 ls
We can list all the buckets in the dev account.
5.5 AWSume
The previous testing process is a bit tedious because we need to export a lot of sensitive stuff, which is not recommended.
Here, I introduce a cool CLI tool for you: AWSume. AWSume is a convenient way to manage session tokens and assume role credentials.
After we get it installed and configured, we can simply run one command:
awsume --role-arn arn:aws:iam::858104165444:role/test_role
And this does exactly what all those commands in the previous section did.
6. AWS Instance Profile
If you are using AWS EC2 instances, chances are you have deployed some apps on those instances, and those apps might need access to other AWS services.
For example, you wrote a small application that writes some data to an AWS S3 bucket. You deploy your app in an EC2 instance, and you must configure it correctly so that your app has the right permission to write to AWS S3.
6.1 Why Not Using Access Keys on EC2 Instances?
It is not absolutely not recommended to use an IAM user for machine-to-machine connection, for two reasons:
- User access keys are long-lived static credentials, meaning they don't expire. If a key is compromised, it can be used for as long as the key is not revoked. This has big security implications since a malicious actor could be acting for a very long time undetected.
- Since they don't expire, access keys are permanent security liability. Anyone who accesses the instance might get the key and use it from anywhere without notice. In other words, the risk of a leak is growing over time.
6.2 What Are Instance Profiles?
Amazon EC2 uses an instance profile as a container for an IAM role. When you create an IAM role using the IAM console, the console creates an instance profile automatically and gives it the same name as the role to which it corresponds. If you use the Amazon EC2 console to launch an instance with an IAM role or to attach an IAM role to an instance, you choose the role based on a list of instance profile names. In this way, apps that run on the EC2 instance can use the role's credentials when they access AWS resources.
TL;DR: it's safer to use IAM roles to manage permissions, and attach them to instances. Instance profiles, and roles in general, provide temporary (or dynamic) credentials on request. If those credentials leak, the damage is contained to their lifespan.
6.3 Launching an EC2 Instance with Instance Profile
Create a Terraform file with the following content:
resource "aws_iam_role" "role" {
  name = "test_role"
  path = "/"

  assume_role_policy = <<EOF
{
    "Version": "2012-10-17",
    "Statement": [
        {
            "Action": "sts:AssumeRole",
            "Principal": {
               "Service": "ec2.amazonaws.com"
            },
            "Effect": "Allow",
            "Sid": ""
        }
    ]
}
EOF
}

resource "aws_iam_instance_profile" "test_profile" {
  name = "test_profile"
  role = aws_iam_role.role.name
}

data "aws_ami" "ubuntu" {
  most_recent = true

  filter {
    name   = "name"
    values = ["ubuntu/images/hvm-ssd/ubuntu-focal-20.04-amd64-server-*"]
  }

  filter {
    name   = "virtualization-type"
    values = ["hvm"]
  }

  owners = ["099720109477"] # Canonical
}

resource "aws_instance" "web" {
  ami                  = data.aws_ami.ubuntu.id
  instance_type        = "t3.micro"
  iam_instance_profile = aws_iam_instance_profile.test_profile.id

  tags = {
    Name = "HelloWorld"
  }
}
And run:
terraform apply
The code snippet above does the following:
- Create an IAM role (you can also attach policies to the role so that it has the correct permissions you want it to have) and delegate permissions to the EC2 service.
- Create an instance profile, which serves as a container of the role.
- Launching an EC2 instance with the instance profile, so that the EC2 instance has the permissions attached to the IAM role.
In this case, if you attach an S3 access policy to the role, the EC2 with this instance profile will get AWS S3 access without having to export access keys and secrets. Voilà!
7. Just-In-Time Access with HashiCorp Vault
Even if we already have Terraform, chances are, we still would have to create some temporary users for just-in-time accesses.
For example, one data engineer needs temporary access to an S3 bucket to verify some data. Maybe he only needs this permission for a one-time job, then he would not use AWS for a long time, so it doesn't make much sense to create a permanent account for him so that he has indefinite access.
For another, maybe your developer needs to get access to a production EC2 instance for debugging, which might also be a one-time job. If you are using Terraform to manage permissions, you probably already use groups for permissions, but it doesn't make sense to grant the whole group temporary prod access.
You get the idea: while you can give someone permanent access, most of the time, you don't have to, and you shouldn't, according to our zero-trust and least privilege access principles.
Even if you used a specific set of Terraform rules to create temporary roles for these temporary accesses, you'd still have to apply/destroy them manually, which is not only operational overhead, but also increases potential risks: what if you forgot to destroy permissions, and indefinite access is maintained?
In this section, we will use Vault to achieve true just-in-time access management for AWS IAM.
7.1 Vault Introduction
HashiCorp Vault can secure, store and tightly control access to tokens, passwords, certificates, and encryption keys for protecting secrets and other sensitive data using a UI, CLI, or HTTP API.
It has different types of engines to manage different types of secrets. For AWS, it has the AWS secrets engine, which generates AWS access credentials dynamically based on IAM policies. For more details on Vault, see this blog.
7.2 Installation
In this part, we will install Vault in a local macOS environment.
For other OS, check out the official doc here. For K8s installation, check out the official doc here. For production-ready installation, check out the doc here.
Run:
brew tap hashicorp/tap
brew install hashicorp/tap/vault
Then start the server by running:
vault server -dev
7.3 AWS Engine Configuration
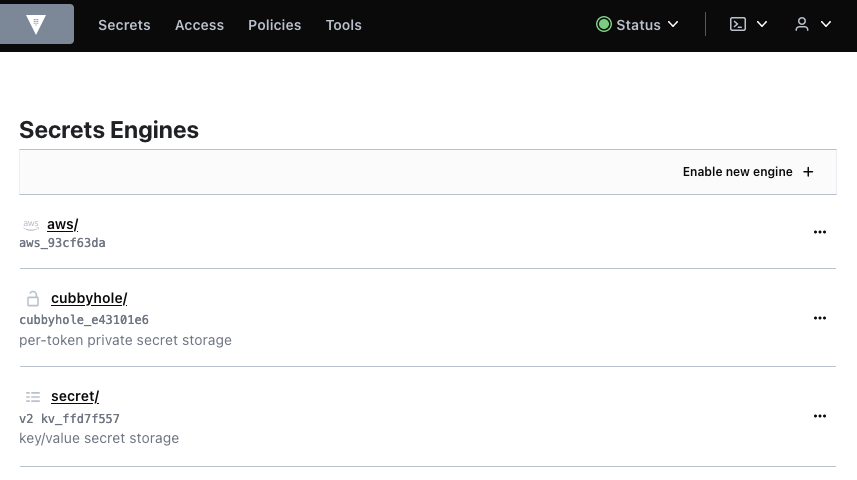
If we visit http://127.0.0.1:8200 and use the token to sign in, we are already in Vault!
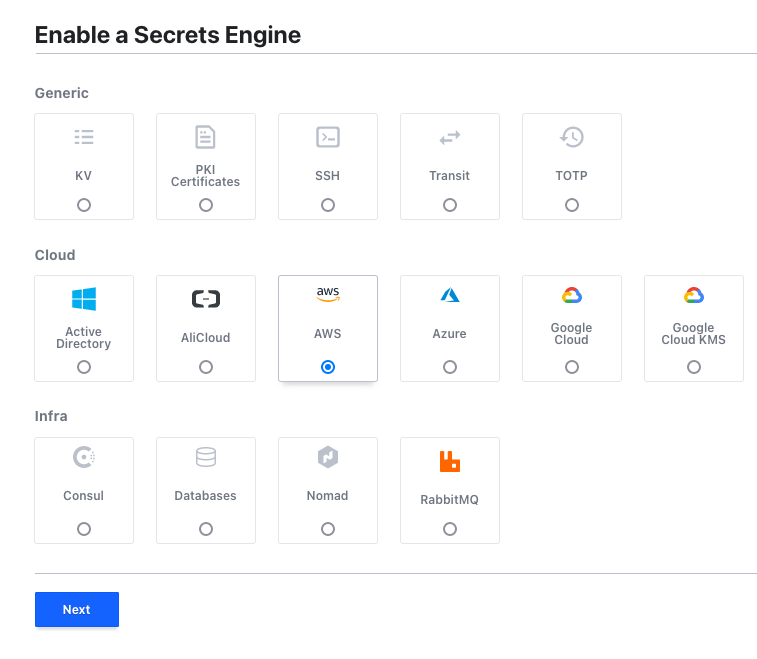
Under the "Secrets Engines" tab, click the "enable new engine" button and choose AWS. Click next, then enable the engine:
Then we go to the configuration tab of the AWS engine, and click "configure":
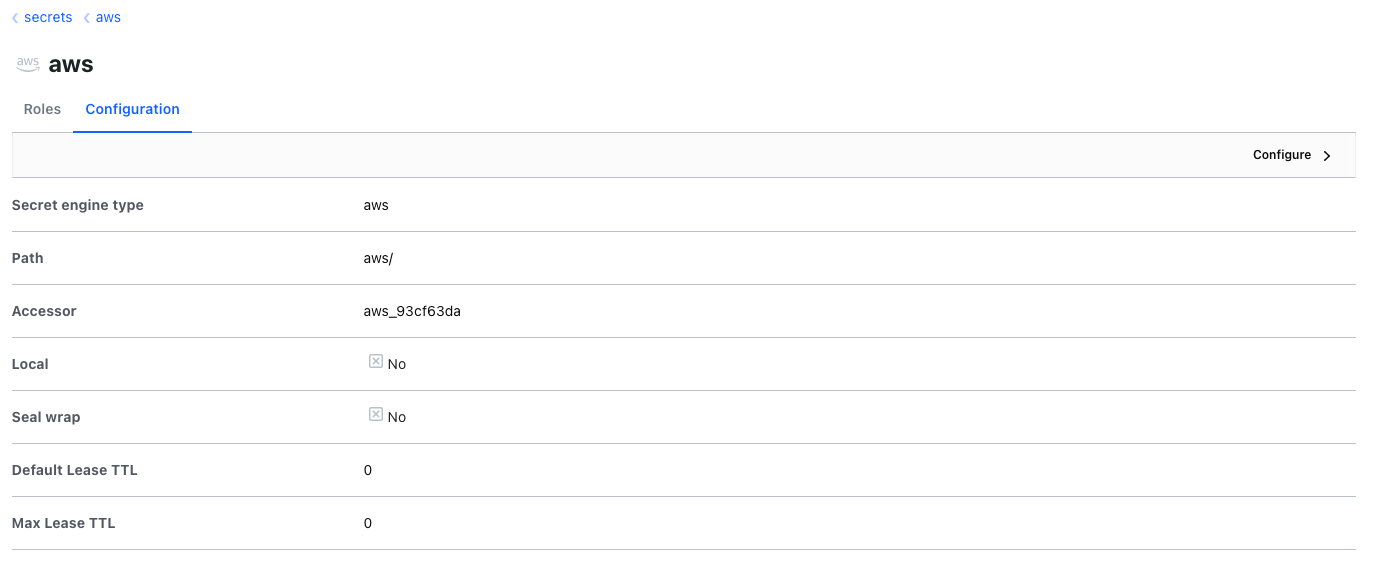
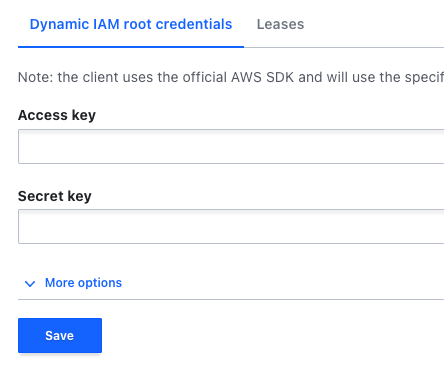
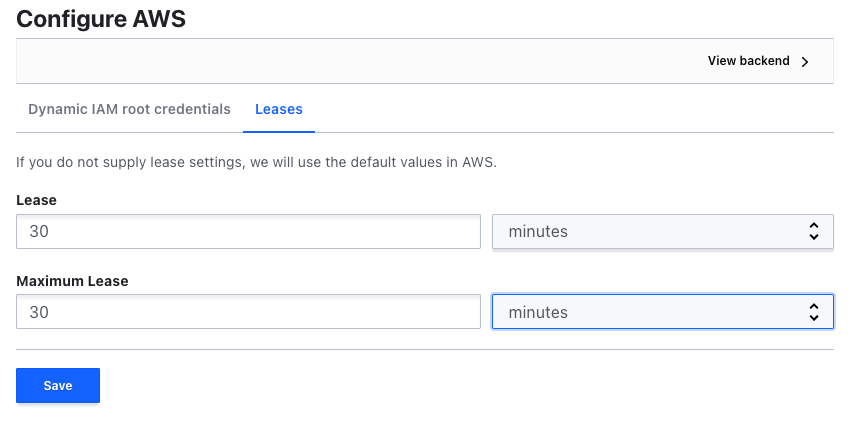
Then we put an AWS key and secret (who has IAM access) to the "dynamic IAM root credentials" tab, and in the "leases" tab, let's choose a reasonable time, say, 30 minutes:
Then we can go to the "secrets" tab, choose "AWS", then click "Create role":
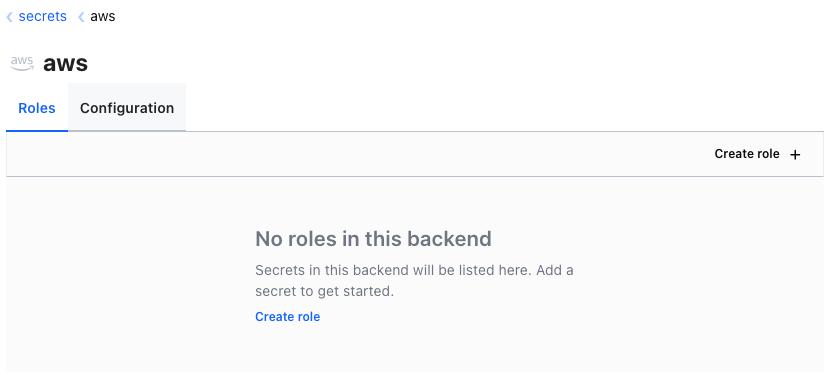
On the create role page, we put the following info:
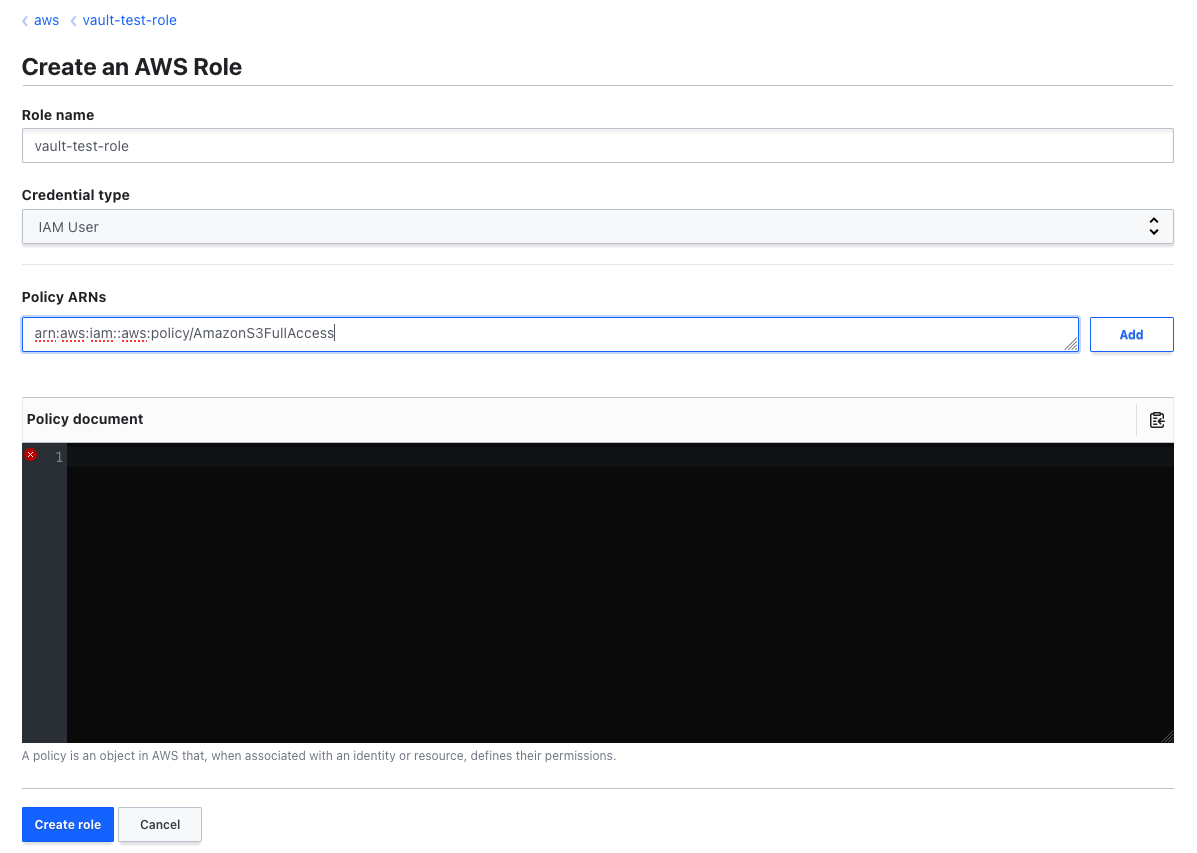
For testing purposes, we use the role ARN arn:aws:iam::aws:policy/AmazonS3FullAccess which will give this role full S3 access. But don't worry, this role won't be created right away and it's managed by Vault.
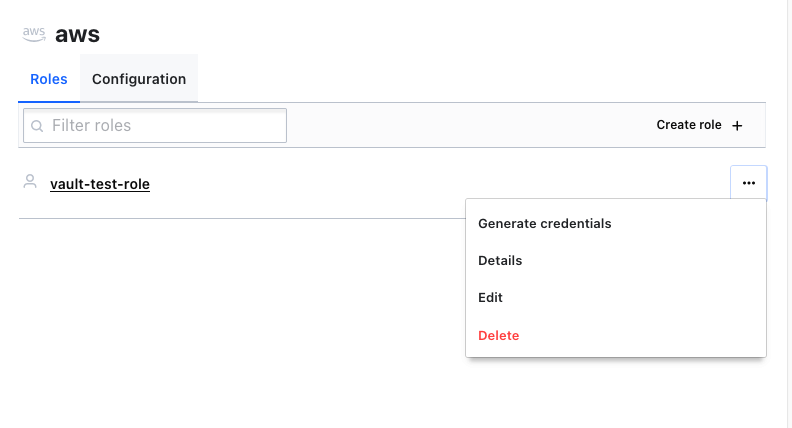
7.4 Testing the Temporary Role
If we go to the secrets tab, in the AWS engine, for the test role we created, we can create a new credential:
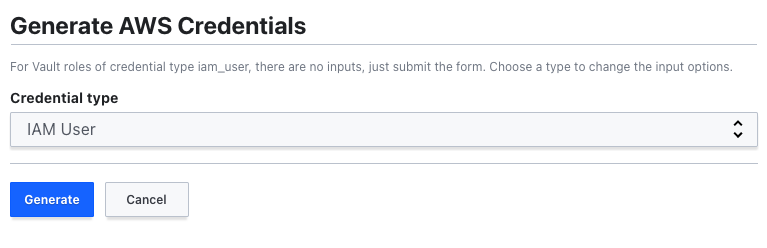

Now if we use this user's key and secret, we have full S3 access. And, it's only valid for 30 minutes, after which, the user will be deleted.
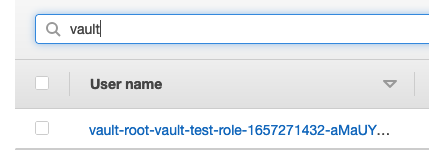
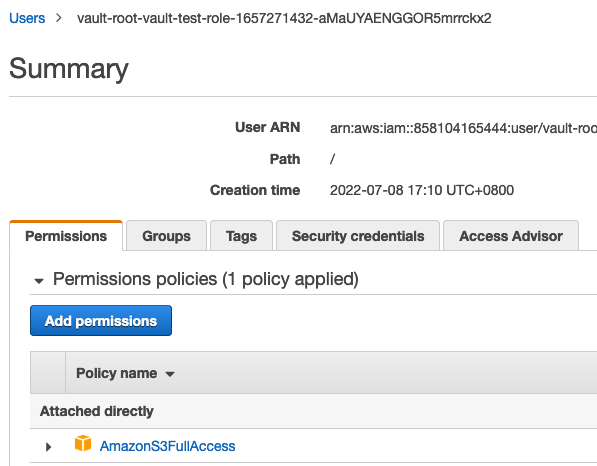
If we login to the AWS console and go to IAM, we can see this user:
And it has the right permission:
There is more to learn if you want to make it production-ready, for example, you could explore DynamoDB Storage Backend and Auto-unseal with AWS KMS.
IAM has grown more and more complicated over the years. I hope this blog helped automate your daily routine and reduce your operational overhead.
Bonus: If you are interested in Terraform and want to know more about it, please read my other article 9 Extraordinary Terraform Best Practices That Will Change Your Infra World as well.
Enjoy and see you next time!
 Guest Expert
 Guest Expert
This article is a guest post. Views and opinions expressed in this publication are solely those of the author and do not reflect the official policy, position, or views of GitGuardian, The content is provided for informational purposes, GitGuardian assumes no responsibility for any errors, omissions, or outcomes resulting from the use of this information. Should you have any enquiry with regard to the content, please contact the author directly.
FAQs
How does using Terraform improve AWS IAM policy management compared to manual configuration?
Terraform enables infrastructure-as-code for AWS IAM, allowing teams to version, audit, and automate policy management. This reduces human error, enforces consistency, and supports repeatable deployments across environments. Terraform also integrates with CI/CD pipelines, enabling policy validation and automated remediation for organizations with large or distributed engineering teams.
What are the best practices for handling sensitive outputs, such as passwords, in Terraform state files?
Sensitive outputs should be marked using sensitive = true to prevent log exposure. Store Terraform state files remotely—such as in S3 with encryption at rest—and restrict access through IAM. Treat state files as highly sensitive, as they may contain plaintext credentials, and ensure encryption in transit and at rest.
How can I enforce multi-factor authentication (MFA) for AWS IAM users using Terraform?
Enforce MFA by defining a customer-managed IAM policy that denies all actions except MFA setup when MFA is not present. Attach this policy to user groups via Terraform. This ensures users must configure MFA before accessing AWS resources, aligning with strong security and compliance requirements.
What are the advantages of using aws_iam_policy_document for advanced policy validation in Terraform?
The aws_iam_policy_document data source validates policy structure during the Terraform planning phase, catching syntax or logical errors early. It supports dynamic references, conditional logic, and integration with policy testing tools like terraform validate, ensuring policies follow least-privilege and organizational standards.
How can I implement policy versioning and rollback for AWS IAM policies managed by Terraform?
Implement versioning by defining IAM policy resources with explicit version identifiers and using the create_before_destroy lifecycle rule. This ensures safe updates and allows fast rollback by referencing prior versions within Terraform state, improving operational continuity and auditability.
How does dynamic policy generation with aws_iam_policy_document benefit complex AWS environments?
Dynamic policy generation tailors IAM policies to variables such as environment, region, or time-based conditions. This enables context-aware access control, scales with organizational growth, and automates compliance enforcement—reducing manual overhead while improving security posture.
Why should EC2 instances use IAM roles and instance profiles instead of access keys for AWS service access?
IAM roles with instance profiles provide short-lived, automatically rotated credentials, eliminating long-lived access keys. This reduces the risk of credential exposure, supports least-privilege access, and aligns with AWS security best practices for limiting attack surface.