
Disclaimer: this tutorial goes all the way through setting up Jenkins in a Kubernetes minikube cluster, if you're only interested in the Jenkinsfile, jump to the last part!
GitGuardian and ggshield
ggshield is a CLI application that runs in your local environment or in a CI environment to help you detect more than 350 types of secrets, as well as other potential security vulnerabilities or policy breaks.
The tool uses GitGuardian's API, more specifically, it will require a service account to set up Jenkins. Service accounts are only available for workspaces under our Business plan and only workspace Managers are allowed to manage service account tokens.
In this tutorial, we will show how to run one of the most famous CI tools that is Jenkins, in a Kubernetes cluster, and how to integrate ggshield with it as a neat declarative pipeline step (with a bonus: how to add Docker image scanning).
Note: if using GitHub Actions, it's actually quite easy to integrate ggshield as part of your workflow using GitGuardian's official gg-shield-action. Actually, I've already done a tutorial covering exactly that!
After reading this tutorial, you will be able to:
- install Jenkins in a Kubernetes cluster;
- integrate Jenkins/Kubernetes/GitGuardian together;
- scan your repo for secrets leak with
ggshieldin a Jenkins pipeline running in a Kubernetes pod; - scan a Docker image in your Jenkins pipeline.
Without further ado, let's get started.
1. Preparing a K8s Cluster
If you don't already have a K8s cluster yet, follow this section; otherwise, jump to the next.
We will use minikube, which is a tool that creates a single-node Kubernetes cluster on your computer. For Mac users, you can easily run:
brew install minikube
to install minikube. For other operating systems users, refer to the official doc.
Once minikube is installed, you can create a minikube cluster by entering the following command:
minikube start
Once the cluster has been created, you can verify its status by entering:
minikube status
2. Running Jenkins in K8s
2.1 Create a namespace
A distinct namespace provides an additional layer of isolation and more control over the continuous integration environment.
Create a namespace for the Jenkins deployment by typing the following command on your terminal:
kubectl create namespace jenkins
2.2 Create a Persistent Volume
We want to create a persistent volume for our Jenkins controller pod (we choose the /data directory). This will prevent us from losing our whole Jenkins controller configuration and jobs when we reboot our minikube.
In a multi-node Kubernetes cluster, you’ll need some solution like NFS to make the mount directory available in the whole cluster. But because we use minikube, which is a one-node cluster, we don’t have to bother about it. We choose to use the /data directory. This directory will contain our Jenkins controller configuration.
We will create a volume which is called jenkins-pv. Create a file jenkins-volume.yaml based on the content here, and apply it:
kubectl apply -f jenkins-volume.yaml
Note 1: in the above spec, hostPath uses the /data/jenkins-volume/ of your node to emulate network-attached storage. This approach is only suited for development and testing purposes. For production, you should provide a network resource like a Google Compute Engine persistent disk or an Amazon Elastic Block Store volume.
Note 2: minikube configured for hostPath sets the permissions on /data to the root account only. Once the volume is created, you will need to manually change the permissions to allow the Jenkins account to write its data by running:
minikube ssh
sudo chown -R 1000:1000 /data/jenkins-volume
At this exact moment, if you have been following the tutorial exactly, the /data folder has been created, but not the /data/jenkins-volume. You might want to return to this step again after helm install in the next section.
2.3 Install Jenkins with Helm
From there you need Helm CLI, if you don't already have it follow the instructions from the Installing Helm page.
First, let's create the required service accounts:
Create a file jenkins-sa.yaml based on the content here, and apply it:
kubectl apply -f jenkins-sa.yaml
Next, we prepare a values.yaml file based on the content here, and install Jenkins with helm using the values file:
helm repo add jenkinsci https://charts.jenkins.io
helm repo update
helm upgrade --install jenkins -n jenkins -f values.yaml jenkinsci/jenkins
2.4 Login to Jenkins
After the installation, to get the default password for your Jenkins admin user, run:
jsonpath="{.data.jenkins-admin-password}"
secret=$(kubectl get secret -n jenkins jenkins -o jsonpath=$jsonpath)
echo $(echo $secret | base64 --decode)
The username is admin.
To login, let's first port-forward the Jenkins service to our localhost:
kubectl port-forward svc/jenkins 8080
And now you can open a browser tab and log in by visiting http://localhost:8080/login with the admin user.
For production usage, you may need to add an ingress and serve it with HTTPS.
3. Jenkins-GitGuardian-Kubernetes Connection
3.1 Creating a GitGuardian API Key
Go to the Service accounts page in the API section of your workspace. Click on Create service account.
- Name your service account according to its use case (for example in this case
jenkins-test) - Set an expiry date for your token (in 1 week, 1 month, 6 months, 1 year, or never). If an expiry date is set, all the Managers of the workspace will receive an email notification 5 days before expiration.
- Choose one or several scopes for your service account.
- Click on
Create service account
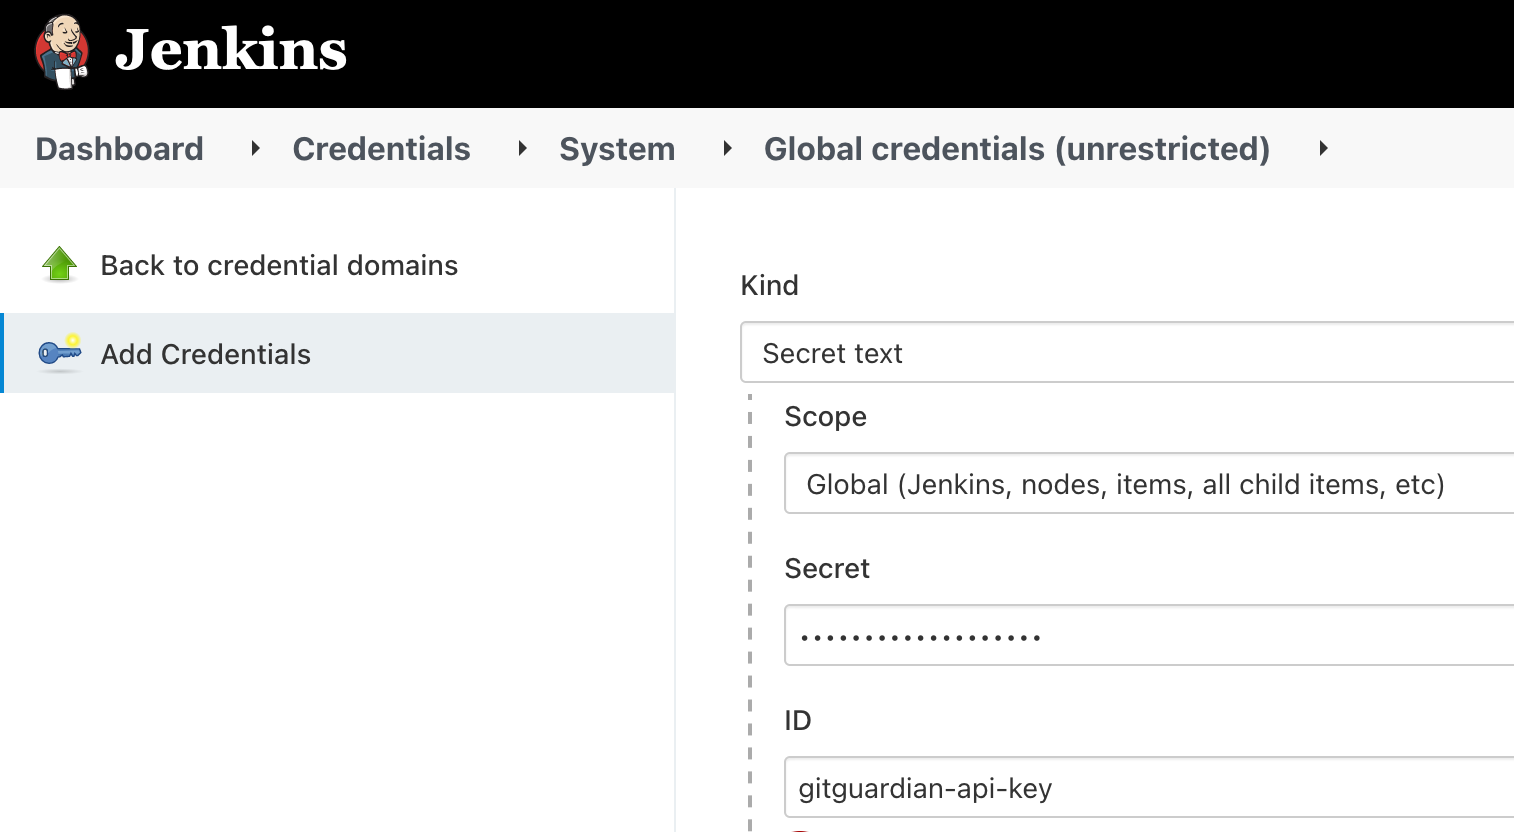
Make sure you copy the service account, it will no longer be visible to you in the future. We're going to put it in a Jenkins credential:
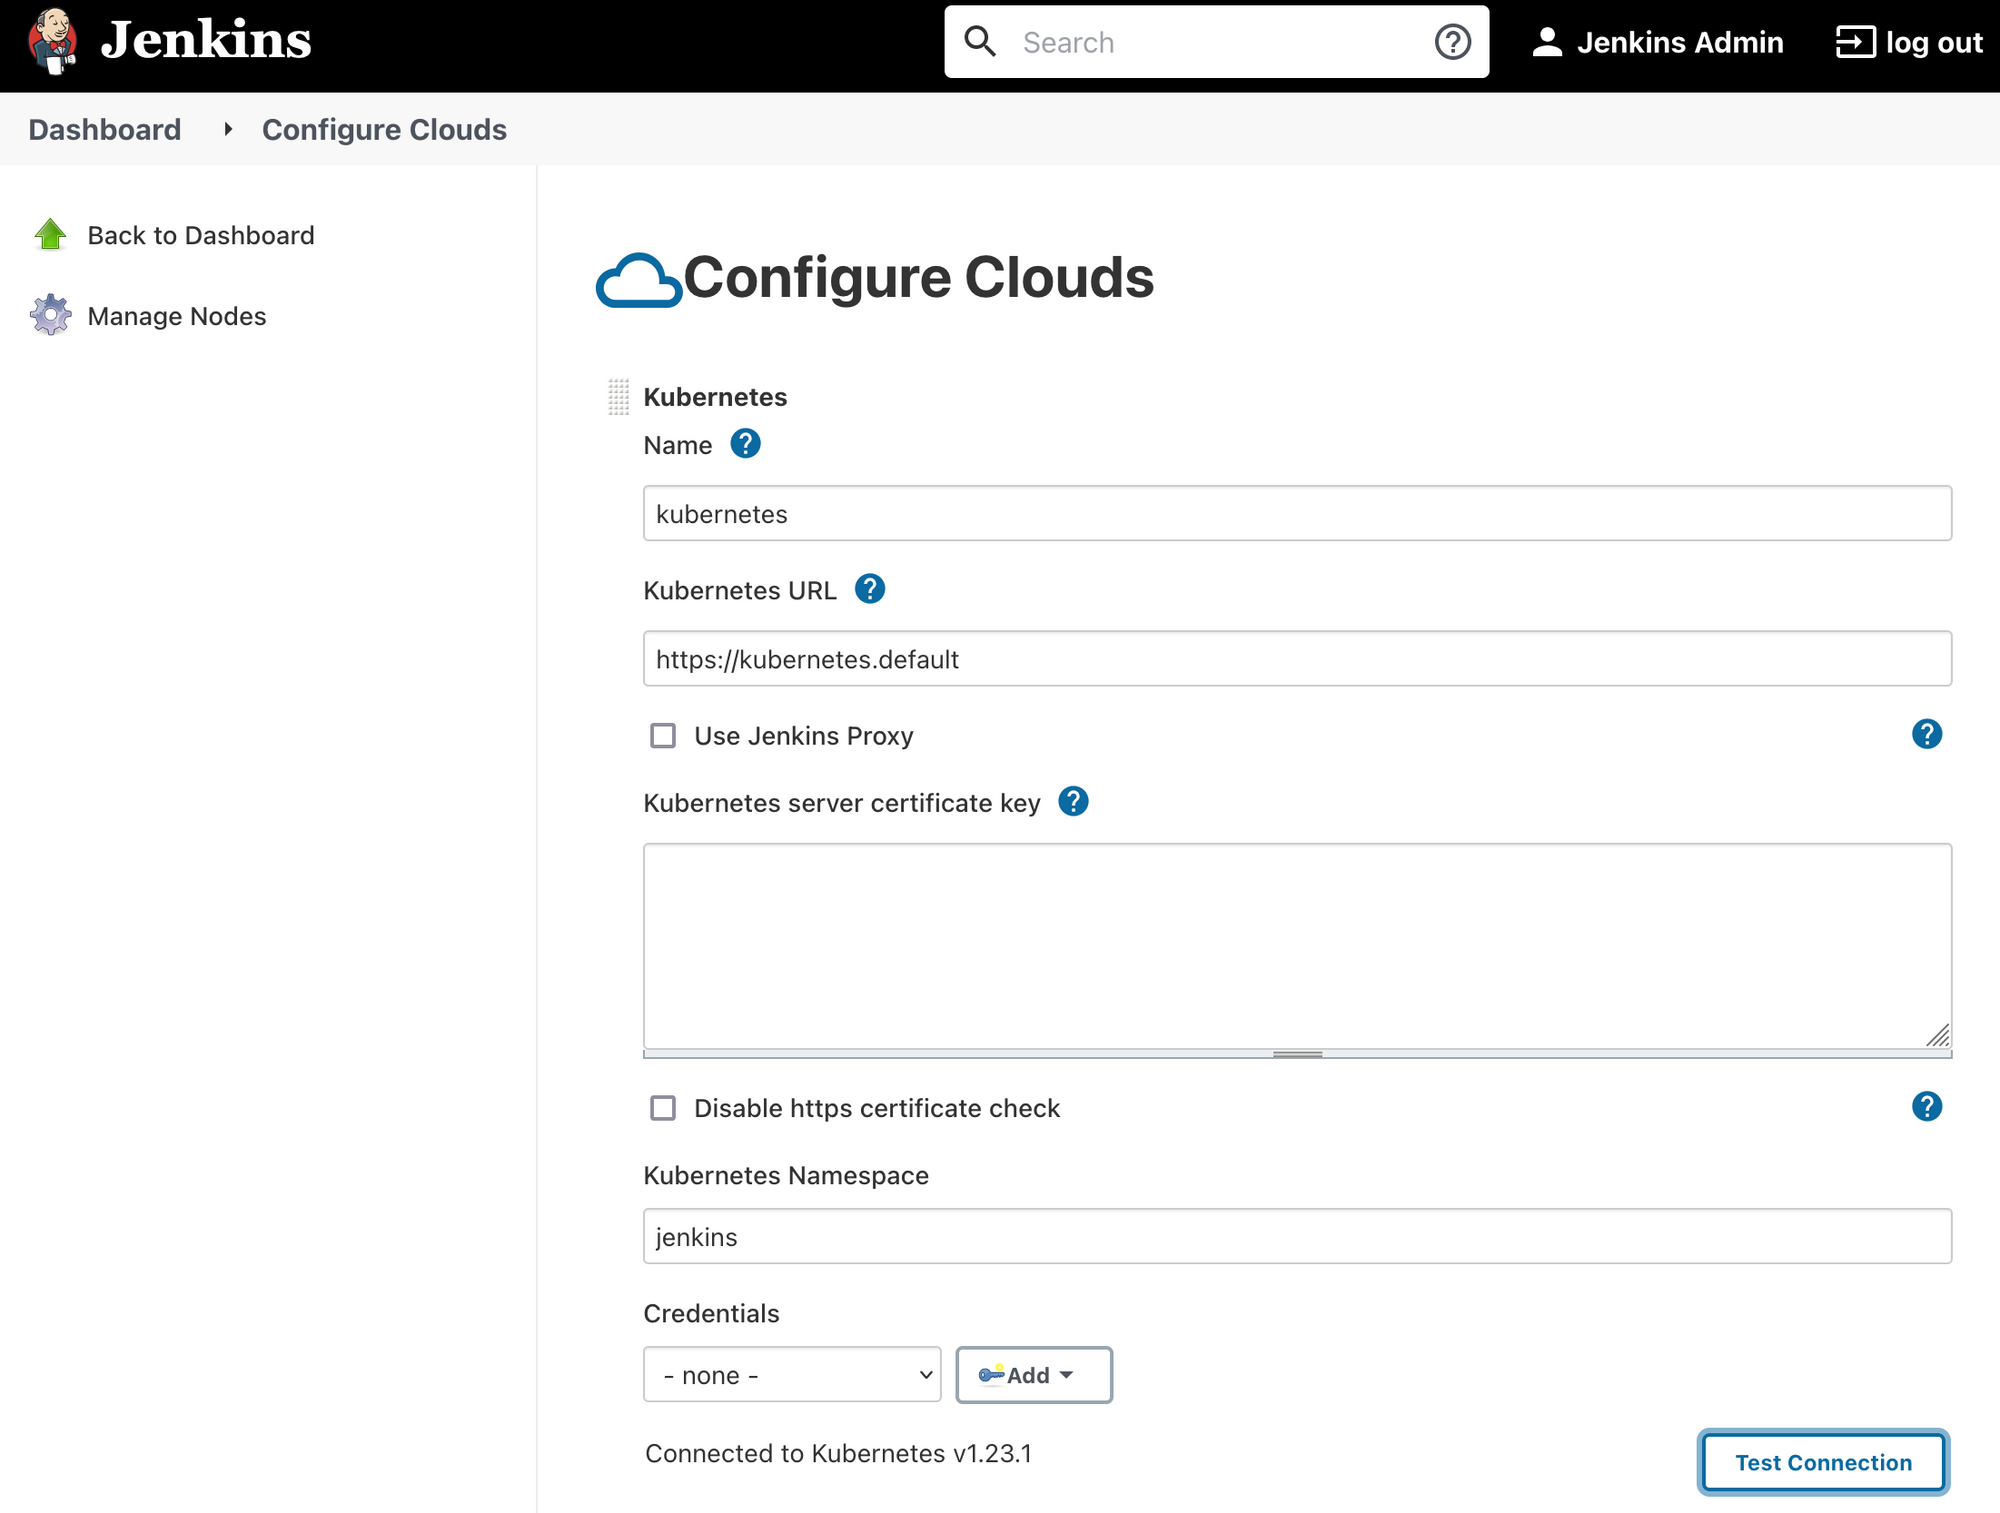
3.2 Making Sure Jenkins-Kubernetes Integration Works Fine
Go to Jenkins -> Manage Jenkins -> Manage Nodes and Clouds -> Configure Clouds, click "Kubernetes Cloud Details...", and test the connection. This should succeed by default since it's the same cluster where our Jenkins lives.
4. Declarative Pipelines with ggshield
After all these preparations, it's time for the important stuff: let's create a Jenkins job and give it a try! Go to Jenkins, click "New Item", and create an item of type "pipeline".
And in the "pipeline definition" part, copy the content below:
podTemplate(containers: [
    containerTemplate(name: 'ggshield',
                      image: 'gitguardian/ggshield:latest',
                      command: 'sleep',
                      args: '99d',
                      runAsUser: '1000')])
  {
      node(POD_LABEL) {
        stage('Get a project') {
            git url:'https://github.com/IronCore864/k8s-vagrant-kubeadm.git',
            branch: 'main'
            container('ggshield') {
                stage('Scan a project') {
                    withCredentials(
                    [string(credentialsId: 'gitguardian-api-key',
                            variable:'GITGUARDIAN_API_KEY')]) {
                        sh 'ggshield scan repo .'
                    }
                }
            }
        }
    }
}
For this demo, we'll scan an existing GitHub repository. Some details about this pipeline definition:
- we declare a podTemplate to use in the Kubernetes plugin.
- we override the
commandwithargsso that the container won't quit immediately after it's started (because by default, thegitguardian/ggshieldimage starts with the command directly). - we also specify under which user the
ggshieldcontainer is running with therunAsUserparameter (because by default,ggshieldruns under user 1337 and Jenkins JNLP runs with user 1000; so there might be some problems for multi-container pods to access shared files, like the cloned git repo). - we use
withCredentialsso that thegitguardian-api-keyJenkins credentials we created earlier will be used as an environment variable for ourggshieldCLI tool.
Let's give it a try:
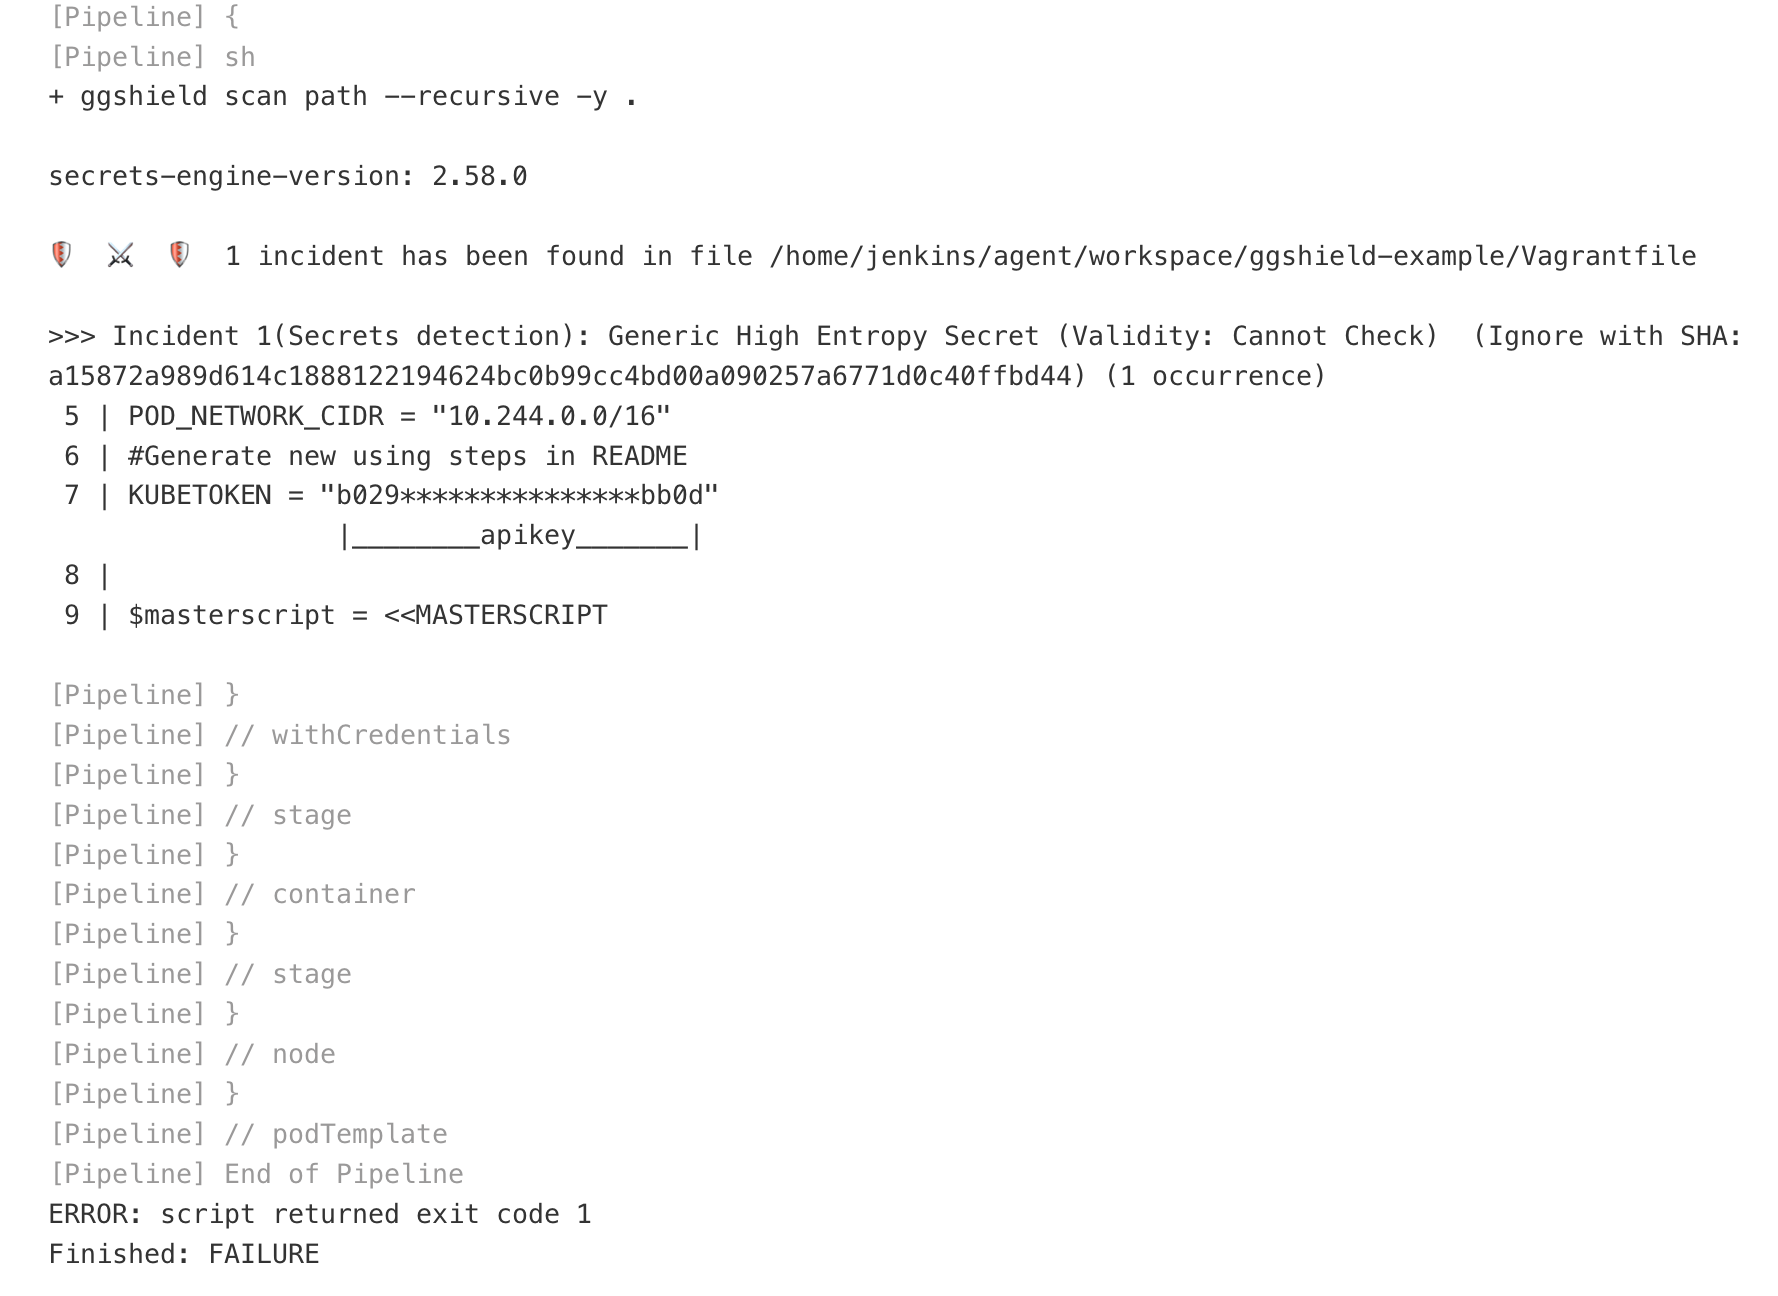
As we can see, it successfully detected a possible leak that looks like an API key; and it is! Because it's a hard-coded token for Kubernetes.
5. Docker Image Scanning with Jenkins Pipeline
To scan a docker image with ggshield, we can simply run the following command in our CI pipelines:
ggshield scan docker REPOOWNER/IMAGEREPO
To add ggshield docker image scan to your pipelines, configure your Jenkinsfile to add a ggshield stage which scans an image:
stage('Get a project') {
  container('ggshield') {
    stage('Scan an image') {
      withCredentials([string(credentialsId: 'gitguardian-api-key', variable: 'GITGUARDIAN_API_KEY')]) {
        sh 'ggshield scan docker REPOOWNER/IMAGEREPO'
      }
    }
  }
}
Similar to the above, do not forget to add your GitGuardian API Key to the gitguardian-api-key credential in your project settings.
6. Summary
With containerized Jenkins in Kubernetes, we get to use the CI that we are already familiar with, without the need to migrate to another CI, and we are running it in modern and immutable infrastructure (hence much easier to manage and much less overhead).
With declarative job descriptions, we get what you write, and we use the pipeline code as the single source of truth of the job.
With ggshield automated with all the benefits above, we are genuinely achieving DevSecOps.
If you like this tutorial and want to see more, please like, comment, and subscribe. See you next time!
This article is a guest post. Views and opinions expressed in this publication are solely those of the author and do not reflect the official policy, position, or views of GitGuardian, The content is provided for informational purposes, GitGuardian assumes no responsibility for any errors, omissions, or outcomes resulting from the use of this information. Should you have any enquiry with regard to the content, please contact the author directly.