
In the first part of the tutorial, we learned about Backstage, an open-source CNCF tool to build developer portals, and we also created a software template to build secure-by-default software components for bootstrapping projects/repositories in GitHub.
If you haven't read it yet, here is the link to it for you:
Platform Engineering: Building Your Developer Portal with Backstage (Pt 1)
Let's continue with our developer portal today and take it to the next level.
Please note that this tutorial builds on the previous part 1. If you haven't created your developer portal yet, follow the first part before proceeding.
1 Use a PostgreSQL database
1.1 Backstage Database
In the first part of the tutorial, we learned that Backstage comprises two parts, the frontend, and the backend.
If you have played with the portal you created a bit, you will figure out that once you restart your yarn dev server, the previously imported components will not be there anymore.
This is because the Backstage backend (and its plugins, which we will discuss later) requires a logical database to store its state.
For simplicity, we didn't talk about databases in the first part of the tutorial, but now, let's change our developer portal to use a database to store its states persistently.
Note: Backstage is tested primarily against two databases: SQLite, which is mainly used as an in-memory mock/test database, and PostgreSQL, which is the preferred production database. Other databases, such as the MySQL variants, are reported to work but aren't fully tested.
So, next, let's configure backstage to use a PostgreSQL database.
1.2 Install and Configure PostgreSQL
Note: these instructions can be skipped if you already have a PostgreSQL server installed and have created a schema and user. For example, you might be running on Linux servers, and you can install PostgreSQL via apt-get; for another example, you might run your PostgreSQL in a Docker container or even a cloud database service.
The following example is for Mac users; in case you do not use Mac for development, luckily, there are detailed instructions on how to install PostgreSQL to help you get started.
Use brew to install:
brew install postgresql@14
To have launchd (the process manager used by brew) start PostgreSQL now and restart at login, run:
brew services start postgresql@14
If you need to stop/restart it, you can run the following commands accordingly:
brew services stop postgresql@14
brew services restart postgresql@14
Run the psql postgres command to log in to the Postgres shell, and you should see a welcoming interactive CLI like the following:
tiexin@mbp ~/work/my-portal $ psql postgres
psql (14.8 (Homebrew))
Type "help" for help.

postgres=#
For this tutorial, we will create a user "backstage" with the password "backstage" as a super user. Note that this is only for local development and not for production:
postgres=# create user backstage with encrypted password 'backstage';
CREATE ROLE
postgres=# alter role backstage with superuser;
ALTER ROLE
1.3 Configure Backstage to Use PostgreSQL
Go to the root directory of your developer portal directory, and use the following commands to start the PostgreSQL client installation:
yarn add --cwd packages/backend pg
Then, again, open the configuration file app-config.yaml, and update the backend.database section to the following:
backend:
  database:
    client: pg
    connection:
      host: 127.0.0.1
      port: 5432
      user: backstage
      password: backstage
Note 1: the default port for PostgreSQL is 5432 or 5433, and the hostname could be 127.0.0.1 if installed locally.
Note 2: the example above uses connection details from the previous step. If you use an existing PostgreSQL database, update the host/port/user/password information accordingly.
Note 3: in general, using connection details in a configuration file is not recommended because it contains sensitive information like username and password. For production usage, we can read the information from environment variables (and use Helm chart to deploy to Kubernetes and use Kubernetes secrets to store this sensitive information). Example:
backend:
  database:
    client: pg
    connection:
      host: ${POSTGRES_HOST}
      port: ${POSTGRES_PORT}
      user: ${POSTGRES_USER}
      password: ${POSTGRES_PASSWORD}
After updating the configuration, we can now start our developer portal:
yarn dev
When Backstage is completely started, adding a new component now will save it in the database. For you to test:
- use the template from the first part of the tutorial to bootstrap a repository;
- restart the yarn server;
- go to the software catalog, and check if the created component is still there (persisted in the DB).
2 Backstage Plugin Introduction
Backstage is a single-page application composed of a set of plugins through which the functionalities are implemented to make your developer portal more powerful to your specific needs. See the architectural diagram below:
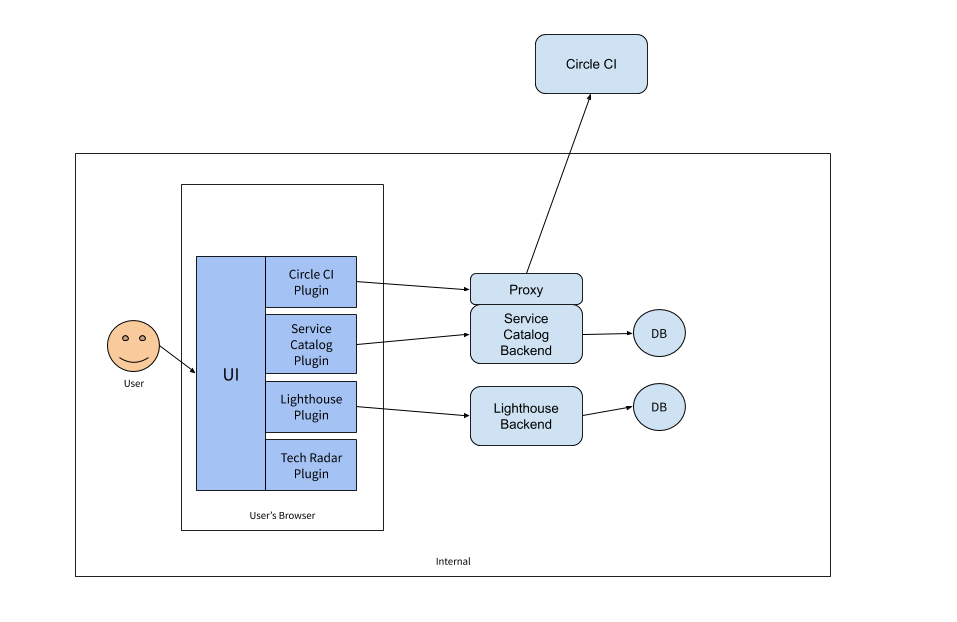
After creating our portal, we've already got a few core features by default, like:
- software catalog
- software templates
- documentation
- search functionalities
Actually, these default/standard core functionalities are all provided by plugins; it's just that when we bootstrapped our developer portal, Backstage already got them enabled by default.
With these core features/plugins, our developer portal is already quite powerful, capable of showing CI/CD status and documentation and serving as an overview software catalog. However, with plugins, we can power up our developer portal to the next level.
Plugins can be open source and reused, and they can also be specific to your company. You can even create customized plugins for your specific needs.
At the moment, there are quite a few plugins, many of which are CI/CD tools, like Circle CI, Buildkite, Argo CD, Go CD, etc., so no matter what CI/CD toolchain you are using, chances are, you can integrate them with your developer portal. Visit this link here to get an overview of all the existing plugins.
3 Creating a Plugin
Since Backstage has both a frontend and a backend, you can create plugins for both the front and backend.
3.1 Frontend
To create a frontend plugin, make sure you've run yarn install and installed dependencies, then run the following on your command line from the root of the developer portal directory:
yarn new --select plugin
For example, we can name the plugin "my-plugin" here.
This will create a new Backstage plugin based on the ID that was provided. It will be built and added to the Backstage frontend App automatically.
To develop a frontend plugin, some knowledge of TypeScript and React is required. However, even if you are not a TypeScript/React developer, it's not too hard to get started because the above command bootstrapped a sample plugin with some basic code and mocked data.
For example, if you name your plugin "my-plugin" after you start the yarn dev server, you can visit it at http://localhost:3000/my-plugin and see the result.
Some customization to the menu/navigation bar is also possible by editing the packages/app/src/components/Root/Root.tsx file. Scroll down to the Root section of the code:
export const Root = ({ children }: PropsWithChildren<{}>) => (
  <SidebarPage>
    <Sidebar>
      <SidebarLogo />
      <SidebarGroup label="Search" icon={<SearchIcon />} to="/search">
        <SidebarSearchModal />
      </SidebarGroup>
      <SidebarDivider />
      <SidebarGroup label="Menu" icon={<MenuIcon />}>
        {/* Global nav, not org-specific */}
        <SidebarItem icon={HomeIcon} to="catalog" text="Home" />
        <SidebarItem icon={ExtensionIcon} to="api-docs" text="APIs" />
        <SidebarItem icon={LibraryBooks} to="docs" text="Docs" />
        <SidebarItem icon={CreateComponentIcon} to="create" text="Create..." />
        {/* End global nav */}
        <SidebarDivider />
        <SidebarScrollWrapper>
          <SidebarItem icon={MapIcon} to="tech-radar" text="Tech Radar" />
        </SidebarScrollWrapper>
      </SidebarGroup>
      <SidebarSpace />
      <SidebarDivider />
      <SidebarGroup
        label="Settings"
        icon={<UserSettingsSignInAvatar />}
        to="/settings"
      >
        <SidebarSettings />
      </SidebarGroup>
    </Sidebar>
    {children}
  </SidebarPage>
);
Here we can see the sidebar page, where we can add a sidebar item, specify an icon, and to which URI it should link.
However, if we dive deeper into the generated plugin code, in the generated file plugins/my-plugin/src/components/ExampleFetchComponent/ExampleFetchComponent.tsx, it returns mocked data instead of fetching via some API:
export const ExampleFetchComponent = () => {
  const { value, loading, error } = useAsync(async (): Promise<User[]> => {
    // Would use fetch in a real world example
    return exampleUsers.results;
  }, []);

  if (loading) {
    return <Progress />;
  } else if (error) {
    return <ResponseErrorPanel error={error} />;
  }

  return <DenseTable users={value || []} />;
};
In the real world, here is where you call some API to get data from the backend to display in your plugin. So, next, let's have a quick look at backend plugins.
3.2 Backend
A new backend plugin package (but empty, unlike the frontend plugin, which comes with sample code) can be created by executing the following command in your developer portal root directory:
yarn new --select backend-plugin
Similarly, you will be asked to supply a name for the backend plugin, just like we did in the previous section for a frontend plugin.
It's worth noting that for simple development purposes, you can start the backend plugin in the standalone mode:
cd plugins/plugin-name
yarn start
This will start a dev server listening on the 7007 port, and it comes with a health check endpoint directly so that you can:
curl localhost:7007/plugin-name/health
This should return {"status":"ok"}.
However, up till now, the newly created backend plugin does not do anything yet. You need to edit src/service/router.ts to start adding routes and connecting those to the actual underlying functionalities you are going to implement.
It's worth noting that the backend comes with a built-in facility for SQL database access to meet your persistence needs, and you can also retrieve the logged-in user's identity, which comes in handy if you want to show different data to different users.
4 Deploy in Production
If you have been following from the very beginning, now we have covered the idea of platform engineering/developer portals, core features, data persistence, and plugins (and creating them). We've got all the tools we need to build our own specific, customized developer portal to meet exactly our needs.
Next, I want to discuss deploying the developer portal in a production environment.
4.1 Host Build for Docker
The faster approach is to build most of the stuff outside of Docker, then put the packages inside a Docker image, hence "host build". The upside is this is almost always the faster approach because the build steps execute faster on a host machine, and it's possible to have more efficient caching of dependencies on the host where a single change won't bust the entire cache.
To build it on the host, we first install dependencies with yarn install, then generate type definitions using yarn tsc, and build the backend package with yarn build:backend.
And, there is already a Dockerfile provided when we created the developer portal, located at packages/backend/Dockerfile. We can use this Docker image to use our host build packages.
4.2 Multi-Stage Build
Sometimes, your CI runs in Docker, so the docker-in-docker approach with host build might not work for you; plus, maybe you do not want to maintain infrastructure as pets (versus as cattle), so you might actually prefer to build everything inside Docker, even though it might sometimes be slower than a host build.
For this, we need to use Docker multi-stage build and create our own Dockerfile. In essence, here's what needs to be done in each stage:
- Stage 1: create yarn install layer. For example, git clone, then copy packages and plugins to the layer.
- Stage 2: install dependencies and run yarn build. The dependencies might include: libsqlite3-dev, python3, build-essential. This is similar to the host build part.
- Stage 3: same as the Docker image in the previous section, where we build the actual backend image using the packages built in the previous stage.
Here is a multi-stage Docker file example.
4.3 Separate Frontend with Backend
In both parts of this tutorial, we rely only on yarn dev servers when we run yarn dev, and this command starts two servers, one to serve the frontend single-page app, the other to serve the backend.
The docker image also builds the frontend and the backend into the same Docker, whether you use host build or multi-stage build.
You've probably already guessed where I'm going with this, and you are right: for production development, it is sometimes desirable to serve the frontend separately from the backend, either from a separate Docker image or, for example, a static file server with CDN (technically, CDN could work with a Docker container as the source as well).
For this, we want to separate the frontend from the backend. For example, the static frontend files could be served in AWS S3 as a static file server, then use CloudFront as CDN in front of the S3 bucket; for the backend, we might deploy it in a Pod in K8s and expose the service using an Ingress.
To separate the frontend, we need to delete packages/backend/src/plugins/app.ts (and remove the corresponding import from packages/backend/src/index.ts), and remove the @backstage/plugin-app-backend (which bundles and serves the frontend from the backend and injects the frontend configuration into the app) from packages/backend/packages.json
4.4 Kubernetes Deployment
Now, we can deploy the backend Image using Helm chart to Kubernetes.
There is a community Helm chart here, and by setting the values and passing your own built Docker image, you can deploy your developer portal to a Kubernetes cluster.
By default, this Helm chart doesn't install PostgreSQL because, in a production environment, you most likely want to manage the database separately. For example, if you are running your infrastructure in a cloud service provider, you can use Terraform to manage the database as a service to create PostgreSQL DB prior to running Helm install for your developer portal.
But, if you want, the Helm chart above can use PostgreSQL as a Helm chart dependency and deploy both the DB and the portal simultaneously in K8s, in which case, you need to choose the right PersistentVolume storage type, like, as a cloud volume or network attached storage, anything that is more persistent than the Kubernetes node's ephemeral storage.
You might also want to choose an ingress class to expose your service internally or externally.
Summary
In this platform engineering miniseries, we started with the concept of platform engineering and the difference between platform engineering and DevOps. Then, we did a hands-on tutorial introducing the tool (Backstage) to build developer portals, how to use it to create a developer portal, build your software catalog and create software templates. Finally, we learned how to persist the data of the developer portal, how to add more features to it, and how to deploy it in the production environment.
From here, there are a bunch of other things you could do, for example:
- adding a continuous deployment plugin, for example, to show your deployment history and status from Argo CD directly in the developer portal;
- integrating Kubernetes to the portal so that inside each component, you can see the deployed apps in K8s directly without needing to run some kubectl commands or open a K8s dashboard;
- add more features, like integrating your secrets manager as a plugin to the developer portal, so that you can view the list of secrets, create secrets, and even show secrets used in each component;
- integrating on-call schedules and even alerts into the portal;
- and more: you can decide what you need in your portal, build that plugin and integrate them so that it can act as a single place to view everything, adding value to developer teams.
I hope you enjoyed this series; I would be pleased if the tutorial could help you in any way. See you in the next one!
This article is a guest post. Views and opinions expressed in this publication are solely those of the author and do not reflect the official policy, position, or views of GitGuardian, The content is provided for informational purposes, GitGuardian assumes no responsibility for any errors, omissions, or outcomes resulting from the use of this information. Should you have any enquiry with regard to the content, please contact the author directly.