
The Kubernetes ecosystem has firmly established itself as the flagship of the Cloud Native Computing Foundation (CNCF) landscape. Among the various secrets management solutions, Vault from Hashicorp stands out as a robust and credible one. Kubernetes provides a production-ready solution for accessing secrets outside of its clusters, known as External Secrets Operators. For those with secrets stored in Vault, the Vault Secret Operator offers an intuitive and efficient way to integrate the two. Although these technologies provide a secure, reliable integration that covers many use cases, the complexity of such an integration can be a drawback.
Kubernetes has had a feature called Secrets for quite some time. It has been criticized for its perceived lack of security and functionality. Yet, this feature comes with Kubernetes right out of the box. Whether to use it, and particularly how to use it correctly, is always up to the team.
This article uses Kubernetes Secrets as a native Kubernetes component for handling sensitive data at container runtime and Vault as a trusted storage and maintenance solution for sensitive data.
A Terraform project is created to deliver secrets from Vault storage to Kubernetes and store them as Kubernetes Secrets. The simplicity of this approach is among its advantages, offering an adequate level of security. However, it's up to software architects to evaluate the appropriateness of this method for their needs.
Setting Up the HashiCorp Vault Server and Secrets
No special requirements are needed for the Vault server to run this discovery project, other than keeping it within its independent Kubernetes cluster. In my approach, I run a local Docker desktop and install minikube (v1.32.0), which provides an empty Kubernetes cluster upon startup.
For installing Vault to minikube via Helm with Integrated Storage, I would recommend following the official tutorial. This is also where I obtained the steps to set the secrets in the Vault section.
You can use these commands to access the Vault server: Vault server access commands.
kubectl config use-context vaultcluster
>>Switched to context "vaultcluster".
kubectl get pods
>>NAME                                    READY   STATUS    RESTARTS   AGE
>>vault-0                                 1/1     Running   0          1h
>>vault-1                                 1/1     Running   0          1h
>>vault-2                                 1/1     Running   0          1h
>>vault-agent-injector-5d85ff9d44-kwhc8   1/1     Running   0          1h
kubectl exec --stdin=true --tty=true vault-0 -- /bin/sh
>>/ $ vault login
>>Token (will be hidden):
>>Success! You are now authenticated.
>>...
/ $
After accessing the Vault server, you can view the secrets created using the method from the tutorial here: Displaying Secrets.
/ $ vault kv get secret/webapp/config
>>====== Secret Path ======
>>secret/data/webapp/config
>>======= Metadata =======
>>Key                Value
>>...
>>====== Data ======
>>Key         Value
>>---         -----
>>password    Losungwort
>>username    Nutzername
To enhance security, it's best to use the root token as sparingly as possible. Therefore, creating a new token with access only to existing secrets is the next step. You can do this by continuing with the commands in the Vault CLI session mentioned earlier: Creating New Vault Policy.
/ $ vault policy write webapp - << EOF
> path "secret/data/webapp/config" {
>   capabilities = ["read"]
> }
> EOF
>>Success! Uploaded policy: webapp
/ $ vault token create -policy=webapp -ttl=744h
>>Key                  Value
>>---                  -----
>>token                hvs.CAESIHOD5eMOX3BG850WnddTyDkkF...MdzQzOE1wd0ZMTXY4OGhuOXU
>>token_policies       ["default" "webapp"]
>>...
Once you have received the less powerful Vault token, you can exit the Vault CLI session. However, don't forget to leave the minikube with the Vault server running continuously.
Using Terraform Project to Deliver Secrets to Kubernetes
Terraform serves as a one-time delivery mechanism for secrets from the Vault cluster to the Kubernetes cluster. Its lack of live synchronization with Vault is a significant drawback. Yet, this issue can be offset by the simplicity of its usage.
To initialize a new Terraform project and add code, begin by defining two Terraform providers in the project: Provider definition.
provider "vault" {
  address          = var.vault_address
  skip_tls_verify  = true
  skip_child_token = true
  token            = var.vault_api_token
}

provider "kubernetes" {
  config_path    = var.kubernetes_config_path
  config_context = var.kubernetes_context
}
As part of the simplification approach, the Vault server runs locally in the Kubernetes cluster on minikube. For ease, the destination Kubernetes cluster was run on Digital Ocean cloud. However, this could be any other cluster, including another minikube instance with a Pod Security add-on.
Some Terraform variables specific to the laptop I used can be found here: Terraform Variables.
variable "vault_address" {
  description = "Vault URL"
  type        = string
  default     = "http://localhost:62702"
}

variable "vault_api_token" {
  description = "Vault API Token"
  type        = string
  default     = "hvs.CAESIG9BxywJcD4nRx-oehBOnKKa6M3fKb2Og-...-VzVrb0xMenVUSVA"
}

variable "kubernetes_config_path" {
  description = "Local PC kube config"
  type        = string
  default     = "~/.kube/config"
}

variable "kubernetes_context" {
  description = "Kube config entry"
  type        = string
  default     = "digital"
}
A new Kubernetes namespace, "playground," is used throughout the entire project: Kubernetes Namespace.
resource "kubernetes_namespace" "playground" {
  metadata {
    name = "playground"
  }
}
Finally, the secret itself can be found here: Secret.
data "vault_generic_secret" "top_secret" {
  path = "secret/webapp/config"
}

resource "kubernetes_secret" "top_secret" {
  metadata {
    name      = "top-secret-ks"
    namespace = kubernetes_namespace.playground.id
  }
  data = data.vault_generic_secret.top_secret.data
  type = "Opaque"
}
This code is enough to see the Secret in action. Let's deploy it: Deploy.
kubectl config use-context digital
>> Switched to context "digital".
terraform apply --auto-approve
>> ...
>> Apply complete! Resources: 2 added, 0 changed, 0 destroyed.
The new Secret, containing the same values as the source Vault kv-storage, is now in the Kubernetes cluster: New Secret.
Enhancing the Terraform Project with Security Features
The current Terraform project code lacks sophistication and does not adhere to many of the best practices espoused in the official documentation for Kubernetes Secrets. To improve this, we will introduce Role-Based Access Control (RBAC) to manage access to Kubernetes secrets. This will enhance security somewhat, although it leaves the code more suited for educational use rather than for production environments.
 Guest Expert
Limiting Secret Access to Specific Containers
Create a Kubernetes Service Account to allow trusted resources to access your secrets. Service Accounts.
resource "kubernetes_service_account" "secret_privileged" {
  metadata {
    name      = "secret-privileged-sa"
    namespace = kubernetes_namespace.playground.id
    annotations = {
      "kubernetes.io/enforce-mountable-secrets" = "true"
    }
  }
  secret {
    name = kubernetes_secret.top_secret.metadata[0].name
  }
  automount_service_account_token = false
}
Line 6 with the annotation “kubernetes.io/enforce-mountable-secrets” = ”true” is important to allow Pods to mount Secrets as a volume. Read more here.
To test the Service Account, I create a Deployment with a single Pod: Demo Deployment
resource "kubernetes_deployment" "demo" {
  metadata {
    name      = "demo-dp"
    namespace = kubernetes_namespace.playground.id
  }
  spec {
    replicas = 1
    selector {
      match_labels = {
        app = "demo-lb"
      }
    }
    template {
      metadata {
        labels = {
          app = "demo-lb"
        }
      }
      spec {
        service_account_name            = kubernetes_service_account.secret_privileged.metadata[0].name
        automount_service_account_token = true
        container {
          name  = "bibinwilson"
          image = "bibinwilson/docker-kubectl:latest"
          volume_mount {
            mount_path = "/etc/sensitive"
            name       = "sensitive-vl"
            read_only  = true
          }
        }
        volume {
          name = "sensitive-vl"
          secret {
            secret_name = kubernetes_secret.top_secret.metadata[0].name
          }
        }
      }
    }
  }
}
Let's break it down:
- `service_account_name` and `automount_service_account_token`: these lines are configuring the Pods to use a specific service account and to automatically mount the service account token.
- `container`: the Pods in the Deployment will have one container each, running the `bibinwilson/docker-kubectl:latest` image, and they will have a volume mounted that contains the data from a secret.
- `volume`: a volume will be attached to each Pod. It uses a secret as the volume source, which means the data in the secret will be mounted into the Pods at the specified path (`/etc/sensitive`).
In summary, this script creates a Kubernetes Deployment in the `playground` namespace with one replica.
If you need to read Secrets via the Kubernetes API, create a Role that has Secret get permissions and bind it to the existing Service Account with a Role Binding.
kubectl exec -it -n playground demo-dp-7756f78b4c-5glk8 -- /bin/bash
>>root@demo-dp-7756f78b4c-5glk8:/# ls /etc/sensitive/
>>password  username
>>root@demo-dp-7756f78b4c-5glk8:/# cat /etc/sensitive/username ; echo
>>Nutzername
>>root@demo-dp-7756f78b4c-5glk8:/# cat /etc/sensitive/password ; echo
>>Losungwort
>>root@demo-dp-7756f78b4c-5glk8:/# kubectl get secret top-secret-ks -n playground
>>Error from server (Forbidden): secrets "top-secret-ks" is forbidden: User "system:serviceaccount:playground:secret-privileged-sa" cannot get resource "secrets" in API group "" in the namespace "playground"
>>root@demo-dp-7756f78b4c-5glk8:/# exit
>>exit
If we connect to the Pod, we can see that the folder `/etc/sensitive` contains two files with the same names as the keys of the Secret's data: the file named "username" contains the value "Nutzername", which is the value of the Secret, and the "password" file contains the value of the Secret's key-value pair, "Losungwort".
However, trying to retrieve the Secret's data via the k8s API results in an error because the Service Account being used does not have a specific Role assigned, nor does it have access to anything via the API.
This demonstrates that accessing Secrets mounted as Volumes into Containers works well. However, it is not currently possible to use the k8s API to read Secrets in the current configuration. If this functionality is required, a Kubernetes Role with access to Secrets must be created and bound to the existing Service Account using a Role Binding.
This will allow the Secrets to be read from within the Container. The official documentation provides a list of best practices for RBAC that should be followed, especially for production-ready solutions.
Preventing Others from Accessing the Secret
It's equally important to restrict unauthorized access to Secrets. This can be achieved by creating multiple Service Accounts: one for resources that require access to Secrets and a default one with no access to Secrets for all other resources. You can create these here: Create Service Accounts
resource "kubernetes_service_account" "non_privileged" {
  metadata {
    name      = "non-privileged-sa"
    namespace = kubernetes_namespace.playground.id
    annotations = {
      "kubernetes.io/enforce-mountable-secrets" = true
    }
  }
  #secret {
  #}
  automount_service_account_token = true
}
This non-privileged service account allows to mount secrets, but without any secret section. For the sake of the demo, let’s allow the service account token to automount (not recommended in real life).
Here is a copy of the previous deployment, only using a non_privileged Service Account: Non-Privileged Deployment. Trying to deploy it would result in an error:
terraform apply --auto-approve
>>Terraform will perform the following actions:
>>...
>>Plan: 2 to add, 0 to change, 0 to destroy.
>>...
>>kubernetes_deployment.demo-non-privileged: Creating...
>>kubernetes_deployment.demo-non-privileged: Still creating... [10s elapsed]
>>kubernetes_deployment.demo-non-privileged: Still creating... [20s elapsed]
>>...
By checking the logs we can see the reason for that failure (here I use Lens):
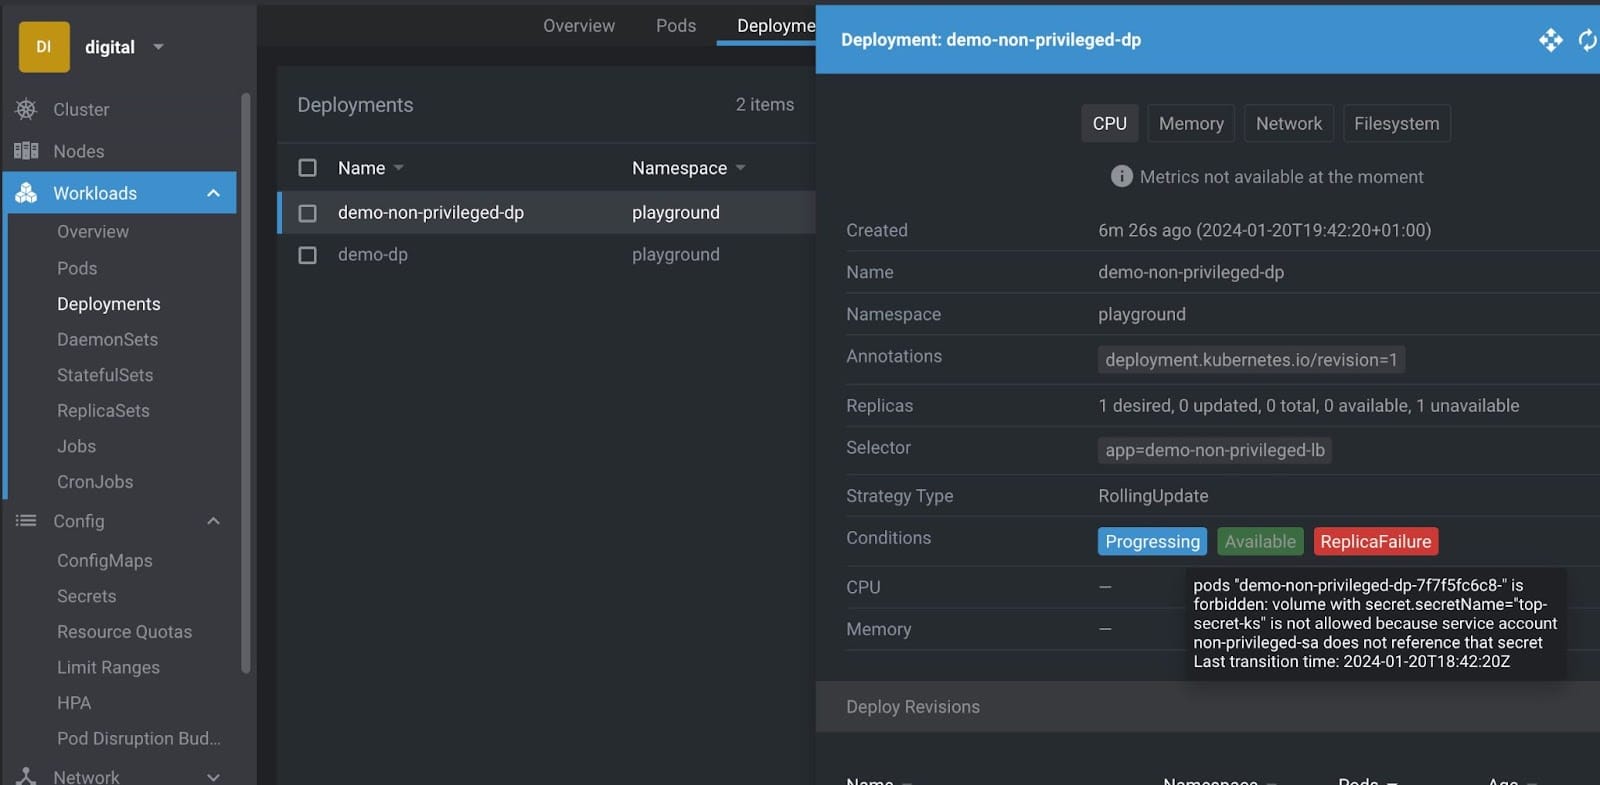
To deploy successfully you’d need to modify the Deployment and remove volume and volume_mount from Pod’s definition. And this makes sense to do before proceeding further.
So, as long as Service Account demo-non-privileged is used, it is impossible to mount any Secrets and get access to it.
Before starting with fixed Deployment, let’s upgrade the Service Account non_privileged to attach a Role explicitly denying access to any Secrets. Here are the Role and Role Binding:
resource "kubernetes_role" "non_privileged" {
  metadata {
    name      = "non-privileged-cr"
    namespace = kubernetes_namespace.playground.id
  }

  rule {
    api_groups = [""]
    resources  = ["secrets"]
    verbs      = [""]
  }
  rule {
    api_groups = [""]
    resources  = ["pods"]
    verbs      = ["get", "list", "watch"]
  }
}

resource "kubernetes_role_binding" "non_privileged" {
  metadata {
    name      = "non-privileged-rb"
    namespace = kubernetes_namespace.playground.metadata[0].name
  }

  role_ref {
    kind      = "Role"
    name      = kubernetes_role.non_privileged.metadata[0].name
    api_group = "rbac.authorization.k8s.io"
  }

  subject {
    kind      = "ServiceAccount"
    name      = kubernetes_service_account.non_privileged.metadata[0].name
    namespace = kubernetes_namespace.playground.metadata[0].name
  }
}
After deploying this new Terraform stack…
kubectl exec -it -n playground demo-non-privileged-dp-65f45f4fcd-g7r48 -- /bin/bash
>>root@demo-non-privileged-dp-65f45f4fcd-g7r48:/# kubectl get secrets
>>Error from server (Forbidden): secrets is forbidden: User "system:serviceaccount:playground:non-privileged-sa" cannot list resource "secrets" in API group "" in the namespace "playground"
>>root@demo-non-privileged-dp-65f45f4fcd-g7r48:/# kubectl get pods
>>NAME                                      READY   STATUS    RESTARTS   AGE
>>demo-dp-7756f78b4c-4zfpr                  1/1     Running   0          4m38s
>>demo-non-privileged-dp-65f45f4fcd-g7r48   1/1     Running   0          3m17s
>>root@demo-non-privileged-dp-65f45f4fcd-g7r48:/# exit
>>exit
.. we can see outputs confirming that the newly started Pod has no access to Secrets, yet can still query other Pods.
In summary, we now have two Service Accounts:
- secret-privileged-sa should be attached to resources that need access to Secrets as mounted volumes (and can be easily upgraded to have k8s API access)
- non-privileged-sa with no access to Secrets should be the default choice for all other resources.
Conclusion
Both Vault and Kubernetes offer versatile and production-ready solutions for managing sensitive data. However, these come with a significant learning curve and may not be suitable for smaller teams due to their complexity. An alternative solution could be to use Terraform to push sensitive data into Kubernetes Secrets. This approach offers simplicity and a sufficient level of security and could be a suitable architectural design pattern for some use cases.
Liked this article? Read more about secrets in Kubernetes:
Guest Expert Thomas Segura
This article is a guest post. Views and opinions expressed in this publication are solely those of the author and do not reflect the official policy, position, or views of GitGuardian, The content is provided for informational purposes, GitGuardian assumes no responsibility for any errors, omissions, or outcomes resulting from the use of this information. Should you have any enquiry with regard to the content, please contact the author directly.