- Leverage Jenkins Credentials Plugin and HashiCorp Vault integration for centralized, auditable secret storage.
- Enforce least-privilege access, regular rotation, and avoid plaintext or hardcoded secrets.
- Use secure secret injection methods (withCredentials, credential binding) to prevent leaks in logs or code.
- Follow best practices to minimize risk and maintain compliance.
DevOps engineers must handle secrets with care. In this series, we summarize best practices for leveraging secrets with your everyday tools.
GitGuardian hires external cybersecurity experts to share their unique experience and knowledge in security on the GitGuardian blog.

Jenkins is a popular open-source automation server that is widely used for building, testing, and deploying software. It allows developers to automate many aspects of their software development process, including continuous integration and continuous deployment.
As with any continuous integration software, managing secrets in Jenkins is crucial to ensure the security and integrity of the applications being built and deployed. In this blog post, we will be discussing the best practices for managing secrets in Jenkins, including configuring and managing secrets and how to handle potential security breaches.
The blog post also covers storing secrets with Hashicorp Vault and integrating it with Jenkins.
Prerequisites
Before diving into the specifics of this tutorial, managing secrets in Jenkins, it's important to have the following:
- Familiarity with Jenkins and its basic concepts, including how to create jobs and build pipelines.
- Access to an already set up Jenkins instance and a Hashicorp Vault for testing and implementation, which will allow you to follow along with the tutorial.
- Installed plugins in your Jenkins instance: Credentials | Jenkins plugin, Credentials Binding | Jenkins plugin, and HashiCorp Vault | Jenkins plugin.
Additionally, you can have an application codebase ready to test the secrets management flow in your workflow. We will take as an example a NodeJS application that has Mocha tests and a Docker build setup.
Next, we have a continuous integration (CI) job that is triggered when commits are pushed to the stage branch. The code is then tested and merged into the main branch. After that, a continuous deployment (CD) job is triggered and builds a Docker image before publishing it to DockerHub.
Please note that this blog post is not contingent on this CI/CD workflow: although the presented flow can look pretty basic, you can follow along without any issues, no matter how complex or simple your workflow is!
Understanding Jenkins Secrets
Jenkins secrets, also known as credentials, are used for various authentication and authorization purposes and can include things like passwords, API keys, and private SSH keys.
When it comes to managing these secrets, it’s important to understand there are two scopes in Jenkins: system-wide and job-specific. System-wide secrets are available to all jobs and projects within a Jenkins instance, such as credentials for a shared database or Git repository. Job-specific secrets are only available to a specific job or project and are typically used for specific tasks, like deploying to a particular environment.
It is important to follow best practices when managing secrets in Jenkins. This includes using different secrets for different purposes, restricting their access, and regularly rotating and updating them to minimize the impact of a potential breach.
Jenkins Secrets Encryption and Storage Architecture
Jenkins employs a sophisticated encryption system to protect secrets at rest, utilizing AES encryption in cipher block chaining (CBC) mode with PKCS#5 padding and random initialization vectors. The encryption keys are stored in the $JENKINS_HOME/secrets/ directory, which should be configured with restrictive permissions (chmod 0700) to ensure only the Jenkins process can access these critical files.
The master key, stored unencrypted in $JENKINS_HOME/secrets/master.key, serves as the key encryption key for protecting other encryption keys. Common key identifiers include hudson.util.Secret for generic secrets, com.cloudbees.plugins.credentials.SecretBytes.KEY for credential types, and jenkins.model.Jenkins.crumbSalt for CSRF protection. Understanding this architecture is crucial for implementing proper backup strategies and security hardening, as the secrets directory requires the highest level of protection and should be excluded from standard backup procedures to prevent credential exposure.
Configuring Jenkins Secrets
Now that we understand the basics of Jenkins secrets, let's take a look at how to set up and configure them. The process of configuring secrets in Jenkins will vary depending on the type of secret and the specific use case.
One way to configure Jenkins secrets is through the Jenkins web interface. To do this, navigate to the "Credentials" page in the Jenkins settings.
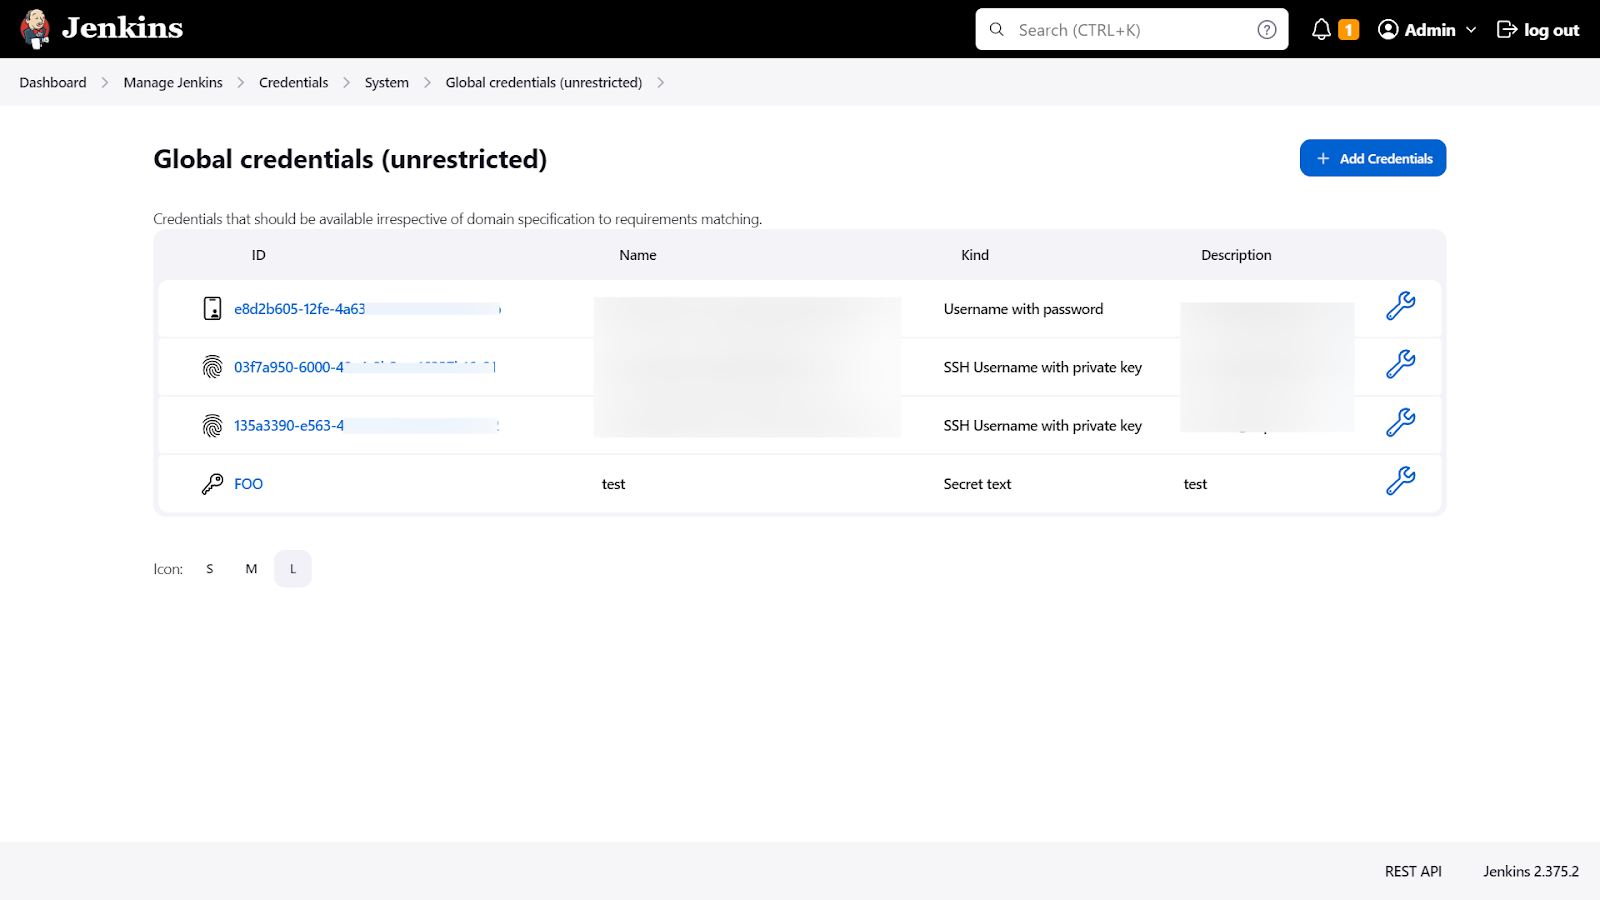
This is Jenkins' official credential management tool. You can add, modify, and delete secrets as needed. You can also specify which jobs or projects a secret is available for, and assign permissions to specific users or groups. There are multiple ways to store secrets using the Credentials Plugin.
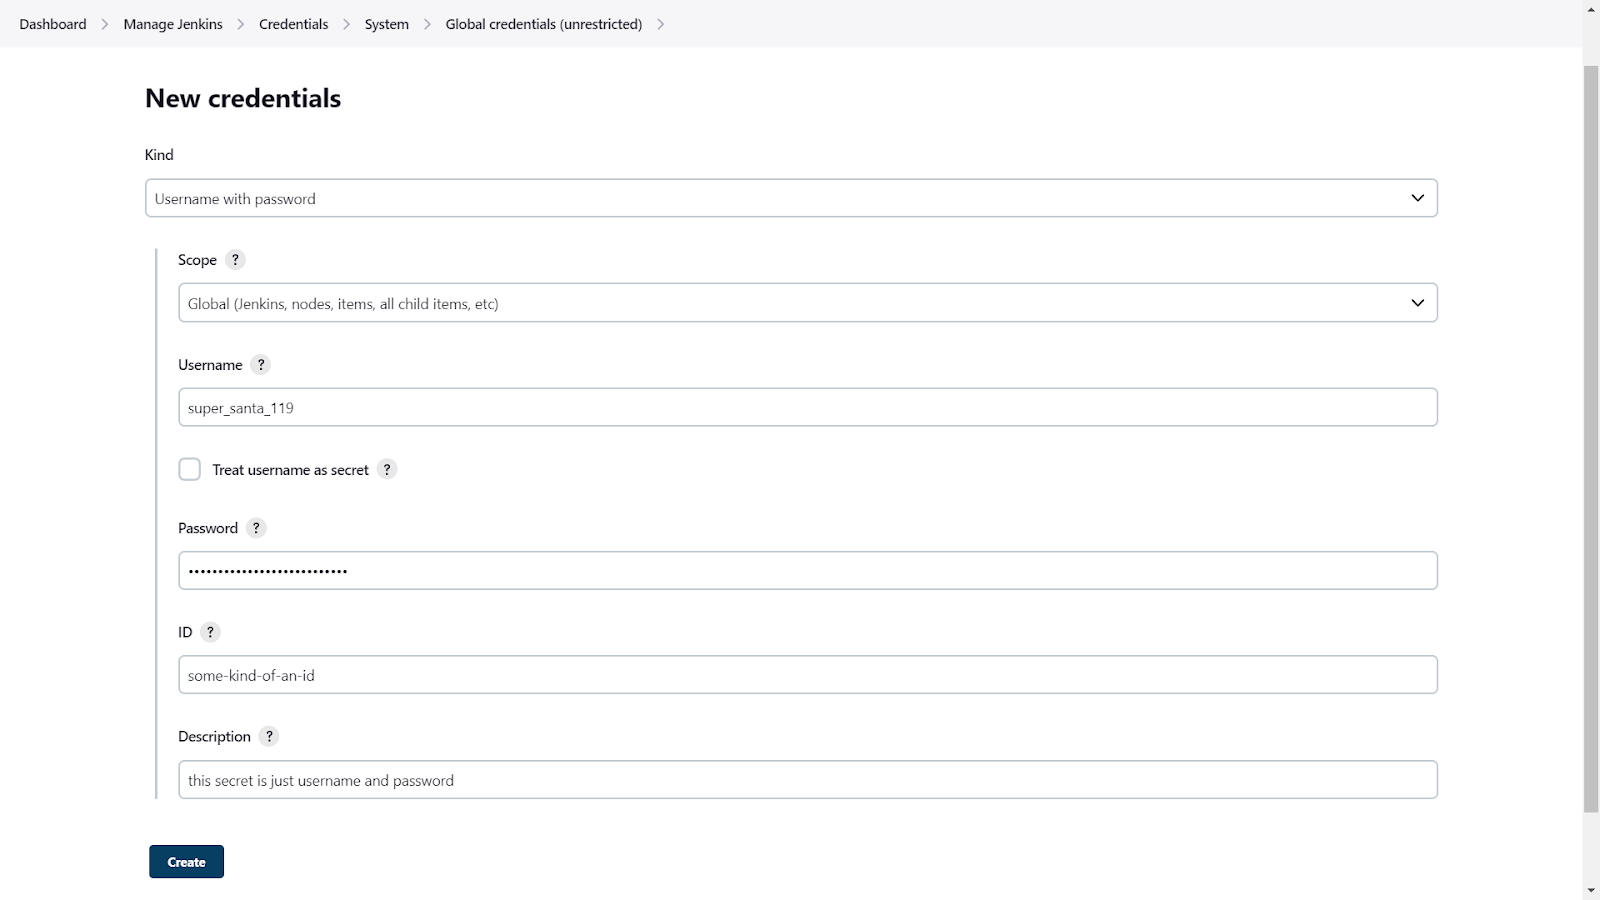
One good practice when configuring a secret is to give it a descriptive and unique name that clearly indicates what the secret is used for. Avoid using generic or ambiguous names that could cause confusion or make it difficult to identify the correct secret.
Also, it is important to scope credentials appropriately based on the intended usage. For example, if a credential is only needed for a specific job or pipeline, it should be scoped to that job or pipeline rather than being made available globally. This helps to minimize the potential for unauthorized access or misuse of the credential.
Here we have stored DockerHub username and password with a global scope:
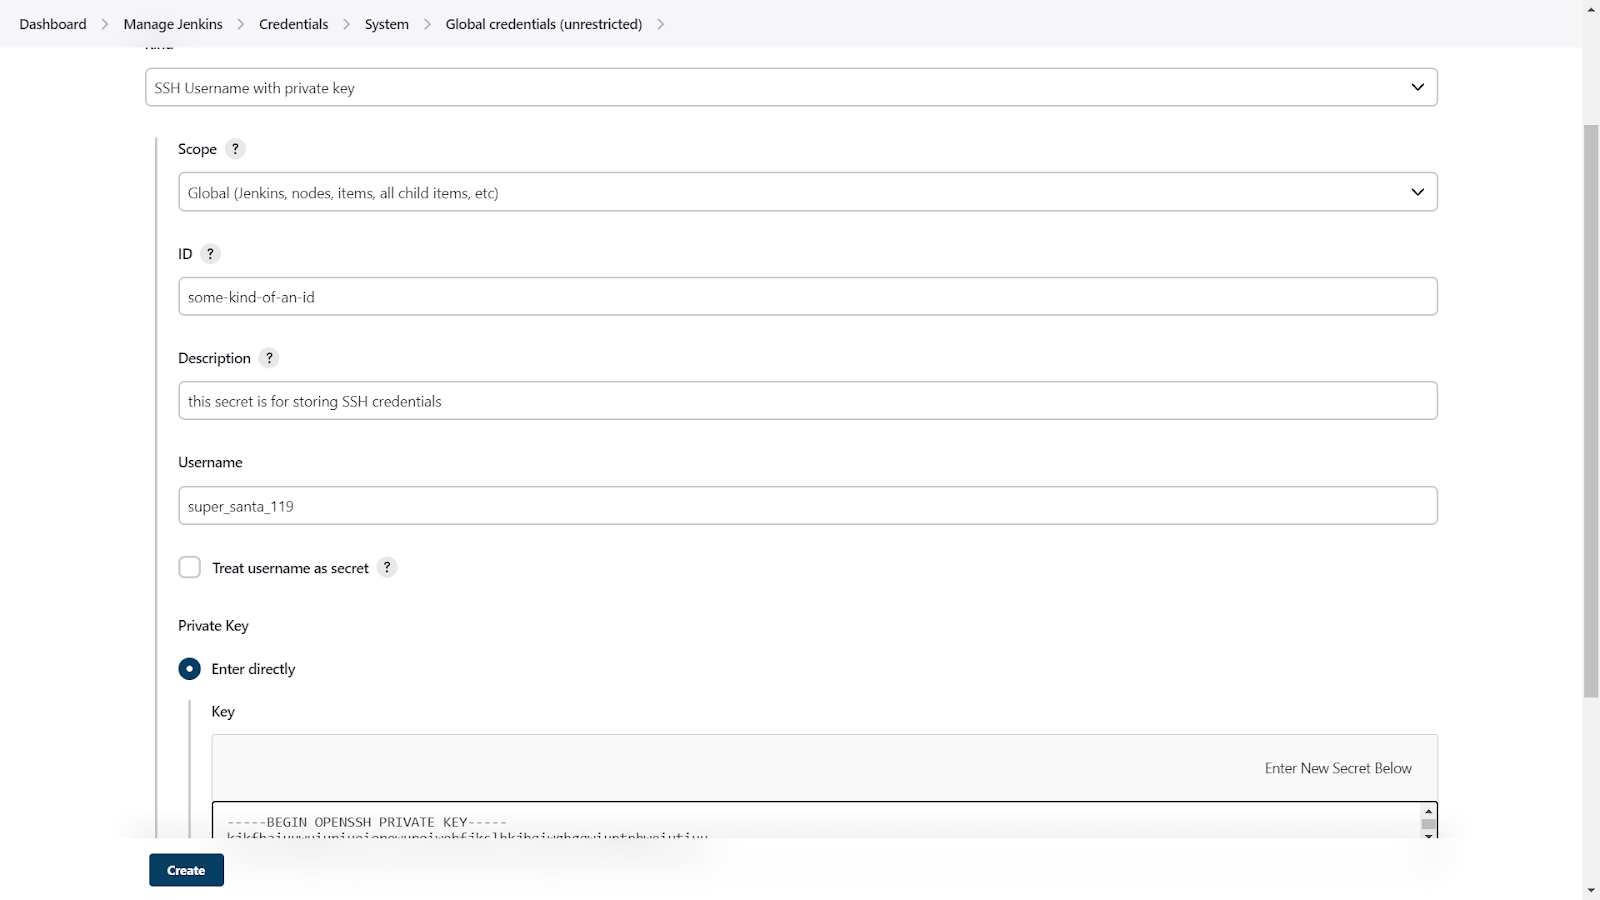
Here is an example of storing SSH keys (GitHub credentials in this case):
We can also store a text-based secret like an OAuth client secret for example:

If you have an .env holding environment variables needed in multiple steps in the build pipeline:

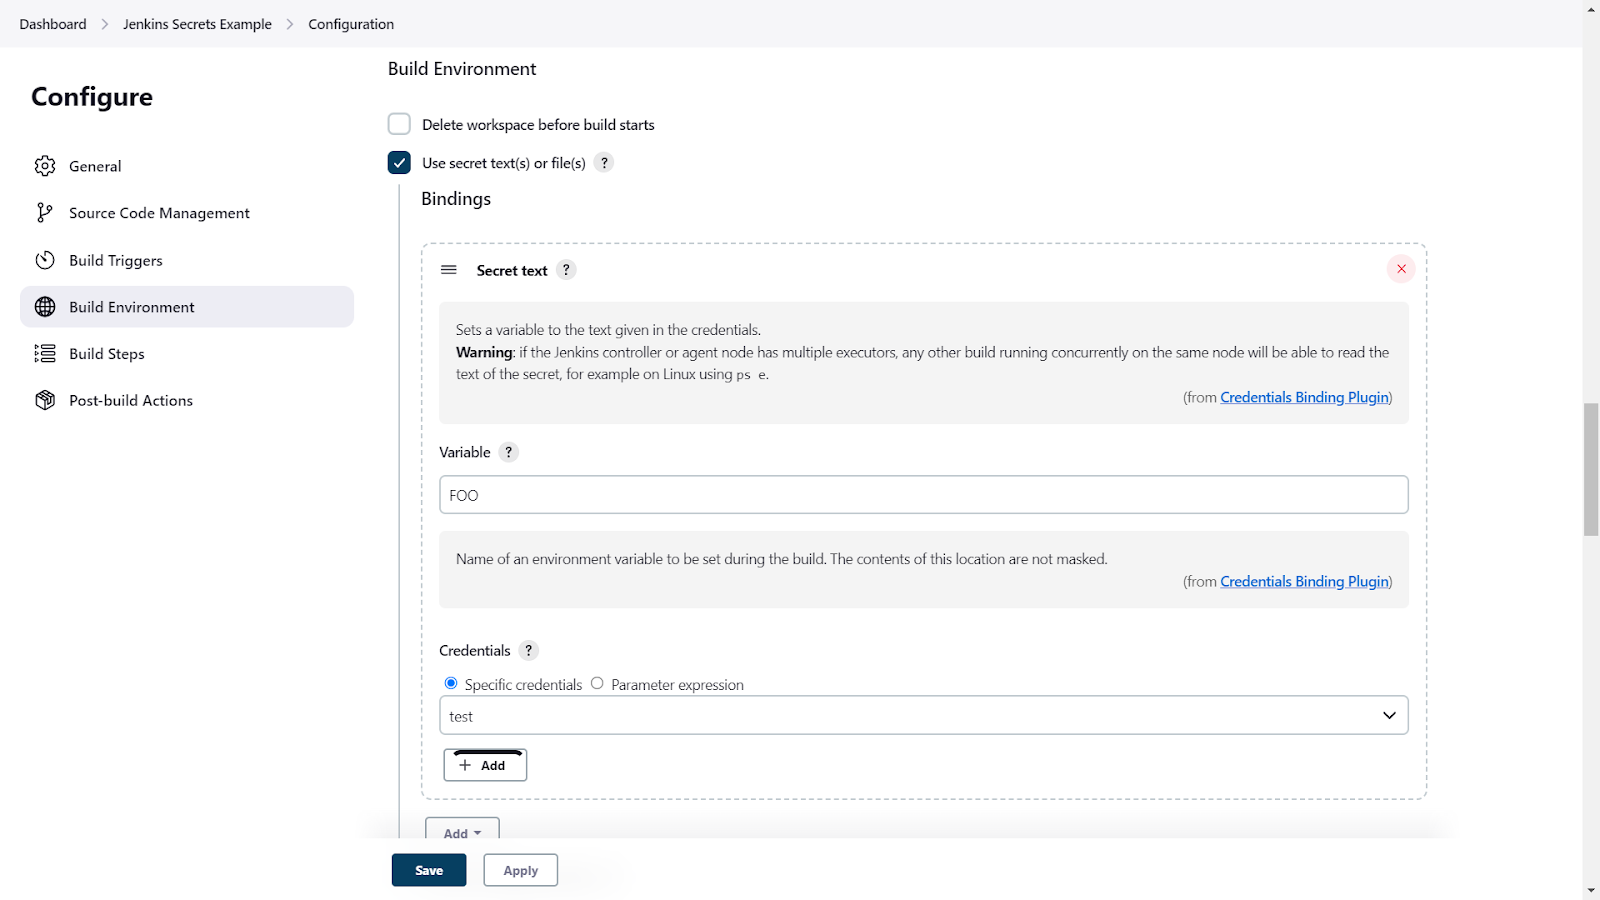
This is where the "Credentials Binding" plugin comes into play. This plugin allows you to bind secrets to environment variables, making them available to your build scripts. It gives you an easy way to package up all a job’s secret files and passwords and access them using a single environment variable during the build.
To use this plugin, you'll need to specify the ID of the secret you want to use, as well as the environment variable it should be bound to. The following example is for a freestyle project in Jenkins.
And below is an example for injecting the credentials PORT into a pipeline project in Jenkins. (full config here)
pipeline {
  …
  stages{
    …
    stage('Building Docker Image') {
      steps {
        script {
          withCredentials([string(credentialsId: 'PORT', variable: 'PORT')]) {
            dockerImage = docker.build("$registry:$BUILD_NUMBER", "--build-arg PORT=$PORT .")
          }
        }
      }
    }
  …
  }
  …
}
Advanced Jenkins Credentials Plugin Integration
Beyond basic secret storage, the Jenkins Credentials Plugin offers enterprise-grade secret management capabilities that extend far beyond simple password fields. This plugin provides a centralized credential store with granular access controls, allowing administrators to define credential domains and scope access based on job requirements and user permissions.
The plugin supports multiple credential types, including:
- Username/password combinations
- SSH private keys
- Certificates
- Secret files
It also offers advanced capabilities such as credential masking in build logs, automatic credential rotation support, and integration with external identity providers.
When implementing Jenkins credentials secret file workflows, the plugin ensures that sensitive files are securely transferred to build agents without exposing their contents in logs or temporary storage. This approach significantly reduces the attack surface compared to embedding secrets directly in build scripts or environment variables, providing a robust foundation for secure CI/CD pipelines.
Jenkins Pipeline Security Best Practices and Secret Injection
Modern Jenkins pipelines require sophisticated approaches to Jenkins secrets management that go beyond traditional freestyle job configurations. Pipeline-as-code introduces unique challenges: secrets must be injected securely into declarative or scripted pipeline definitions without compromising the integrity of Jenkinsfiles in version control.
The withCredentials block provides the most secure method for injecting secrets into pipeline steps, automatically masking credential values in console output and ensuring proper cleanup after step execution. Best practices include using credential IDs rather than hardcoded values, implementing least-privilege access patterns, and leveraging pipeline shared libraries to centralize secret handling logic. Additionally, pipeline developers should avoid using echo or println statements with credential variables, implement proper error handling to prevent credential leakage in stack traces, and utilize Jenkins' built-in credential binding syntax to maintain separation between pipeline logic and sensitive data access patterns.
How to Use Vault Secrets in Jenkins
In addition to the built-in Jenkins Secrets manager, it is also possible to integrate with third-party secret management tools such as Hashicorp Vault, AWS KMS, etc. This can be particularly useful if you are already using Vault to manage secrets for other applications or services.
In this section, we will walk through the process of configuring Jenkins to retrieve secrets from Vault and use them in your pipeline.
Run your Vault with the following command and leave this terminal session open as dev servers run in-memory, i.e., shutting them off would wipe the slate clean.
# we are running the vault inside an ec2 machine thus the private ip
$ vault server -dev -dev-listen-address=”<private ip of ec2>:8082”
Now, run the following commands in a separate terminal session:
$ export VAULT_ADDR='http://<private ip of ec2>:8082'
# check the status just to be sure
$ vault status
It should print information similar to this:

Next, our Jenkins instance needs to communicate with the Vault. The following commands will take care of the auth-related formalities. Jenkins will later use this role to talk to the Vault.
# firstly enable the vault approle authentication method
$ vault auth enable approle
# ensure a v2 kv secrets engine is in use
$ vault secrets enable kv-v2
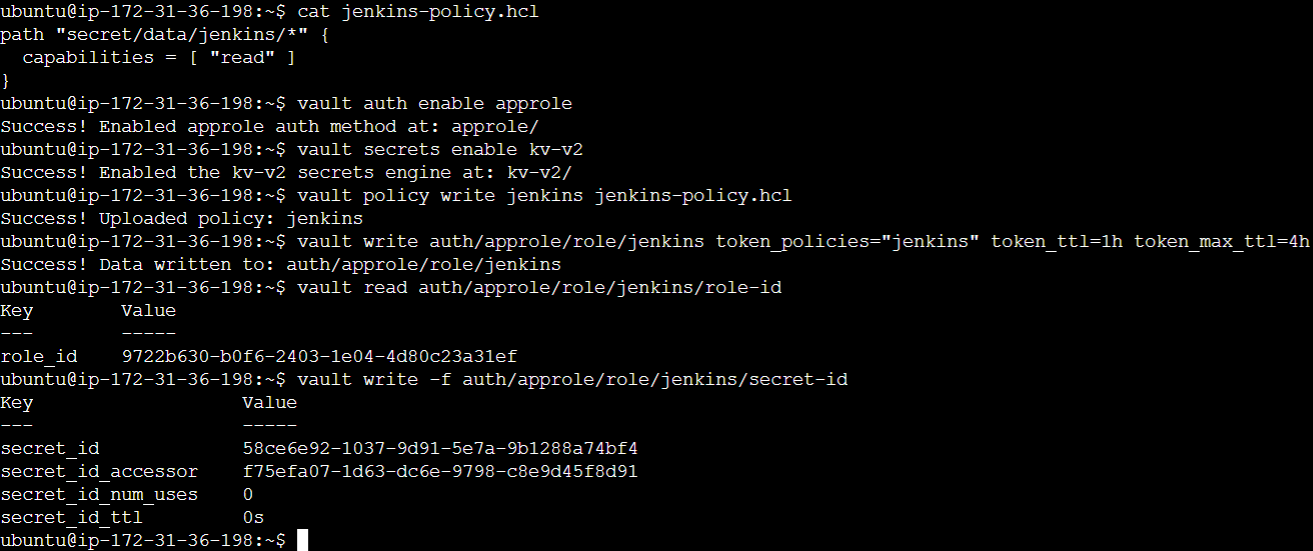
# create a local file “jenkins-policy.hcl” that houses a policy allowing “read” access to the path “secret/data/jenkins” under which we’ll store our secret
$ tee jenkins-policy.hcl <<"EOF"
path "secret/data/jenkins/*" {
capabilities = [ "read" ]
}
EOF
# create a vault policy “jenkins” from the local policy file “jenkins-policy.hcl”
$ vault policy write jenkins jenkins-policy.hcl
# create a vault approle “jenkins” and associate the vault policy “jenkins” with it
$ vault write auth/approle/role/jenkins token_policies=”jenkins” token_ttl=1h token_max_ttl=4h
# Next, we need the strings roleId and secretId with
$ vault read auth/approle/role/jenkins/role-id
$ vault write -f auth/approle/role/jenkins/secret-idThese commands will ensure that apps and/or services like Jenkins can connect with the Vault. The access policy we’ve defined allows the path secret/data/jenkins/* to be accessed by the policyholder. Then, this policy is registered with the Vault and a role is attached to this policy.
Copy the role_id and secret_id for later use. These are what Jenkins will use to identify itself while communicating with the Vault, and to access secrets in the path secret/data/jenkins/*. We’ll store these as a credential in Jenkins.
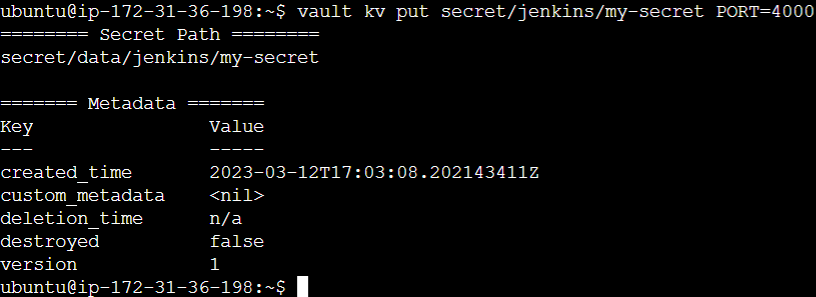
Finally, on Vault’s end, we need to store the secret. There are multiple ways to achieve this, but we’ll store it as a secret text here. The following command is used to store a secret identified as my-secret in the kv secret engine in the path we earlier declared in the approle policy.
$ vault kv put secret/data/jenkins/my-secret PORT=4000
Then create credentials in Jenkins via the Jenkins web interface. To do this, navigate to the "Credentials" page in the Jenkins settings. Add a new credential under Global credentials. Select the “Kind” as “Vault App Role Credential”. And paste in the IDs role and secret we copied from the terminal. The form should look like the following:
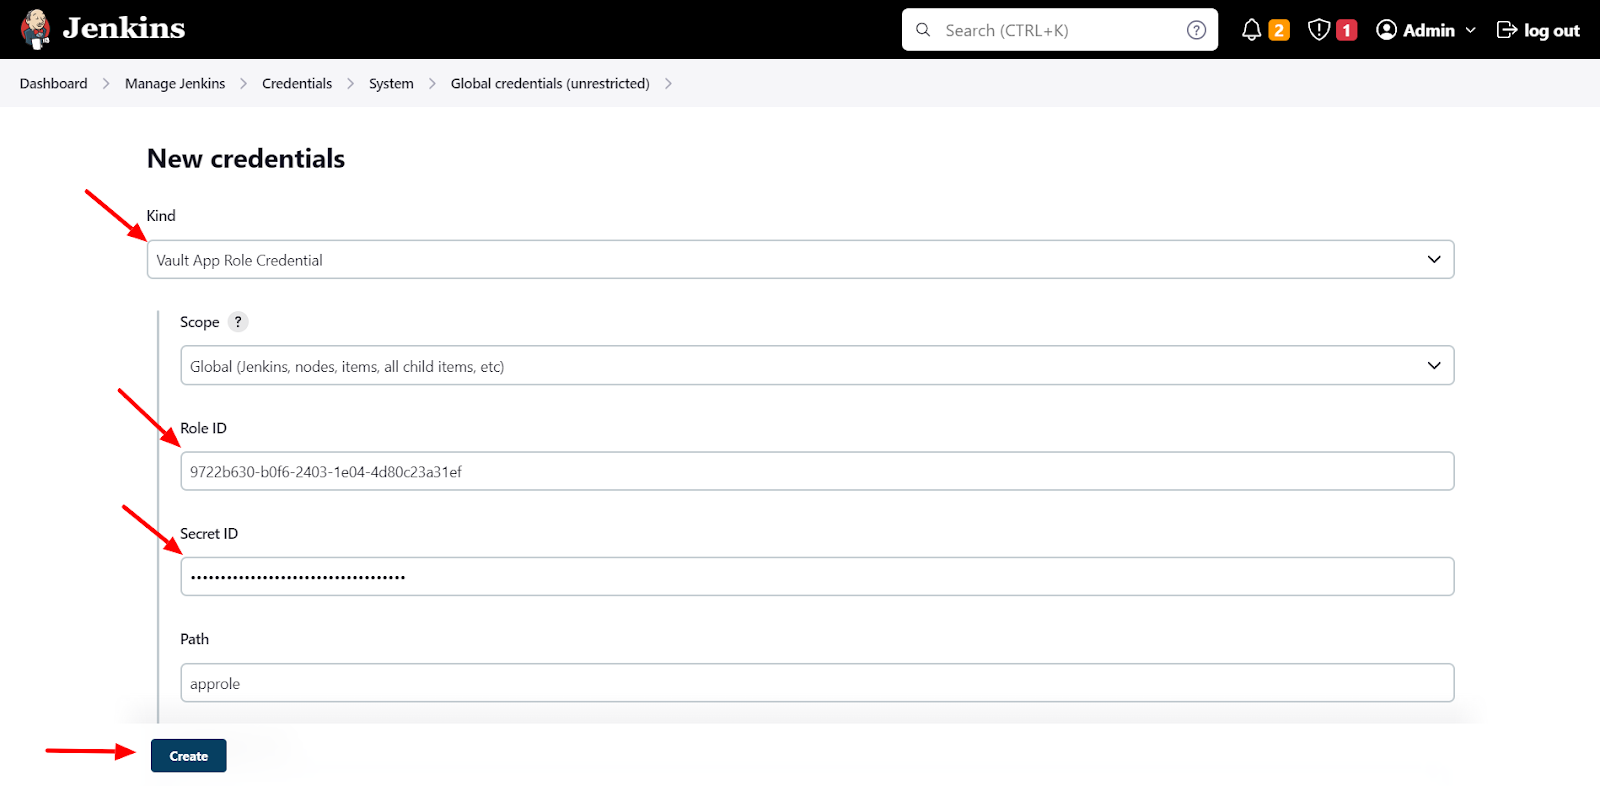
Once the credentials are added, copy the credential’s ID for later reference in the Jenkins pipeline.
Lastly, the following example is for a pipeline project in Jenkins. (full config here)
def secrets = [
  [
    path: 'secret/data/jenkins/my-secret',
    engineVersion: 2,
    secretValues: [
      [envVar: 'PORT', vaultKey: 'PORT']
    ]
  ],
]

def configuration = [
  vaultUrl: 'http://172.31.36.198:8082',
  vaultCredentialId: 'ccc2cf0c-1b1a-40a1-a7bd-81ef1dc764f1',
  engineVersion: 2
]

pipeline {
  …
  stages{
    …
    stage('Building Docker Image') {
      steps {
        script {
          withVault([configuration: configuration, vaultSecrets: secrets]) {
            dockerImage = docker.build("$registry:$BUILD_NUMBER", "--build-arg PORT=${env.PORT} .")
          }
        }
      }
    }
  …
  }
  …
}
In this section, we have demonstrated how to integrate Jenkins with Hashicorp Vault to securely manage your secrets. By leveraging the power of Vault's secret management capabilities and Jenkins' flexible pipeline configuration, you can ensure that your sensitive information remains protected throughout your CI/CD process.
Managing Secrets in Jenkins
Managing secrets in Jenkins is crucial for maintaining the security of your applications. To ensure this, it is important to follow best practices such as rotating secrets regularly, using strong passwords, and avoiding storing plaintext secrets in Jenkins or in version control.
In addition, regular auditing and monitoring of secrets are also important. This involves keeping track of access to secrets, and their usage, and updating them as necessary. Alerts should also be set up to notify of potential breaches, such as unauthorized access to secrets or failed login attempts.
In case of a security breach or secrets leakage, having a plan in place for revoking access to the compromised secrets, rotating all secrets, and conducting a thorough investigation to prevent similar incidents in the future is crucial.
Conclusion
As we have seen, Jenkins secrets are used to store sensitive information such as passwords, tokens, and keys that are needed by your applications to function properly. However, if not managed properly, these secrets can become a security risk.
Throughout this blog post, we have discussed the importance of managing secrets in Jenkins, the types of secrets that can be managed, and best practices for securing and managing these secrets. We also provided step-by-step instructions for setting up and configuring secrets in Jenkins natively or with an external secrets management solution.
It is important to remember that hard-coding secrets or storing them in plaintext can lead to security breaches. Therefore, it is crucial to follow best practices for secret management and to have a plan in place for handling potential breaches.
 Mackenzie Jackson
We hope this blog post has provided you with a better understanding of how to manage secrets in Jenkins and keep your applications secure.
It is part of a series on secrets management with popular technologies, have a look!
Guest Expert Guest Expert
 Guest Expert
FAQ
How does Jenkins encrypt and store secrets at rest?
Jenkins encrypts secrets using AES in CBC mode with PKCS#5 padding and random IVs. Encryption keys are stored in $JENKINS_HOME/secrets/, where master.key serves as the key encryption key. Restricting permissions on this directory (e.g., chmod 0700) is essential to reduce the risk of credential compromise.
What are best practices for managing Jenkins secrets in CI/CD pipelines?
Scope secrets to the minimum required jobs, use descriptive credential names, rotate them regularly, and inject them securely using the withCredentials block. Avoid hardcoding secrets in Jenkinsfiles or logs, and enable monitoring and auditing for all credential usage to maintain visibility and compliance.
How can Jenkins integrate with external secret managers like HashiCorp Vault?
Jenkins integrates with external managers using plugins such as the HashiCorp Vault plugin. Configure Vault authentication (e.g., AppRole), define strict access policies, and store Vault tokens or credentials in Jenkins. Pipelines can securely fetch secrets at runtime using the withVault step, ensuring no secrets are exposed in code or logs.
What advantages does the Jenkins Credentials Plugin offer for enterprise secret management?
The Jenkins Credentials Plugin centralizes credential storage with granular access controls, supports multiple secret formats (passwords, SSH keys, files), masks secrets in logs, and allows secure distribution to build agents. It also integrates with external identity systems, improving secrets governance across large CI/CD environments.
How should secrets be injected into Jenkins pipelines to maximize security?
Use the withCredentials block to inject secrets only for the required pipeline steps. This ensures masking in console output, limits secret scope, and guarantees automatic cleanup. Always reference secrets by credential ID, never echo secret values, and centralize secret-handling logic in shared libraries where possible.
What should I do if Jenkins secrets are leaked or compromised?
Immediately revoke and rotate affected credentials, audit access logs to assess exposure, and update downstream systems. Review Jenkins configuration and permissions for weaknesses, and strengthen monitoring and alerting to detect future unauthorized access attempts or anomalous credential usage activity.
How does using Jenkins secrets differ from storing secrets in environment variables or code?
Jenkins secrets are encrypted at rest and accessed via controlled credential IDs, significantly reducing accidental exposure risk. Environment variables and in-code secrets are more prone to leaks through logs, version control, or misconfiguration. For secure CI/CD operations, Jenkins-managed secrets are always the preferred method.
Views and opinions expressed in this publication are solely those of the author and do not reflect the official policy, position, or views of GitGuardian, The content is provided for informational purposes, GitGuardian assumes no responsibility for any errors, omissions, or outcomes resulting from the use of this information. Should you have any enquiry with regard to the content, please contact the author directly.