

This is the second blog post in a series that is taking a deep dive into DevSecOps program architecture. The goal of this series is to provide a holistic overview of DevSecOps as a collection of technology-driven, automated processes. If you didn’t read the first blog post, make sure to check that out too!
This entry will be less about the “decision-making” side of things, and more about the developer experience. We will learn how to equip our software engineers with the tools they need to successfully own the security for their own code, and how to support them through automation. Before getting started here, I want to reiterate my mission statement for DevSecOps:
“My job is to implement a secure-by-design software development process that empowers engineering teams to own the security for their own digital products. We will ensure success through controls and training, and we will reduce friction and maintain velocity through a technology-driven, automated DevSecOps architecture.”
What does “secure-by-design” mean?
In this blog post, we will be constructing a process that makes our applications “secure-by-design”. This means that our software development lifecycle (SDLC) includes security as part of the development process, which guarantees a minimum level of security for every software product it produces.
Through this strategy, our digital products will have gone through rigorous security testing by the time they are published, and we will have caught many vulnerabilities before anything is made available to customers.
In DevSecOps, there are 2 key components in our software development pipeline that support our secure-by-design strategy: Security Gates and Automation. These 2 components work together to enforce a security baseline while preserving efficiency. Just like last time, we will be building a diagram to visualize how this process works.
Software development pipeline
In DevSecOps, we build our security practices on top of our existing software development practices. For the purposes of this blog post, we will say that our example organization produces container-based apps deployed through Kubernetes. These are the high-level artifacts or steps in our example pipeline:
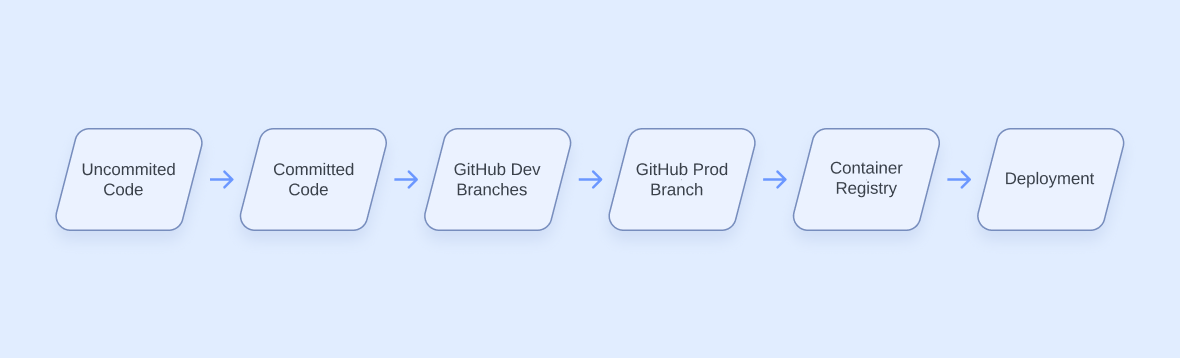
Your development process may look different, but as we go, you’ll find that many of the concepts will be transferable to whatever you’re working with. Let’s break each stage down briefly before moving on.
Uncommitted Code
The software development pipeline begins with the software engineer drafting new code or modifying the application. This typically happens on the developer’s local workstation. From there, the code is added to the git history using the “git commit” command.
Committed Code
Once the code has been committed to git, it now exists in our repository’s history forever. We can make additional changes, but the old commits are still able to track how our code changed over time. This becomes important later. At some point, we will “git push” our code to our git hosting provider. In this case, that’s GitHub.
GitHub Dev Branch
It’s not good practice to make changes directly on your production (prod) branch, so we have a different development (dev) branch to push our code to first. Once our code is ready to be published, we will open a Pull Request to review and merge the changes from the dev branch into our prod branch.
GitHub Prod Branch
If the code passes review in the Pull Request from the dev branch, it is ready to be published as a container. We will build a container image with our code and publish the image to our container registry.
Container Registry
In the container registry, our software sits frozen as an image waiting to be deployed. Our example organization uses Kubernetes for orchestration to deploy the container(s) to run our app.
Deployment
Once we’ve deployed our app, it is running and exposed to the internet. Years ago, this was where most organizations would start doing vulnerability assessments of their applications. This means any major security issue would require that we start all the way back from the beginning and go through the entire process again.
That’s obviously not very efficient, so over time, new tools were created to help developers shift security “left” in the pipeline and catch vulnerabilities earlier. Unfortunately, these tools have only been marginally effective, and vulnerable software is still extremely common. If we have the tools to tell us what is vulnerable and things still aren’t getting better, what are we doing wrong?
I theorize that our problem with secure software development lies with our requirements. The ONLY requirement for software development has traditionally been that the app meets our functionality needs.
To make software that is secure-by-design, we need to redefine what “production-ready” means for our digital products. We must agree upon some minimum level of security and guarantee that we are meeting those standards through Security Gates that prevent us from moving on until we have met our security requirements. This leads us to the first key component of our DevSecOps pipeline.
Security gates
To guarantee security in our software development pipeline, we will be adding scans or checks to each step of the process. Each of these scans will be automated to make sure that they can’t be forgotten.
Scanner Types
In the last blog post, we covered many types of vulnerability scanners in the “Identification” stage of our process diagram. The same types of scanners will be used in the security gates we are about to cover, though we use them differently here.
In the vulnerability management lifecycle from last time, our security scanners were cataloging historical, previously introduced vulnerabilities in our software. In our security gates, we are mostly concerned with preventing the introduction of new vulnerabilities.
There’s one more distinction in how we are implementing the scanners here that I talked about briefly in the last post. Rather than making our software engineers context-switch and look at some web dashboards to see their vulnerabilities, we will be integrating our security scanners with the tools they already use. By doing this, we are showing them vulnerabilities where they’re relevant, and when they’re relevant.
With that out of the way, let’s jump into the different types of security gates that we can set up in our pipeline. Below is the next part of our diagram which shows the interactions between our traditional pipeline and our security gates.
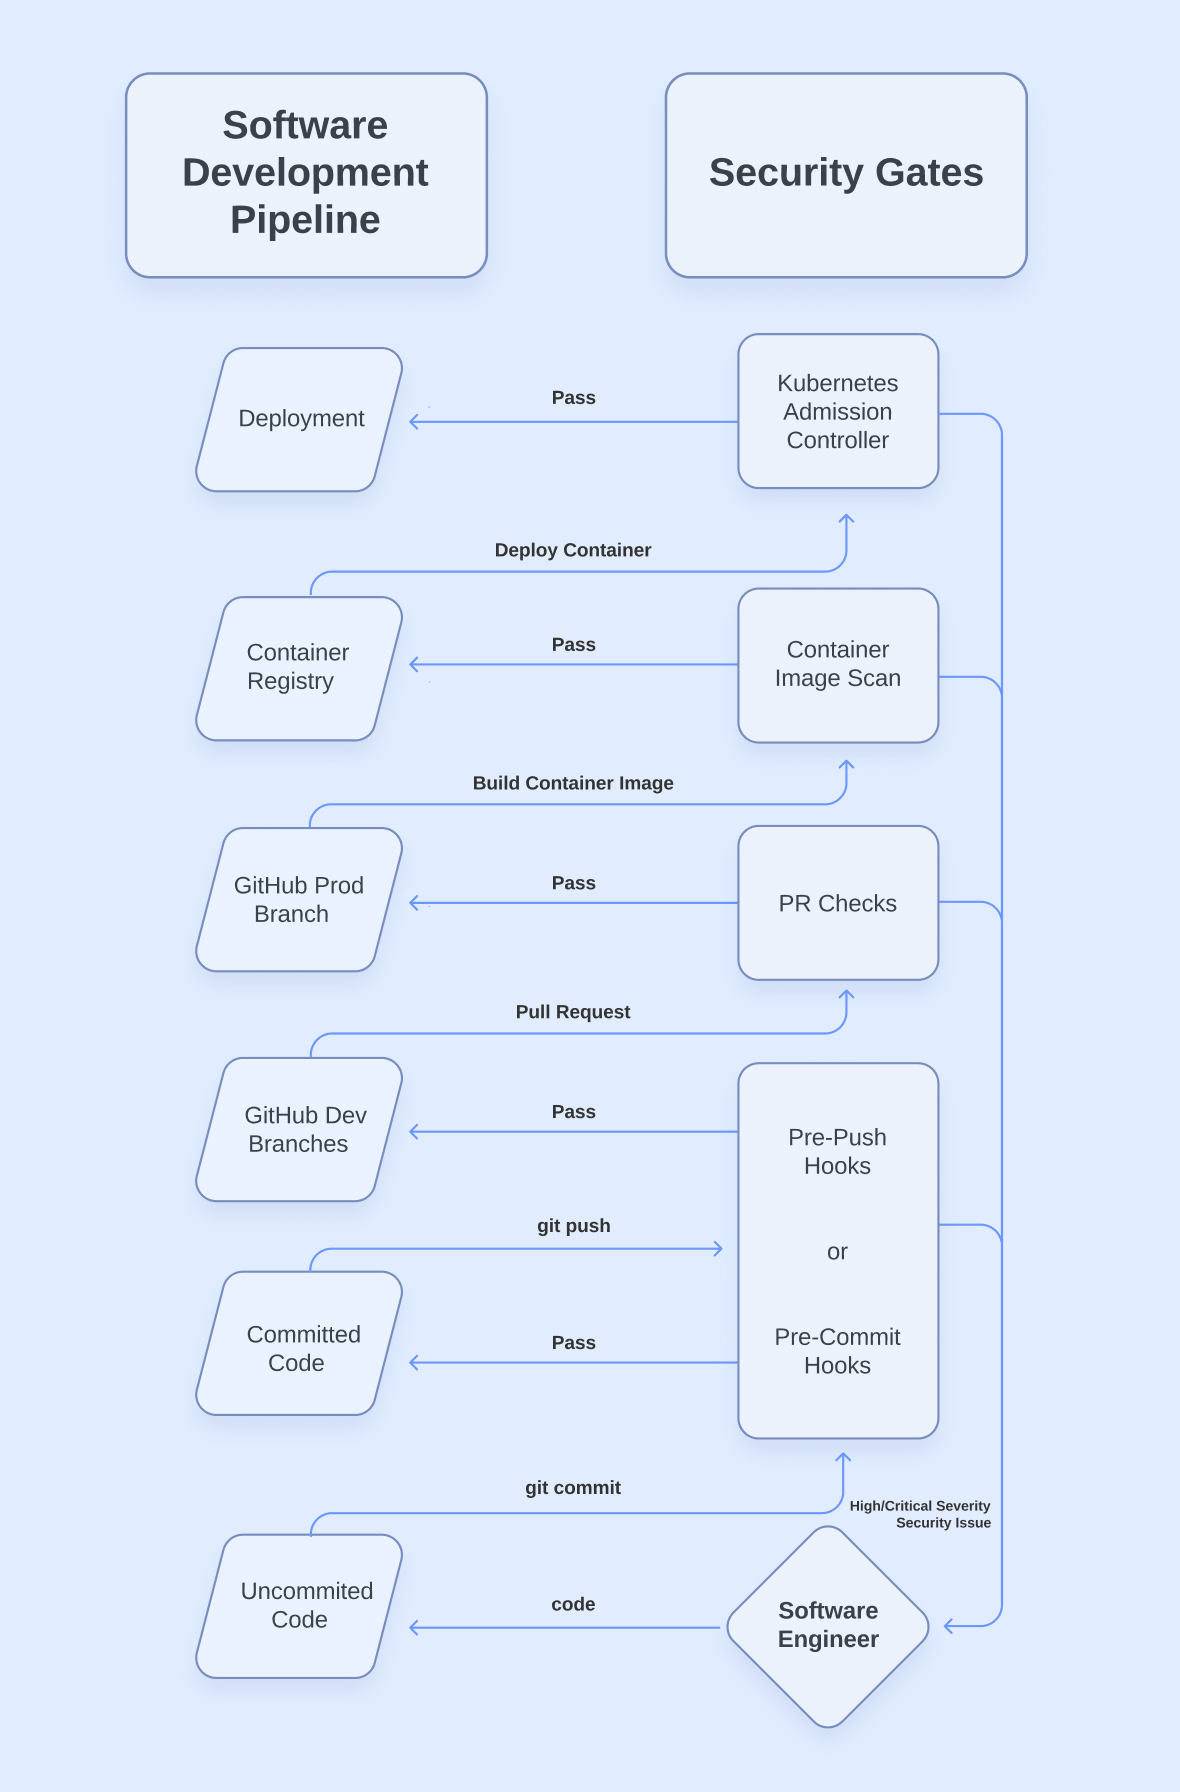
As you can see, rather than moving directly from one stage of our pipeline to the next, our software now has to pass an automated security check before it can progress. We can set whatever we want as our threshold for failure, but ultimately, a failure will require us to fix vulnerabilities before we can move on.
Now, let’s go into detail on what each type of security gate looks like. We’re going to start slightly out of order, but it will be clear why in a moment.
Pull Request checks
Pull Request (PR) checks are one of the most critical pieces in our secure-by-design SDLC because PRs are the first place in our pipeline where we can truly guarantee that security checks are happening. Prior to the code being in GitHub, everything is happening on our local workstations. We trust our software engineers, but we can never be 100% sure that they aren’t disabling security checks or using personal devices to write code. We do know that we have full control of the GitHub repository, though.
By configuring branch protection rules, we can force all code to go through a Pull Request before transitioning from our “development” branch to our “production” branch. In DevSecOps, we use PRs as an opportunity to run various security checks and require them to pass before the code can be merged.
Pre-commit and pre-push hooks
Even though the Pull Request is the first enforceable security gate, we should still try to help our developers out by shifting checks further “left” to catch things even earlier in the process. Pre-commit and pre-push hooks are automated actions that run when we execute a “git commit” or “git push” command.
As a security gate on our software engineer’s workstations, we can configure pre-commit or pre-push hooks. I emphasize the word “or” because the two hook types are redundant if all we want to accomplish is passing security checks before pushing our code to GitHub.
There are reasons to use one or the other depending on what type of scan we’re talking about. For example, we can set up a hook for discovering leaked secrets. A pre-push hook won’t detect a leaked secret until it has already been committed to the git history. At that point, it might be difficult to undo our commits and we may have to revoke and rotate the secret.
We can save ourselves from all that extra work by configuring our secret scanner as a pre-commit hook, which prevents our code from entering the git history until it is free from secrets. This is a great example of why we need security gates at multiple steps of the software development pipeline. We can’t guarantee or perform some scans until later, but it saves us time to catch things as early as possible.
On the other hand, pre-push hooks might make more sense for SAST or SCA scanners. One of the software engineers I work with once gave me feedback that overdoing pre-commit hooks can cause you to be unable to commit the code you are working on. Especially when you are trying to commit a lot of new code all at once. By using pre-push hooks instead of pre-commit, we are allowed to commit code with vulnerabilities and still use the version control functionality of git. Then, we just fix any issues before pushing to GitHub.
The debate of pre-commit versus pre-push hooks is arguable other than secret scans. My recommendation is to have security and software engineering teams collaborate and agree on what makes the most sense. The key thing to remember is that performing the same scan at different stages of the SDLC is helpful, not unnecessary.
Container image scans
Now let’s get back on track in our software development pipeline. We’ve merged a Pull Request that passed the security gates in our PR checks. Now the code has been merged into our “prod” branch, and we are ready to build the container image that will run our application. If you have multiple environments, this same thing might occur in your “dev” branch. This security gate will look the same either way.
In this example, we will build and publish our container image using an automated workflow. After the step of our workflow that builds the image, we can run a container scanner that will fail the build if it finds vulnerable dependencies in our image that exceed our severity threshold. If the scan passes, our workflow publishes the image to our container registry, where it waits to be deployed.
Kubernetes admission controller
The last security gate in our example pipeline is a Kubernetes admission controller. Admission controllers are just plugins that validate or even modify the instructions given to our Kubernetes cluster. The capabilities of the admission controller depend on the plugins.
In our example pipeline, our admission controller is scanning the container images being deployed for critical dependency vulnerabilities that may have been introduced since the container was built. We could also enforce configuration policies that prevent unsafe settings from our infrastructure-as-code (IaC).
If our admission controller plugins pass all their validations, our application finally reaches deployment. Having gone through each of the security gates we covered along the way, we can now be confident that our application meets the minimum security level that we configured in our security gates.
Assisting with automation
At this point, you’re probably thinking, “This is adding a lot of hassle to getting to deployment.” You’re not wrong, but you should remember that we are redefining what “production-ready” means so we can improve the security of our apps. Luckily for us, this isn’t the end of the post. Now comes the part where we look at the other key component of our DevSecOps pipeline that aims to assist developers and protect our velocity: Continuous Automation.
Our goal for Continuous Automation is to provide software engineers with assistive technology that produces automated feedback and security fixes. This will reduce the time and cognitive load needed to meet our new security requirements. Just like our security gates, we want to utilize technologies that operate where work is already being done to reduce context-switching. Below is our final process diagram, to which we have added the Continuous Automation column:

IDE Plugins
The IDE is as far “left” as we can get when providing vulnerability feedback – it’s where our software engineers are writing the code! By using security scanners as IDE plugins, we can get instant feedback in the linter and see issues in the code we are already working on. We can have all sorts of security scans take place in our IDEs: SAST, SCA, Secrets, IaC, etc… Also, these plugins will work the same whether the code has been committed or not.
Local container image scan
Because container images aren’t built until the later stages of our software development pipeline, they don’t get stopped by a security gate until quite far into the process. The further “right” we are when an issue is discovered, the more time-consuming it is for us to fix it.
To reduce the number of times we get stopped by a container image scan late in our security gates, we need to give our software engineers the ability to run the same container image scans locally on their workstations in the earliest stages of development.
Automated Dependency Updates
Out of everything in our DevSecOps pipeline, one of the most challenging things we have to deal with is the constant discovery of vulnerabilities in our dependencies. Our software can pass through all our security gates and reach deployment, only to have a critical vulnerability discovered in some component that our app uses the very next day. While our software engineers can prevent the introduction of many types of vulnerabilities, this will always be something that they have to deal with. This problem can be helped by using minimal container base images that have fewer packages, but we will always have some dependencies.
To make this ongoing challenge easier and less time consuming, we must use tools that automate dependency updates for us. We can use SCA and Container Image scanners to identify vulnerable dependencies in our runtimes, container registries, and/or git branches. Robust dependency scanners will have the option to automatically create Pull Requests that update the vulnerable packages to a fixed version. Then, all we need to do is accept the fix and merge the PR.
Others
As technology evolves, there may be new ways to automate security fixes. For example, security researcher Jonathan Leitschuh has used CodeQL and OpenRewrite to automate vulnerability discovery and patches across many open-source repositories. There is also a chance that we can use future AI models to find and/or fix vulnerabilities in our code for us. Ultimately, our goal is to help developers work less while maintaining security. Any chance we get to do that will be a huge win for DevSecOps and the security of our software.
Reducing friction
Now, we’ve covered the entire process of creating a secure-by-design software development pipeline. Before wrapping up, I’d like to provide some final advice from my experiences in implementing this architecture at my own company.
Importance of consistency
Throughout this blog post and the last one, I’ve mentioned the importance of reducing context switching. Application security is a complex problem, even for those of us who dedicate our entire career to it. To simplify things for our non-security collaborators, the implementation of our DevSecOps architecture needs to be as consistent as possible. There are two main ways to accomplish this.
The first way to provide a consistent security experience for our software engineers is to ensure that our scan results are the same at every stage of the SDLC. If we use a specific container image scanner in our Kubernetes admission controller, we need to make sure that our software engineers have access to the same scan on their local workstation and build workflow. They need to be getting the same information in the same format so there are no surprises in the later stages of our software development pipeline.
The other way to drive consistency in our DevSecOps implementation is to consolidate scanning tools where possible. In our last blog post, we discussed how no one tool is the best at scanning for every type of vulnerability. But if we have the option of using the same provider for a few of our scans (e.g., SAST, SCA, and Container) rather than having a different tool for each one, it will reduce management overhead and provide a more consistent experience for our software engineers.
Order of operations
Lastly, I wanted to provide some generalized guidance on what order we should go about implementing the various components in our process diagram. The first thing you should do is help your software engineers get familiar with the security tooling and vulnerability scans. Take the time to help them get their IDE plugins set up, show them how to address false positive findings, set expectations and timelines, configure automated dependency fixes, and gather feedback about all the tools.
Once your software engineers are familiar with the tools and findings, start implementing warnings in your security gates. Don’t go blocking things right away, just display warnings for the things that would cause blocks in the future. Gather feedback about the warnings.
Finally, meet with leaders on the software engineering side and agree upon severity thresholds that will be blocking based on the feedback from the warnings and the perceived workload increase. Maybe start with PR checks and work from there on the rest.
Conclusion
There are a lot of technologies involved in the implementation of our secure-by-design SDLC. As we evaluate new code security tools, we should be trying to answer these questions to find the right fit for our DevSecOps architecture:
- How and where can we use this tool as a required security gate?
- How can we automate fixes or feedback with this tool to protect our velocity while meeting security requirements?
If the answer to either of these questions suggests that the tool won’t work well with our goals, it may be worth checking out alternatives to see if any can do these things.
Implementing a secure-by-design SDLC is a complex challenge. But by leveraging technology and automation, we can guarantee that our digital products meet a minimum level of security without much drag on our ability to deliver. Here is the template for the process diagram from this post, so you can use it to track your own progress.
This concludes the second entry in this series on DevSecOps architecture. The next post will be the final entry, where we will be exploring how to protect the security and integrity of the systems involved in our SDLC.
Read more articles from these series:
 Guest Expert
 Guest Expert
This article is a guest post. Views and opinions expressed in this publication are solely those of the author and do not reflect the official policy, position, or views of GitGuardian, The content is provided for informational purposes, GitGuardian assumes no responsibility for any errors, omissions, or outcomes resulting from the use of this information. Should you have any enquiry with regard to the content, please contact the author directly.