
Learn how to build a modern CI pipeline using GitHub Actions to achieve testing, building, and pushing Docker images. Harden your pipeline by scanning your Docker image for leaked secrets and credentials with the help of GitGuardian's ggshield action.
Or simply download our GitHub Actions security cheat sheet!
1. A Story
I was once working in an agile team within a big corporation. The team was meant to be at the same time an experiment to quickly build something cool in an unconventional way, and an “A-team” so that the culture and the way of working could be preached to other teams, as to kick-off digital transformation in a traditional business.
At that time, we were handling more than 25 microservices and releasing as often as 100 times per week. Before that, I had worked in real start-ups, but even there we didn't release half as often. So we were already achieving something truly great, I thought.
Until I was tasked to add another stage in our existing CI pipelines.
Since I was new to the team, another teammate was kind enough to spare 30 minutes to give me a quick introduction to the CI pipelines and libraries they were using. Everything was implemented in Groovy and running in Jenkins; nothing that I hadn't already been familiar with. How hard can it be? As a pro myself, I reckoned that I would finish it in hours, if not tens of minutes.
Then, somehow, my colleague started jumping around between pieces of code within the same big repo full of Groovy libraries. After half an hour, when I was looking at the pipeline code, I didn't have a single clue of how the heck everything was glued together.
How did the pipeline even trigger the library execution? In what order did all the tasks run? How could I know which stage was included in which pipelines, and not included in other pipelines?
Don't get me wrong, I'm not arrogant, but I do often think of myself as a "not too stupid" guy. At that exact time, though, I started to question my intelligence level, because as a genius as myself, how on earth was I not able to figure out the logic behind a bloody pipeline? I mean, really?
There was nothing I could do, except take a coffee break to absorb more energy from the universe so that I could refocus and rethink the problem at hand.
How could something as simple as adding a task into an existing pipeline be so difficult that it almost borders on the impossible?
Only then did I start to realize: yes, we were doing agile development, using state-of-the-art orchestration tools, writing infrastructure code, and architecting microservices; yes, all that; but our CI pipeline code was a bloody monolith.
I could understand the person who created it in the first place: he must have thought that it was nice to reduce duplicated code in the pipelines and to make everything modular so that others didn't have to reinvent some wheels. I could literally feel how he thought in the very first place. But as time went on, the number of pipelines grew, and the complexity of the pipeline increased, it was harder and harder to orchestrate all tasks efficiently and in the end, the CI pipeline was not human readable anymore.
In this article, we will show an example of the "declarative" way to build a modern CI pipeline to achieve testing, building images, pushing images, and security scanning. No matter what programming languages or CI tools you are using, you will find this article useful.
2. Building a Demo App
Why Go? A starting point
In this tutorial, we will build an App, build a Docker image without even using the Docker daemon, scan the image for possible credentials leaks, and push it to a Docker image registry, all with the state of the art declarative CI pipeline.
Let's start with the App first. In this example, we will use Golang, but the ideas are transferable to any other programming language. I chose Golang for the following reasons:
-
in a modern container world, compiled languages generate way smaller images, making the pushing and pulling of an image much more efficient, so that the code to production time is much faster
-
we can demonstrate the power of a Docker multi-stage build with a compiled language
-
the K8s ecosystem is built mostly using Golang
I don't want to start a war by saying which language is the best; they all are the best; we choose the right tool for the right job, and for this tutorial, Golang should suffice.
This is our main code from helloworld-golang/main.go
package main

import "fmt"

func main() {
	name := "Tiexin"
	text := fmt.Sprintf("Hello, %s!", name)
	fmt.Println(text)
}
To build the app locally, run:
go build ./helloworld-golang
Adding Some Unit Tests
Now we add some unit tests (as an example) in helloworld-golang/main_test.go
package main

import (
	"testing"
	"github.com/stretchr/testify/assert"
)

func TestSomething(t *testing.T) {
	assert := assert.New(t)
	var a = 42
	assert.Equal(a, 42, "The two words should be the same.")
}
We created a demo test case to represent the unit tests you would run in your CI pipelines. To run all the tests, we can run:
go test -v ./...
3. Docker Build
First Dockerfile
Now let's write a Dockerfile and try to build a Docker image.
If, for example, you are building an app in Python, and since Python is an interpreted language, you need both the source code, as well as the interpreter, I.E., Python itself, in order to run the app.
No matter how small your code is, the Python interpreter itself is already quite large (several hundreds of Megabytes), so the Docker image you build is going to be not quite small in size.
Since Golang is a compiled language, we don't really need the source code to be there. For example, we added a “main.go” and a “main_test.go” files, but since after the build, we have an executable, we don't really need those source code files to be in the Docker image. And we don't even need the Go compiler. This is where things get interesting
Normally, we would write a Dockerfile as follows:
FROM golang:alpine
WORKDIR /app
COPY . .
RUN apk add git
RUN go get ./... && CGO_ENABLED=0 GOOS=linux GOARCH=amd64 go build -o app
But if we take a closer look:
$ docker images
REPOSITORY   TAG       IMAGE ID       CREATED          SIZE
<none>       <none>    a1b26a18a472   12 seconds ago   323MB
$ docker run -it a1b26a18a472 sh
/app # ls
Dockerfile         app                go.sum             main.go
README.md          go.mod             helloworld-golang  main_test.go
First of all, the image is quite large, because the base image we used is golang:alpine (which is already smaller than Golang without alpine); and secondly, the source code including the test is also in the image, which we don't really need if we are going to deploy this image in a production environment.
What if there is a way to build the app, generate the executable, and put only the executable into an image? Luckily there is a way.
Multi-stage Build
Check out this new Dockerfile:
FROM golang:alpine AS build-env
WORKDIR /app
COPY . .
RUN apk add git
RUN go get ./... && CGO_ENABLED=0 GOOS=linux GOARCH=amd64 go build -o app

FROM alpine
WORKDIR /app
COPY --from=build-env /app/app /app/
CMD [ "/app/app" ]
It looks like two Dockerfiles inside one file, and it is.
The first part is equivalent to the previous one we used, except we gave it a label with the AS keyword: build-env.
In the second part of the Dockerfile, we used a very small base image alpine, and we copied the executable, and only the executable from the first section where it was built.
In essence, we used the first part of the Dockerfile to do exactly the same as we did in the previous section of the article; then we used the first part as an intermediate step, copied the executable to the second part so that the second part contains only what we need. The resulting image must be small:
$ docker images
REPOSITORY   TAG       IMAGE ID       CREATED              SIZE
<none>       <none>    41923498ef8a   About a minute ago   7.55MB

$ docker run 41923498ef8a
Hello, Tiexin!
It is merely several MB in size, and it could still work.
To recap, the interesting part is, we first build an image, just as we did before, with Golang compiler, with the source code, and we get the executable. Then we use the first image as an intermediate step, and only copy the executable out of it, and get our final image.
4. GitHub Actions
What are Actions?
Modern CI tools allow you to define your pipelines as they are, in a declarative way, most likely in YAML syntax (slightly more human-readable than others).
When you look at the declaration of the pipeline, you know exactly what would happen, because the pipeline definition is the description of the pipeline itself: how many stages, what happens after what, what happens in parallel with what, what is being done in each stage.
And there are quite a few common "wheels" already built for you. For example, in many of the pipelines for your containerized applications, you probably would have one final step that does the docker login, and docker push, so that your image is stored in your image registry. And there already is a generic action for that.
Disclaimer using third-party software in your integration pipeline (as we are about to do, in our case with actions not under direct GitHub control) is always risky. You should be very attentive to the reputation and security commitement of any software provider. The use of a staging environment using different secrets is also a must to limit the potential impact of malicious code. The CI environnement is a high interest target for attackers and needs to be under vigilance, but fear not! We have packaged a special cheat sheet on this topic: GitHub Actions Security cheat sheet
Building a CI Pipeline in a Declarative Way with GitHub Actions
Now let's build a simple GitHub Action pipeline that will trigger according to the following rules:
-
new pull request → build the app + run the unit tests
-
new merge into master → build the app
+ run the unit tests
+ create a tag
+ build the docker image using the same tag
+ push the docker image to an image registry
These pipelines will be named respectively pr-builder and master-builder.
First, we create a folder named .github/workflows, where we will put our pipelines descriptions as two YAML files.
Let's create a pr-builder.yaml with the following code:
name: PR Builder

on:
  pull_request:
    branches: [ master ]

jobs:
  test:
    name: Test
    runs-on: ubuntu-latest
    steps:
      - uses: actions/checkout@v2
      - name: Set up Go
        uses: actions/setup-go@v2
        with:
          go-version: 1.15
      - name: Build
        run: go build -v ./...
      - name: Test
        run: go test -v ./...
in this file, we define when this pipeline is triggered (the on section), what jobs to run (jobs section), and inside the job named build, where we run this job (ubuntu-latest), and what command to run in each step. Pretty straightforward, right?
Here comes the master-builder.yaml with two more jobs, for tagging and then building & pushing the Docker image:
name: Master Builder

on:
  push:
    branches: [ master ]

jobs:
  test:
    name: Test
    runs-on: ubuntu-latest
    steps:
      - uses: actions/checkout@v2
      - name: Set up Go
        uses: actions/setup-go@v2
        with:
          go-version: 1.15
      - name: Build
        run: go build -v ./...
      - name: Test
        run: go test -v ./...
  tag:
    name: Tag
    needs: [test]
    runs-on: ubuntu-latest
    outputs:
      new_tag: ${{ steps.tag_version.outputs.new_tag }}
    steps:
      - uses: actions/checkout@v2
      - name: Bump version and push tag
        id: tag_version
        uses: mathieudutour/github-tag-action@v5.1
        with:
          github_token: ${{ secrets.GITHUB_TOKEN }}
          tag_prefix: ""
  docker:
    name: Build Docker Image
    needs: [tag]
    runs-on: ubuntu-latest
    steps:
      - uses: actions/checkout@v2
      - name: Login to Docker Hub
        uses: docker/login-action@v1
        with:
          username: ${{ secrets.DOCKERHUB_USERNAME }}
          password: ${{ secrets.DOCKERHUB_TOKEN }}
      - name: Build and push
        id: docker_build
        uses: docker/build-push-action@v2
        with:
          push: true
          tags: ${{ secrets.DOCKERHUB_USERNAME }}/helloworld-golang:${{needs.tag.outputs.new_tag}}
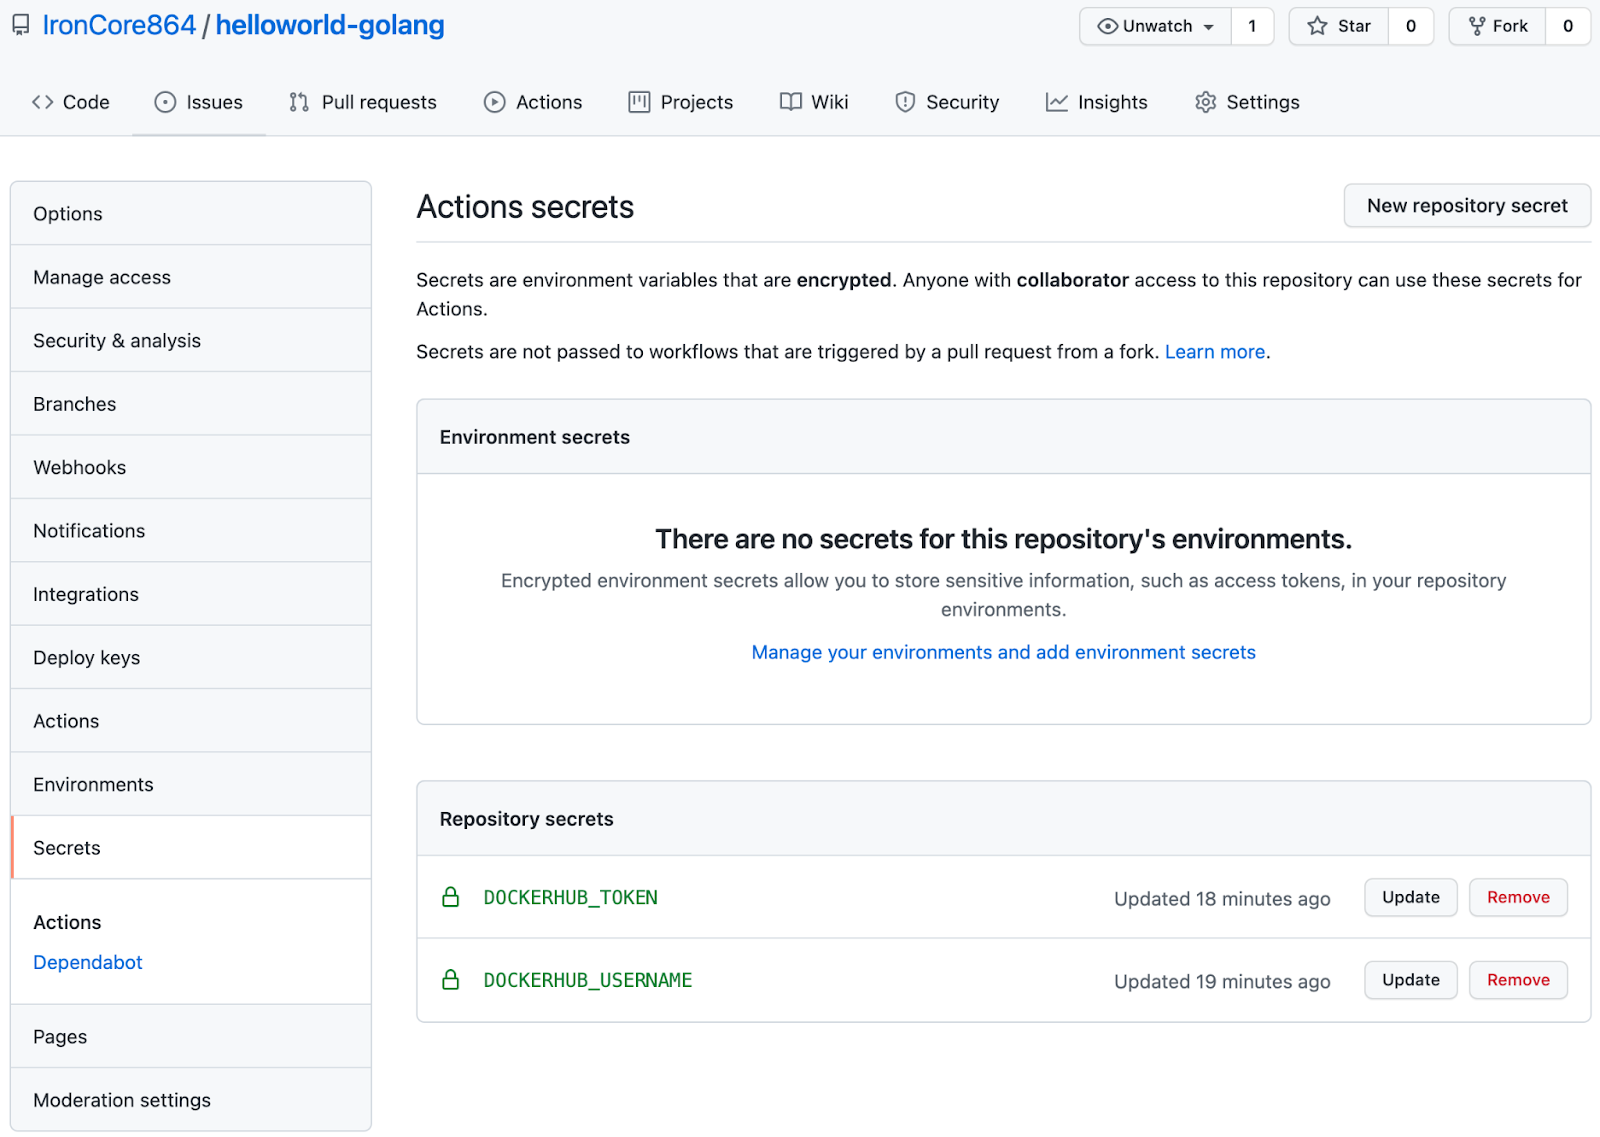
Because we need to authenticate with DockerHub in order to push the image, but we don't want to put our docker API key in the pipeline definition file, so we can store them in the repo as secrets:
What If I'm Not Using GitHub Actions?
If you are not using GitHub Actions, the ideas are the same. For example, you can achieve the same with Circle CI / Travis CI. Even if you are using Jenkins, you can use the Kubernetes plugin for Jenkins, define a multi-container pod, with each step defined declaratively and each step can run in any container. Read our tutorial on setting up a ggshield with the Jenkins Kubernetes plugin
5. Adding Secret Scanning to the CI Pipeline
Finally, let’s try to add more security to our pipelines.
We will use a GitHub Action that is the GitGuardian shield.
ggshield is a CLI application that shields your codebase from any leaked credentials. It uses a public (stateless) API to detect more than 250 types of secrets to scan the files in your repository.
Most of the time, it’s completely transparent because it won’t trigger for dummy variables used in a test, for example, but only when it is certain that it has found a real secret.
And now, it can be integrated with GitHub Actions.
First, we need to log in to GitGuardian and create a GITGUARDIAN_API_KEY.
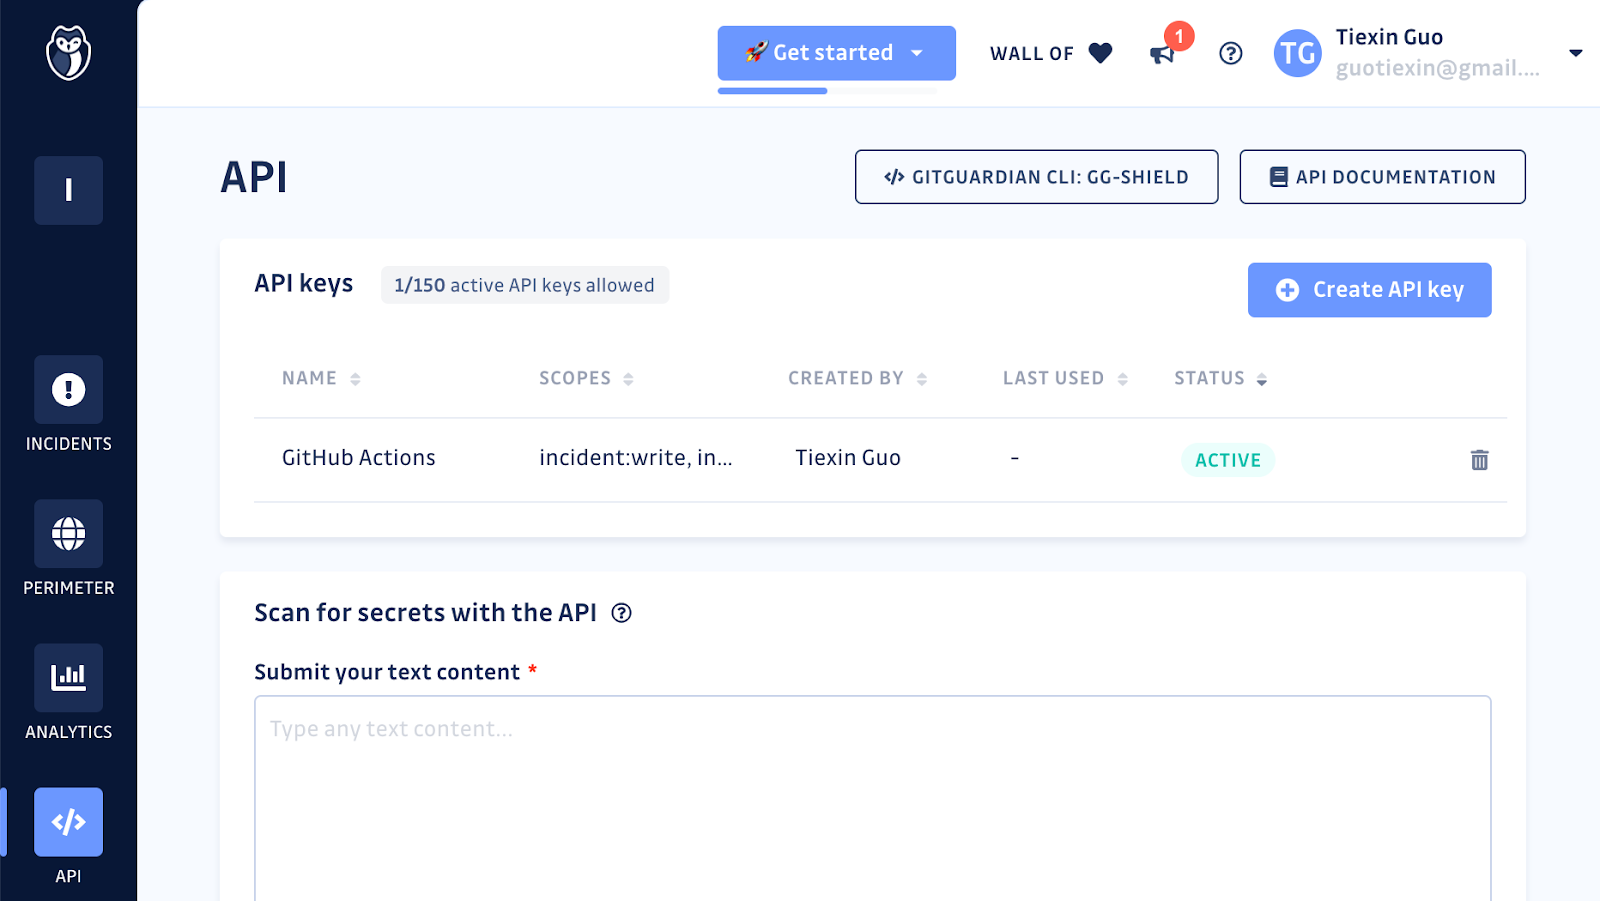
Then we can put this key into the secrets section of the repo in GitHub, just like we did for docker username and password in the previous section.
Now let’s add a scanning job, between the testand the tag jobs, to both the master-builder.yaml and the pr-builder.yaml pipelines:
...

  scanning:
    name: GitGuardian scan
    runs-on: ubuntu-latest
    steps:
      - name: Checkout
        uses: actions/checkout@v2
        with:
          fetch-depth: 0 # fetch all history so multiple commits can be scanned
      - name: GitGuardian scan
        uses: GitGuardian/gg-shield-action@master
        env:
          GITHUB_PUSH_BEFORE_SHA: ${{ github.event.before }}
          GITHUB_PUSH_BASE_SHA: ${{ github.event.base }}
          GITHUB_PULL_BASE_SHA: ${{ github.event.pull_request.base.sha }}
          GITHUB_DEFAULT_BRANCH: ${{ github.event.repository.default_branch }}
          GITGUARDIAN_API_KEY: ${{ secrets.GITGUARDIAN_API_KEY }}

...
Here are the complete files in case you have a doubt.
Just as simple as that, you will have a guard that scans for possible secrets leaks in each of your build jobs!
Final Thoughts: Daemon-less Docker Build
As a conclusion, there is one last security improvement we should bring to our CI in a production context.
If you are running your own CI as containers, for example, Jenkins or Tekton in Kubernetes, and you need to build a docker image in one of your steps in the pipeline, you need privileged containers: the container running the CI job must have access to the Docker daemon so that it can run docker build commands.
But privileged container has its own security challenges and risks. What if there is a way to build an image without the need for Docker daemon at all? So that I can run state-of-the-art CI in my K8s clusters without privileged containers?
The Open Container Initiative (OCI) was formed to define standards around container images and runtime. It took its lead from a lot of the work that had been done in Docker, so there is quite a lot in common between what happens in Docker and what is defined in the specs — in particular, a goal of the OCI was for the standards to support the same user experience that Docker users had come to expect, like the ability to run an image with a default set of configuration settings.
The OCI specs cover an image format, which discusses how container images are built and distributed. In short, the Docker image contains the root filesystem and a configuration.
Since the Docker image follows the OCI image spec, as long as we prepare the root filesystem and the configuration, we can generate an image that is Docker daemon compatible. We don’t necessarily need the Docker daemon to build a docker image.
There are a couple of tools that can do this, the most famous of which are probably Kaniko and Podman. They both can build images according to OCI specs from within a container without the need for Docker daemon. This is a great and secure way of building images if you are running your CI in containers.
If you are interested in how exactly containers and images work, feel free to read this series of articles on Docker.
This article is a guest post. Views and opinions expressed in this publication are solely those of the author and do not reflect the official policy, position, or views of GitGuardian, The content is provided for informational purposes, GitGuardian assumes no responsibility for any errors, omissions, or outcomes resulting from the use of this information. Should you have any enquiry with regard to the content, please contact the author directly