
Foreword
As Kubernetes has become the de-facto platform to orchestrate containerized workloads, more and more users have begun to look for ways to control and secure their Kubernetes clusters.
We have already explored quite extensively the Kubernetes threat model, as well as the NSA/CISA hardening guidelines, and dove in-depth with a series of tutorials that I will put below in case you missed them:
- Kubernetes Hardening Tutorial Part 1: Pods
- Kubernetes Hardening Tutorial Part 2: Network
- Kubernetes Hardening Tutorial Part 3: Authn, Authz, Logging & Auditing
Hardening is a thing for sure, but what about enforcing policies inside a cluster? This is a completely different task that requires a different set of tools.
As you've already guessed, an appropriate way to do that would be to define policies as code, and a nice tool for that is Open Policy Agent or OPA. If you don't know what I'm talking about, please take the time to read this introduction first:
 Guest Expert
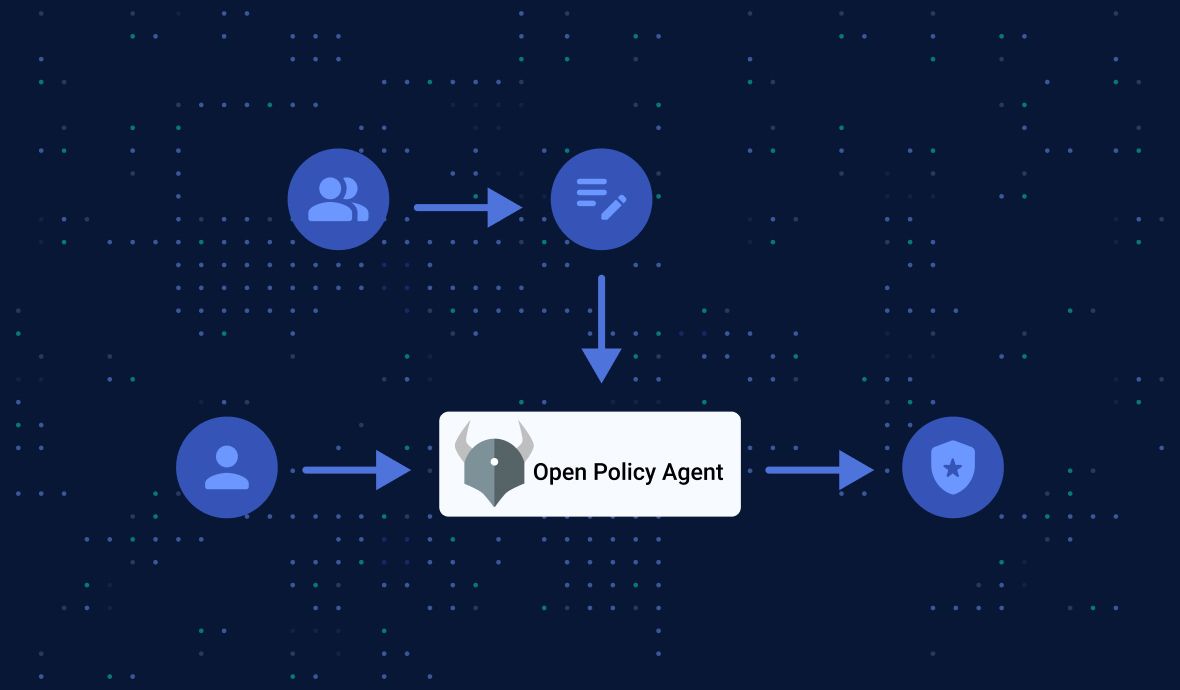
Why not just use RBAC?
To better understand why we need to use a new tool for policies, let's take a concrete example: imagine you are a cluster administrator, and you want to restrict what can run in your cluster.
At first, it looks like a perfectly valid use case for Role-Based Access Control (RBAC, a permission system for creating and managing Kubernetes objects at the resource level): with RBAC, you can easily authorize cases such as "user X can do Y in the namespace Z".
You start by defining a Role in the default namespace to grant read access to pods:
apiVersion: rbac.authorization.k8s.io/v1
kind: Role
metadata:
  namespace: default
  name: pod-reader
rules:
- apiGroups: [""]
  resources: ["pods"]
  verbs: ["get", "watch", "list"]
Now, a bit more tricky: how would you do if you wanted to restrict, not access to resources like pods, but how they are configured?
This is where RBAC powers end: access controls cannot go beyond and restrict Kubernetes' objects configurations, settings, and content. Yet, as a cluster admin, you could absolutely want that!
Why not write my own admission controller?
For the sake of the exercise, we will imagine that you need to require all resource objects in your cluster to have a specific label.
As you can see, this is not related to a role or a group, in fact, it is related to a very specific field for all resources in your cluster.
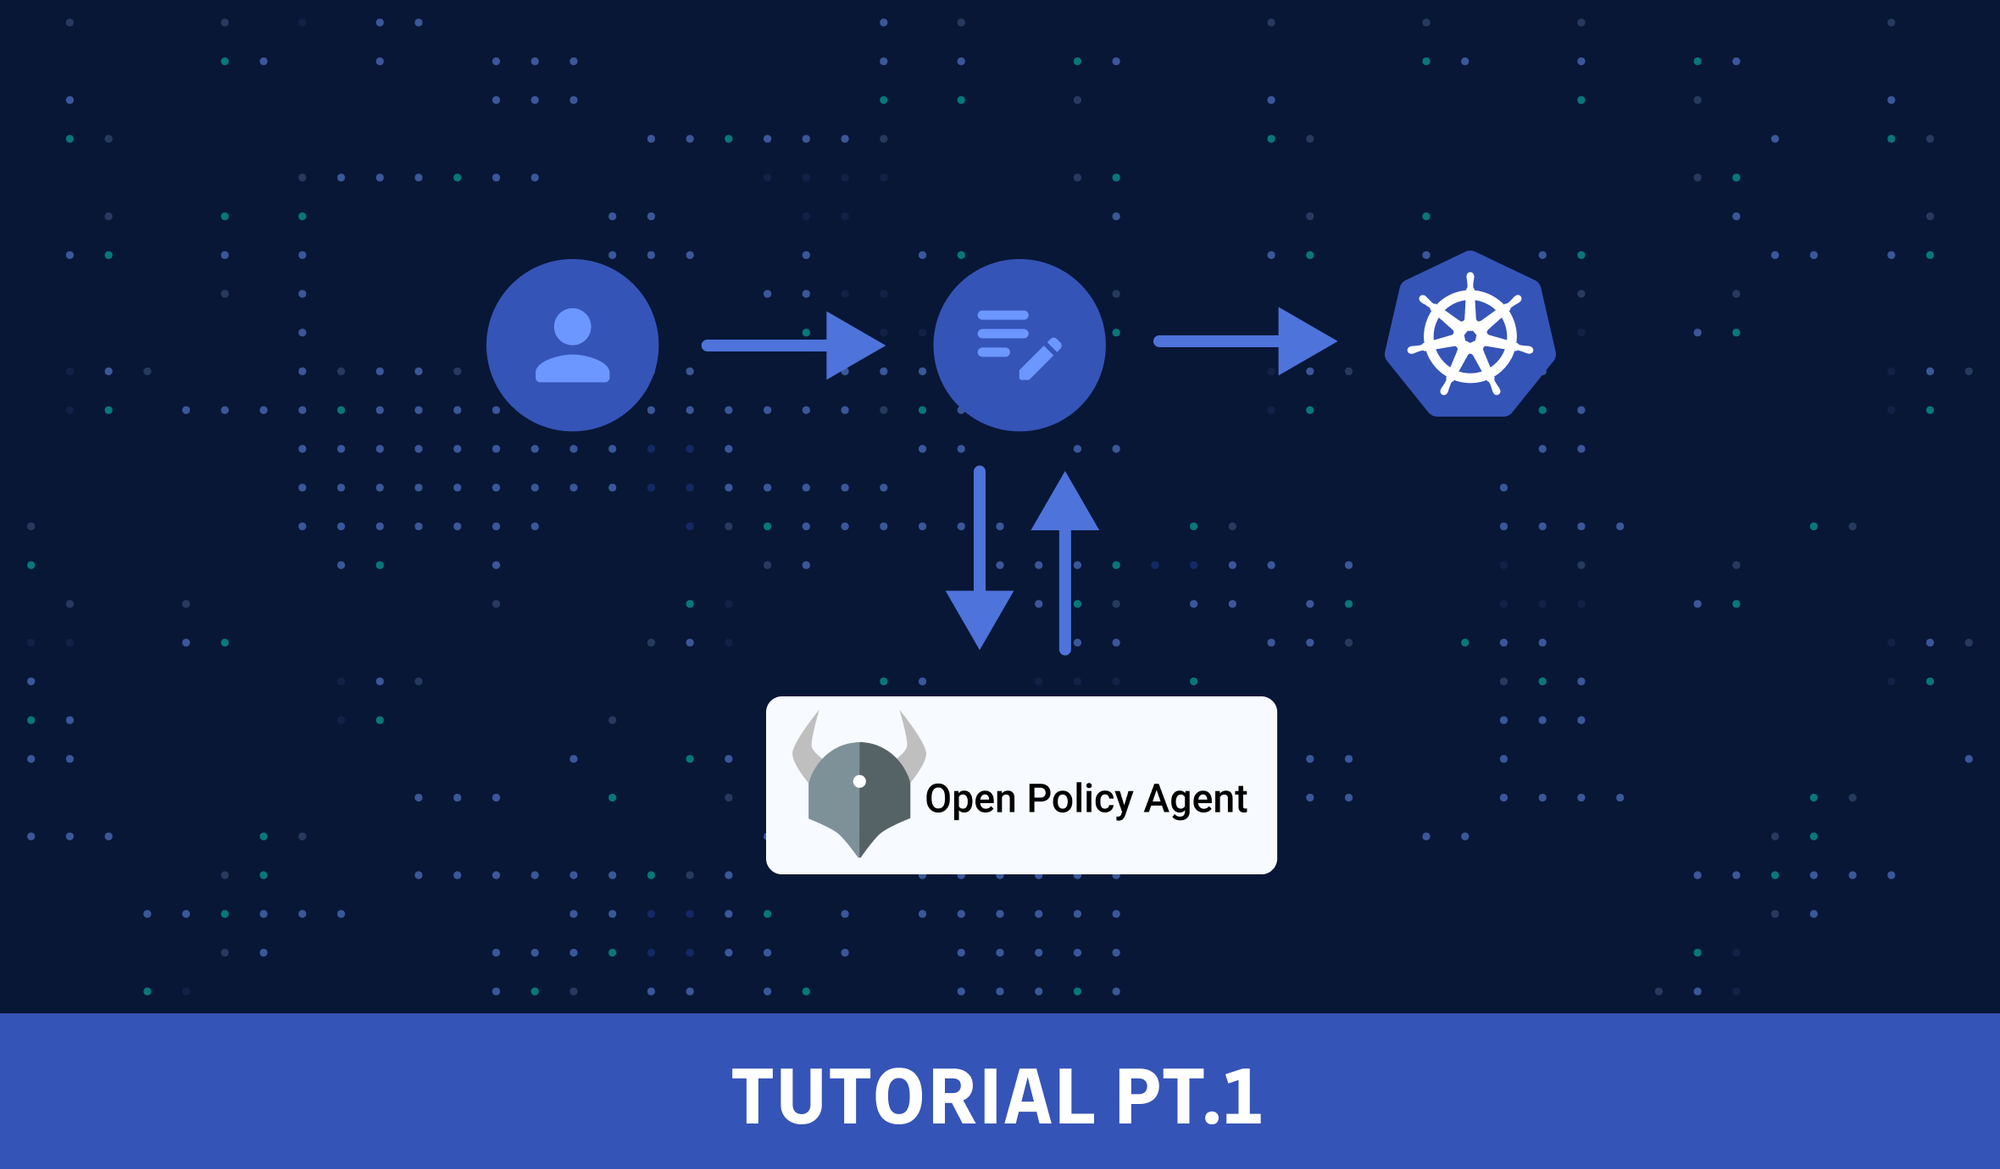
Suppose you need to control pod fields (or any fields in other resource types, for that matter). In that case, you have one option: creating your own validating admission controller. An admission controller is a piece of code that intercepts requests to the Kubernetes API server before persistence of the object.
In detail, it would work as follows: a request to create a new pod is made to the cluster API service; this would trigger a custom ValidatingAdmissionWebhook matching this request; the controller would call a validating webhook; if the controller rejects the request, the API service would reject it as well.
The problem with this is that it doesn't scale: you would have to write as many custom admission controllers as rules or policies you want to enforce!
This is where OPA comes in, and we will see together how to set it up.
Open Policy Agent in Kubernetes
To solve the challenge above, what we really need here is a system that supports multiple configurations covering different resource types and fields and allows reusability. Open Policy Agent (OPA) provides just that.
In a nutshell, the OPA policy engine evaluates requests to determine whether they conform to configured policies.
OPA can integrate with Kubernetes easily: it expects a JSON input, is easy to containerize and supports dynamic configuration, which makes it well-suited to provide policy evaluation for the Kubernetes API service.
So let's dive in and demo how to deploy and integrate OPA with Kubernetes.
Tutorial: How to use OPA with Kubernetes
In this example, we will demonstrate how to integrate OPA with Kubernetes by deploying a policy that ensures the Ingress hostname must be on the allowlist on the namespace containing the Ingress.
That is to say, we want to deny all creations of Ingress objects whose hostname doesn't match the allowlist.
Before you start, download OPA if you haven't done so.
Prepare the Kubernetes Cluster
minikube is recommended.Let's start minikube, enable minikube ingress addon, create a namespace (to deploy OPA), and configure the Kubernetes context:
minikube start
minikube addons enable ingress
kubectl create namespace opa
kubectl config set-context opa-tutorial --user minikube --cluster minikube --namespace opa
kubectl config use-context opa-tutorial
The communication between Kubernetes and OPA must be secured using TLS. Let's use openssl to do just that:
openssl genrsa -out ca.key 2048
openssl req -x509 -new -nodes -sha256 -key ca.key -days 100000 -out ca.crt -subj "/CN=admission_ca"

# generate the TLS key and certificate for OPA:
cat >server.conf <<EOF
[ req ]
prompt = no
req_extensions = v3_ext
distinguished_name = dn

[ dn ]
CN = opa.opa.svc

[ v3_ext ]
basicConstraints = CA:FALSE
keyUsage = nonRepudiation, digitalSignature, keyEncipherment
extendedKeyUsage = clientAuth, serverAuth
subjectAltName = DNS:opa.opa.svc,DNS:opa.opa.svc.cluster,DNS:opa.opa.svc.cluster.local
EOF

openssl genrsa -out server.key 2048
openssl req -new -key server.key -sha256 -out server.csr -extensions v3_ext -config server.conf
openssl x509 -req -in server.csr -sha256 -CA ca.crt -CAkey ca.key -CAcreateserial -out server.crt -days 100000 -extensions v3_ext -extfile server.conf

# create a secret to store the TLS credentials for OPA
kubectl create secret tls opa-server --cert=server.crt --key=server.key --namespace opa
Define the policy with Rego
Now that the Kubernetes cluster is ready let's write some policies. First, create a new folder to store them:
mkdir policies && cd policiesWe want a policy that restricts the hostnames that an ingress can use. Only hostnames matching the specified regular expressions will be allowed. Create a file ingress-allowlist.rego with the following content:
package kubernetes.admission

import data.kubernetes.namespaces

operations := {"CREATE", "UPDATE"}

deny[msg] {
  input.request.kind.kind == "Ingress"
  operations[input.request.operation]
  host := input.request.object.spec.rules[_].host
  not fqdn_matches_any(host, valid_ingress_hosts)
  msg := sprintf("invalid ingress host %q", [host])
}

valid_ingress_hosts := {host |
  allowlist := namespaces[input.request.namespace].metadata.annotations["ingress-allowlist"]
  hosts := split(allowlist, ",")
  host := hosts[_]
}

fqdn_matches_any(str, patterns) {
  fqdn_matches(str, patterns[_])
}

fqdn_matches(str, pattern) {
  pattern_parts := split(pattern, ".")
  pattern_parts[0] == "*"
  suffix := trim(pattern, "*.")
  endswith(str, suffix)
}

fqdn_matches(str, pattern) {
    not contains(pattern, "*")
    str == pattern
}
If you don't know much about the Rego policy language yet, read the official documentation here.
In essence, this piece of code does the following:
- The
valid_ingress_hostsfunction gets the "ingress-allowlist" annotation in the metadata section of a namespace. - Then it tries to match the hostname against it using regular expression.
- If not matched, the request will be denied with a message.
Next, we will define the main policy that will import the hostname restriction policy above and respond with an overall policy decision.
Note that in this example, since we are using only one policy, this main policy is a bit redundant. Yet, in real-life situations where you want to enforce multiple policies, the main policy is needed to make a comprehensive decision in the end.
Create a file main.rego with the following content:
package system

import data.kubernetes.admission

main := {
  "apiVersion": "admission.k8s.io/v1",
  "kind": "AdmissionReview",
  "response": response,
}

default uid := ""

uid := input.request.uid

response := {
    "allowed": false,
    "uid": uid,
    "status": {
        "message": reason,
    },
} {
    reason = concat(", ", admission.deny)
    reason != ""
}

else := {"allowed": true, "uid": uid}
Build and Publish the OPA Bundle
With the Rego policy code ready, now it's time to build it. Run the following commands in the policies folder to build and publish:
cat > .manifest <<EOF
{
"roots": ["kubernetes/admission", "system"]
}
EOF
opa build -b .

# serve the OPA bundle using Nginx:
docker run --rm --name bundle-server -d -p 8888:80 -v ${PWD}:/usr/share/nginx/html:ro nginx:latest
Here we will build a "bundle" out of the Rego code, and then we are serving the bundle in an Nginx server in a docker container, locally, which will be integrated with OPA in the next step. Read on.
Install OPA as an Admission Controller
First, let's deploy OPA:
kubectl apply -f https://gist.githubusercontent.com/IronCore864/035f7feca2c89ffd2809ec604fb3b873/raw/3e85364f72970b82f418544fd009fd478bc655ae/admission-controller.yamlLet's have a look at part of this admission-controller.yaml file:
apiVersion: apps/v1
kind: Deployment
metadata:
  labels:
    app: opa
  namespace: opa
  name: opa
# ...
        - name: opa
          image: openpolicyagent/opa:0.47.3-rootless
# ...
        - name: kube-mgmt
          image: openpolicyagent/kube-mgmt:2.0.1
          args:
            - "--replicate-cluster=v1/namespaces"
            - "--replicate=networking.k8s.io/v1/ingresses"
There is a container named kube-mgmt which runs as a sidecar to the OPA container. kube-mgmt manages policies/data of OPA instances in Kubernetes by loading Kubernetes Namespace and Ingress objects (see the "args" in the YAML file) into OPA when OPA starts. The sidecar creates watches on the Kubernetes API server so that OPA has access to Kubernetes namespaces and ingresses (which are what our policy cares about in this tutorial).
Next, let's label kube-system and the opa namespace so that OPA does not control the resources in those namespaces:
kubectl label ns kube-system openpolicyagent.org/webhook=ignore
kubectl label ns opa openpolicyagent.org/webhook=ignore
Last, we register OPA as an admission controller by creating a ValidatingWebhookConfiguration:
cat > webhook-configuration.yaml <<EOF
kind: ValidatingWebhookConfiguration
apiVersion: admissionregistration.k8s.io/v1
metadata:
  name: opa-validating-webhook
webhooks:
  - name: validating-webhook.openpolicyagent.org
    namespaceSelector:
      matchExpressions:
      - key: openpolicyagent.org/webhook
        operator: NotIn
        values:
        - ignore
    rules:
      - operations: ["CREATE", "UPDATE"]
        apiGroups: ["*"]
        apiVersions: ["*"]
        resources: ["*"]
    clientConfig:
      caBundle: $(cat ca.crt | base64 | tr -d '\n')
      service:
        namespace: opa
        name: opa
    admissionReviewVersions: ["v1"]
    sideEffects: None
EOF

kubectl apply -f webhook-configuration.yaml
Testing our policy
Now that everything is deployed let's try if our policy is working. For that, we need a test namespace.
Create a file: qa-namespace.yaml with the following content:
apiVersion: v1
kind: Namespace
metadata:
  annotations:
    ingress-allowlist: "*.qa.acmecorp.com,*.internal.acmecorp.com"
  name: qa
We can see that the metadata.annotations.ingress-allowlist label corresponds to the code we wrote earlier. Basically, here we only allow Ingress objects to be created if their hostnames match the pattern ".qa.acmecorp.com" or ".internal.acmecorp.com".
Let's create this namespace :
kubectl create -f qa-namespace.yamlNext, we prepare a good and a bad test case for it. Create file ingress-ok.yaml with the following content:
apiVersion: networking.k8s.io/v1
kind: Ingress
metadata:
  name: ingress-ok
spec:
  rules:
  - host: signin.qa.acmecorp.com
    http:
      paths:
      - pathType: ImplementationSpecific
        path: /
        backend:
          service:
            name: nginx
            port:
              number: 80
The hostname matches the regular expression from the namespace's annotation.
Create the file ingress-bad.yaml with the following content:
apiVersion: networking.k8s.io/v1
kind: Ingress
metadata:
  name: ingress-bad
spec:
  rules:
  - host: acmecorp.com
    http:
      paths:
      - pathType: ImplementationSpecific
        path: /
        backend:
          service:
            name: nginx
            port:
              number: 80
And this hostname doesn't match. Now if we run the first test:
kubectl create -f ingress-ok.yaml -n qaWe can see that the Ingress is created successfully. If we run the second one:
kubectl create -f ingress-bad.yaml -n qa We will get the following error:
Error from server: error when creating "ingress-bad.yaml": admission webhook "validating-webhook.openpolicyagent.org" denied the request: invalid ingress host "acmecorp.com"Congrats! This means our policy is working properly now 😃
Clean Up
Run the following commands to nuke everything:
minikube delete
docker stop bundle-server
Summary
OK, in this tutorial, we showed how to create OPA policies, how to build and publish them as a bundle served by Nginx, and register them with OPA. It's worth noting that we installed OPA with kube-mgmt as a sidecar.
In the second part of this tutorial, we will look at a more practical example policy using OPA Gatekeeper, which can restrict the taint tolerations that pods can use. We will also demonstrate the importance of policy tests and try to answer the question: how does Policy-as-Code scale?
Thanks for making it this far, and see you in the next tutorial:
 Guest Expert
This article is a guest post. Views and opinions expressed in this publication are solely those of the author and do not reflect the official policy, position, or views of GitGuardian, The content is provided for informational purposes, GitGuardian assumes no responsibility for any errors, omissions, or outcomes resulting from the use of this information. Should you have any enquiry with regard to the content, please contact the author directly.